Daktela Desktop App
Use the Daktela Desktop App to control certain Daktela features from a dedicated application.
You can:
Download the Daktela desktop app from App store for MacOS or Microsoft store for Windows. Follow the installation instructions and open the app when done.
WebRTC client.
The feature is available starting from version 6.24 of Daktela. It closely resembles the Daktela mobile app. All you need to do is create a WebRTC device of type Desktop (application). Once you connect to this device, the desktop app will function as a softphone.
Therefore, you won't need any additional external apps like Telephone or MicroSIP in the future.
Log in
When you open the Daktela Desktop App, log in just like you would in your browser.
Enter you Daktela URL. The format of the URL is "yourcompany.daktela.com" or similar. If you don't know your URL, ask your Supervisor or Team Leader.
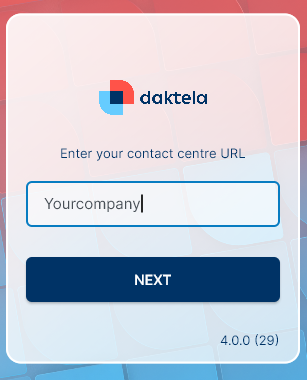
Click Next to continue.
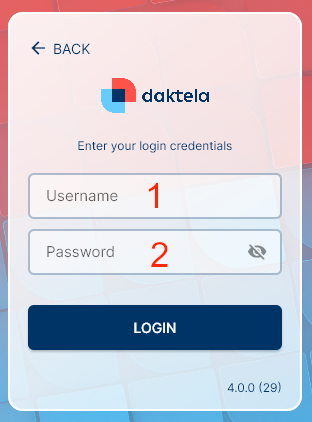
Enter your user name.
Enter your password
Click Login or press Enter to log in.
If you are not on the daktela.com domain, you may need to load your SSL certificate into your Java library.
Go Ready
Once you have logged in, click the Go Ready button to start processing activities.
Log in and Out of Queues
Click the queue tab to open queues.
The tab will open.
In the Queues tab, select which queues you want to log in to.
Filter queues by type.
Tap the Queue Type to Filter your queues by type.
Log in and Out of Devices
In the Devices tab, select your devices or set up call forwarding.

Select a device from the dropdown list.
Log out of device. You cannot log out of devices with a lock.
If you want to forward your calls, enter the forwarding number.
Activate call forwarding. The Save button will turn into a Delete button. Click it to deactivate call forwarding.
Log in to the selected device.
Make a Call

Type a number or a CRM contact.
Click the green call button.
A new tab with your call will open:
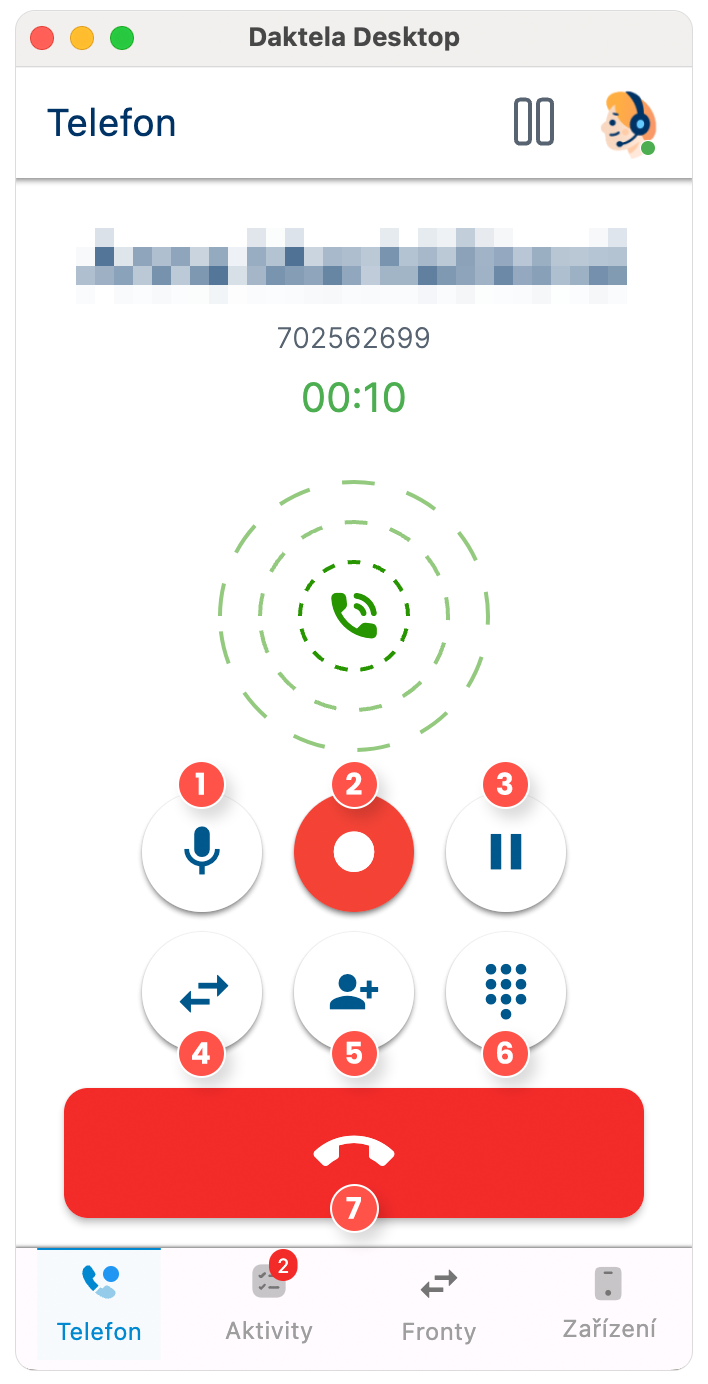
Mute you microphone.
The call is being recorded whenever the button appears red. To stop recording, simply click the button; it will then change to blue, indicating that recording has stopped.
Put the customer on hold/unhold.
Transfer the call.
Invite another agent to the call.
Open the numpad.
Hang up.
When your call is finished, close the tab. If your queue has a mandatory status, click Save button and select one from the list and click OK.
Receive a Call
Your incoming call notification displays the customer's name or number, the queue name and activity type. Accept the call using the green button. If you have more than one device online, select which device you want to accept the call with from the drop down menu.
If there is a window in full screen mode, Daktela Desktop App can’t go in front of it, hence it won’t show you, that you’ve an incoming call.
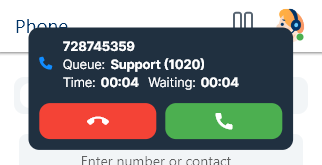
A new tab with your call will open:

Mute you microphone.
The call is being recorded whenever the button appears red. To stop recording, simply click the button; it will then change to blue, indicating that recording has stopped.
Put the customer on hold/unhold.
Transfer the call.
Invite another agent to the call.
Open the numpad.
Hang up.
When your call is finished, close the tab. If your queue has a mandatory status, click Save button and select one from the list and click OK.
Transfer a Call
During an ongoing call, click the Transfer button.
The window with options will open. Click Transfer or Blind transfer.
Blind transfer: your call will be ended as soon as you tap the option. The customer will be on hold while the phone is ringing and will be connected to the new agent as soon as they answer. The new agent will only know the customer's name or phone number and that you have transferred the call to them.
Transfer: the customer will be put on hold. You will be connected to the agent you are transferring the call to so you can explain to them what the customer needs.
Click the user or queue to tranfer the call.
Your call will be transfered.
Send an SMS
Click the SMS tab to send a new SMS message.
Set up your message:
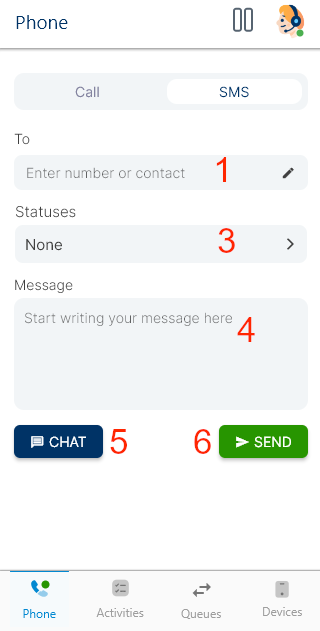
Enter a phone number or a contact or account name. Click a suggested contact to enter their number into the Number field.
Select a status.
Enter the text of your message.
Open message in chat.
Send your message.
Accept Other Activity Types and Open Them in Daktela
Your incoming activity notification displays the customer's name or number, the queue name and activity type. Accept the activity using the green button.
A new tab with your activity will open.
Once you accept an activity, click Open in Daktela. A new browser tab with the activity will open. You can manage the activity there.
When your activity is finished, close the tab. If your queue has a mandatory status, select one from the list and click OK. You can close the activity the standard way in Daktela – the changes will be visible in Daktela Desktop too.
Select a Pause
Click the Pause button to open a dropdown list with available pauses.
Select a pause. Some pauses are started automatically – you cannot select them.
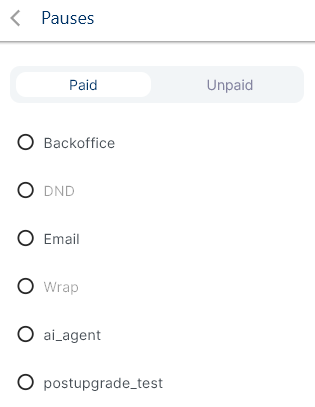
To end your pause, click on the pause name and select No pause from the dropdown list.
Switch to Unready, Log Out, Exit
Click the Pause button and select:
Switch to unready to stop processing activities.
Click the Profile icon and select:
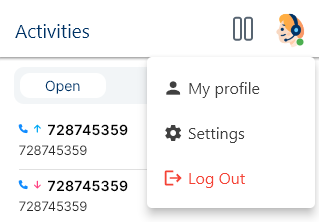
Log out to log out of Daktela.
If you exit the app without first switching to unready or logging out, you will remain in the state you were in before exiting the app.
My profile
Profile | |
|---|---|
Name | Type your name. |
Type your email. | |
Alias | Choose a nickname for an agent |
Change Password | Password should contain at least six characters and combination of capital letters, numeric and special characters. |
Login sessions | Manage your list of active devices, where you can logout from any of them separately. |
Settings
In order to manage your Daktela Desktop, click Avatar in the top right corner and select Settings.
General Settings | |
|---|---|
Missed call notifications | Determine whether you want to see your missed call notofications. |
Automatic call pickup |
|
Sound Settings | |
|---|---|
Ringtone | Select a ringtone from your device, respecting the valid format (aac, midi, mp3, ogg, wav). After adding you can play the selected ringtone by clicking the Play button on the right side of the screen. |
Input | Select an input device (microphone, webcam etc.) |
Output | Select an output device ( speakers, headphones etc.) If you answer a call using headphones on macOS, your headphones must communicate with the standard Apple MediaPlayer. |
Ringtone | select a device from which your ringtone will be played back. |
On Windows, there might bre a delay of approximately 6-10 seconds before the sound for an outgoing call begins. This delay occurs specifically during the initial ringing phase, where the operator is waiting for the customer to answer the call.
Solution:
This issue can be resolved by adjusting the Windows sound settings:
Go to Sound Settings ➝ Sound Control Panel.
Navigate to the Recording tab.
Select the Properties of the integrated microphone.
Open the Advanced tab.
Uncheck the first checkbox under Exclusive Mode (allowing applications to take exclusive control of the device).
Troubleshooting
Firewalls
Some firewalls may prevent the app from working correctly (e.g. ESET). If the app crashes immediately after you accept a call, disable your firewall and try again. If the issue persists, please contact support.
Bulk Installation
If you wish to install the Daktela Desktop App across multiple instances simultaneously, you can do so by following one of the options described below:
Using the Microsoft Intune solution.
in the case of operating with the Microsoft Intune software licence, use it directly.
This process is detailed at https://learn.microsoft.com/en-us/mem/intune/fundamentals/manage-apps#deploy-apps-your-organization-uses for applications from the Microsoft Store.
Using Active Directory.
prepare a PowerShell script that installs the application from the Microsoft Store (example: "winget install 9phbv0t5qdlp --source msstore"). Execute this script on your instances using GPO (Group Policy Objects).
At Daktela, we do not support bulk installation using ".msi" files because this method would cause the loss of automatic updates that are exclusive to the app hosted in the Microsoft Store.
