Facebook | Viber | WhatsApp | Instagram DM
Answer an Incoming Message
Your incoming notifications appear in a black rectangle. You can move notifications around your screen by dragging them. You can also minimise them into Waiting activities using the arrow in the bottom left corner.
The notification displays:
the customer's details. Click their name or company to open their CRM details.
the name of the Queue and the amount of Time the customer has been in the queue.
the amount of time since you received the notification.
Accept or Reject the message by clicking one of the corresponding buttons. You may see a white button next to the reject button. This opens a URL defined by your administrator.
You may have limited time to answer the message. If you take longer, you may automatically be put on an unpaid pause.
Notice the Waiting activity badge?
You may be able to answer web chats even if you don't receive a black notification (e.g. because you are logged out of a queue or because the call is being routed to one of your colleagues).
Click the Waiting activities button above the main menu.
Click Accept to answer the chat.
Message Details
Once you have accepted a message, a new tab will appear in the static panel. It will be labeled with the customer's name.
Click the message tab to see the message details. Click it again to return to the previous screen (e.g. the Dashboard).
When you receive a new message in the chat, the message tab will flash red and white. You may also hear a notification sound.
The message detail screen may contain different widgets set up in different order.
The message widget is the only mandatory one.
Message Widget
The message widget header displays the Queue number, queue name and the customer's name.
The top part of the widget contains the chat and event history as well as chat controls.
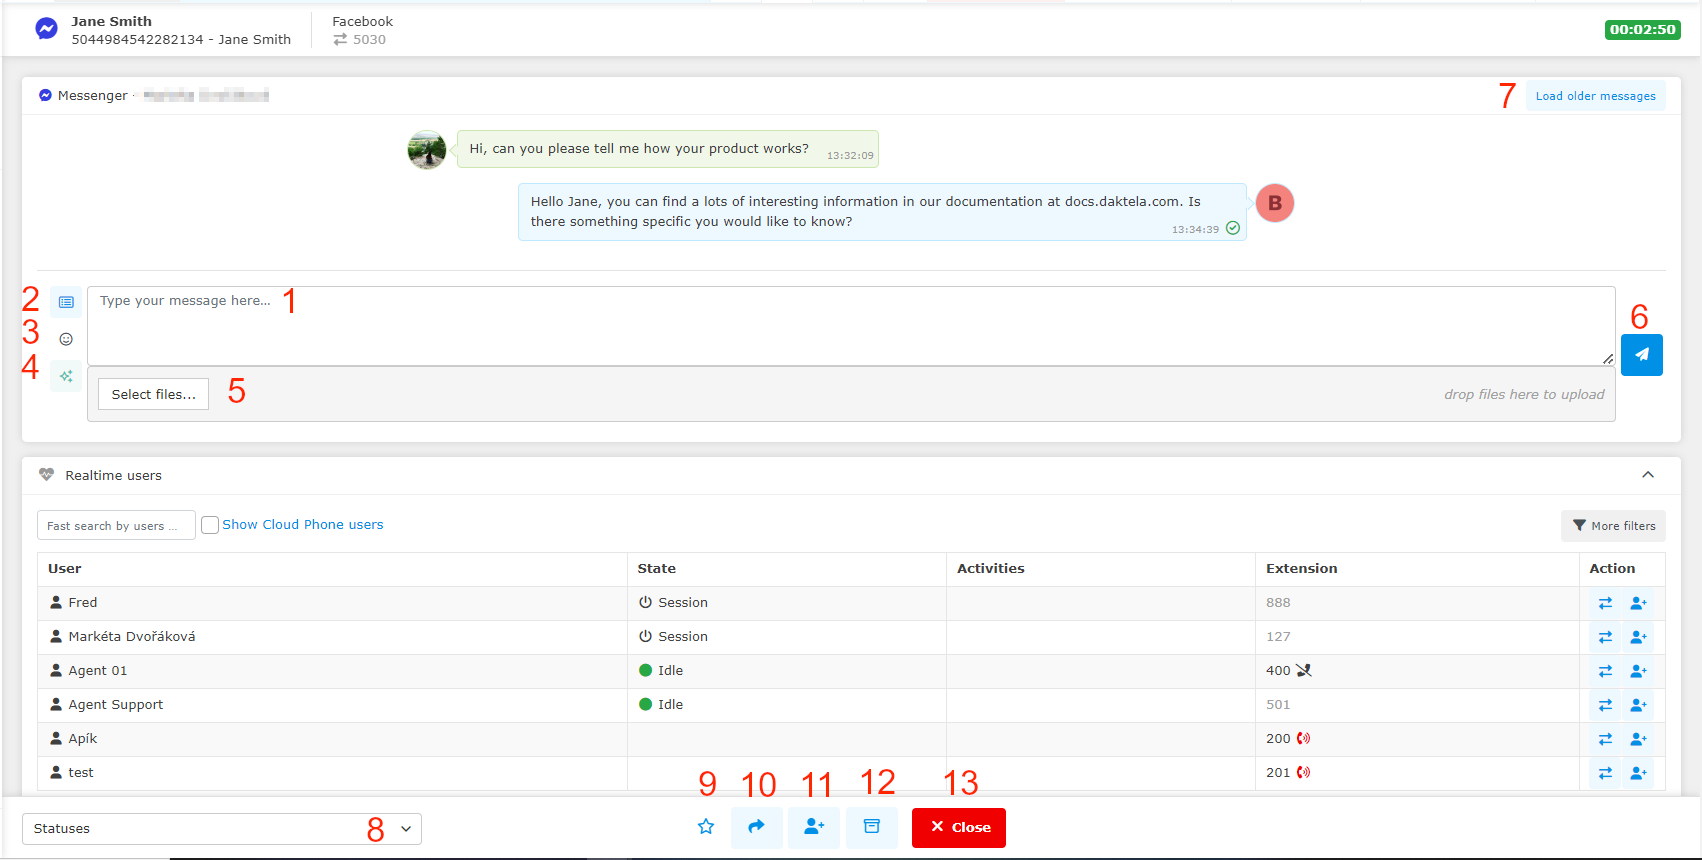
Type your message in the field. To send your message, click Send (5) or press Enter on your keyboard. Use Shift+Enter to start a new line.
Instagram DM (Direct Message) can contain maximum 1000 characters.
Open a dropdown menu and select a template to insert.
Open a preview with emotikons and click on to insert.
Open Compose Features. See more information here.
Select files to send to the customer or drag and drop files into the grey area around the Select files button.
Send message.
Load older messages from earlier chats with this contact. Only appears if any history exists.
Select a status. You must select a status before closing the message.
Mark the message as important.
Invite another agent to the message.
Transfer the message to another agent.
Postpone chat. You can find it in your Postponed activities above the Main menu.
Close the message tab. You will be disconnected from the customer.
When the operator closes the activity, the next message from the customer starts another chat, i.e., it goes through routing again, including automessages, DTs, etc.
If you are not in the activity widget you can get a toast notification to remind that you have an open activity. There are two option when you get a notification:
Notification will display after certain time from first message from the customer.
You get a notification for every new message in the chat.
Send a New Message
To send a new message, click the Facebook, WhatsApp, Viber or Instagram DM button in the static panel at the top of your screen.
The person must have contacted you in the past for you to be able to start a new message. You can't message new contacts.
Other restrictions apply for Facebook and WhatsApp – they will appear directly in the Send message window if they apply to your situation.
The Send message window will open.
From the CRM Module
Open the CRM module in the main menu and go to Contacts.
Find the Contact you would like to send a message to and open the details. See CRM for detailed instructions.
The person must have contacted you in the past for you to be able to start a new message. You can't message new contacts.
Click the Facebook/WhatsApp/Viber/Instagram DM icon next to the Contact name in External contacts.
The Send message window will open.
From a Ticket
Open the Ticket module in the main menu.
Open the ticket that you would like to send a message from. See Tickets for detailed instructions.
Click the Facebook/WhatsApp/Viber/Instagram DM icon in the top right corner of the ticket and choose the customer's number that you would like to message. The Send message window will open.
If one of your past activities in the ticket contains a Facebook/WhatsApp/Viber/Instagram DM message, you can also send a message from one of those.
Click the Messenger/WhatsApp/Viber/Instagram DM button.
The Send message window will open.
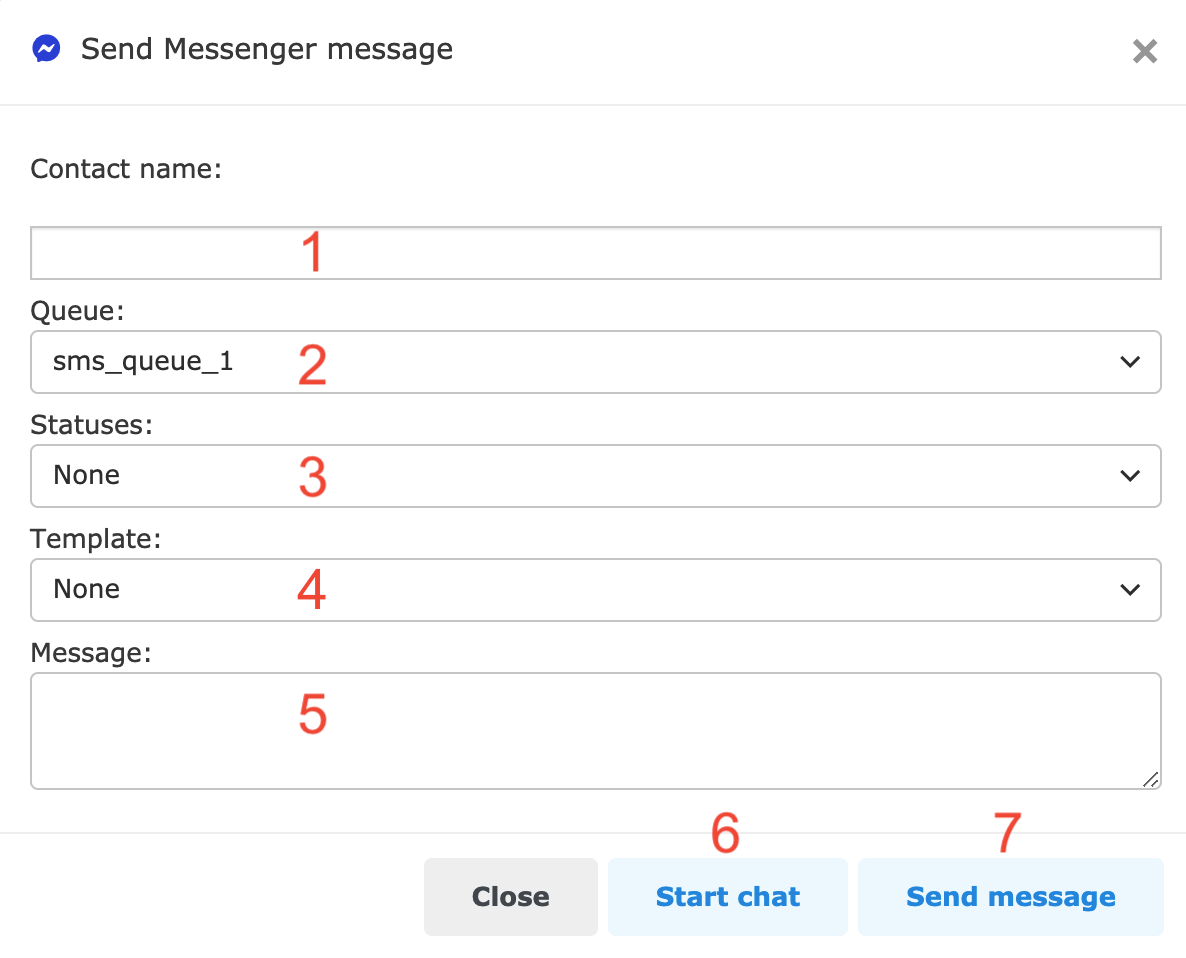
Enter a contact's name.
Select the queue you want to use to send the message (only visible if you have more than one queue).
Select a status. You must select a status before sending the message (not if you start a chat).
Select a template to insert into the message.
Type a message. When starting a chat (5), you don't need to enter a message now – you can enter it after you open the chat.
Start a chat.
Send message and close the Send message window (if you see Statuses (3), you must select one before sending the SMS).