User access defines the permissions granted to a user to access specific modules and functionalities within Daktela. It determines which areas of the system a user can interact with, ensuring that each user only has access to the features relevant to their role.
The combination of user type, user access, and user rights creates a specific configuration for each user.
User access can be applied to Contact center, Back office nad Passive user types. That means that user access can be shared across multiple user types. You can not assign user access to user of Cloud phone type. Some user type alters or limits certain functionalities, even if they are allowed through user access.
How to Set Up User Access
If you are an administrator with access to Users module and its sub-modules, you can navigate to Settings - Users - List of users - Accesses. There is a list of user accesses that you can edit or create new ones.
When creating a new user right, select a title and description to help identify its intent in the future. After creating user rights, it can be identified by a generated hash present in the URL (e.g., role_674d8254cfc89197054498).
Giving Access
Here, we will find tabs for each specific module. We can grant users with these accesses the ability to access the module while also allowing general actions (e.g., creating, editing, or deleting items).
|
Access |
Description |
|---|---|
|
Access |
Users have this module or sub-module available in quick menu. |
|
Create |
Users are allowed to create items in this module. |
|
Read |
Users are allowed to open items in this module in a read-only state. |
|
Update |
Users are allowed to make changes to items in this module. |
|
Delete |
Users are allowed to delete items in this module from the grid using the trash bin icon. |
|
Remove activities from tickets |
Users are allowed to use the function that lets them move activities from one ticket to another. When they do, a system-generated comment is added to the original ticket, informing everyone of this action. |
|
Remove activities from tickets without trace |
As an addition to the previous function, when this is enabled, the system will not generate a comment on the original ticket, leaving no trace of the action. |
|
AI ondemand actions |
Users are allowed to generate AI Topics or AI QAs for specific activities in the activity detail. This consumes Power Pack tokens. |
|
Play own recording |
Users are able to play recordings from their call activities. |
|
Download own recording |
Users are able to download recordings from their call activities. |
|
Access to all recordings |
Users have access to recordings of all users and queues that they have rights to. |
|
Delete recordings |
Users are able to delete recordings of call activities. |
|
Export recordings |
Users are able to export recordings of call activities. |
|
Generate Transcript |
Users are allowed to generate Smart Call Transcripts for call activities in the activity detail. This consumes Power Pack tokens. |
|
Read own reviews (QAs) |
Users are able to view QA Reviews for their evaluated activities and view the scores in read-only mode. |
|
Read all (QAs) |
Users are able to view QA Reviews for all activities of all users and queues they have rights to. |
|
Export recordings (Campaings) |
Users are able to export recordings of call activities for campaign records. |
|
Monitoring |
Users are able to start a user monitoring from Realtime panel. |
|
User state |
Users have access to various buttons in Realtime that can change the login state, pauses, or queues of other users. |
|
GDPR |
Users are able to anonymize calls, chats, emails, or tickets by deleting their current content. The metadata of these items will not be deleted. |
|
Delete attachments |
Users are able to delete attachments throughout the entire Daktela app. |
|
Export |
Users are able to export data throughout the entire Daktela app. |
|
Upload recordings (Agent Greetings) |
Users are able to upload their own recordings for the Agent Greetings function. |
If you are granting access to an admin or someone who should have no limitations, check the top checkbox "Admin accesses" – this will automatically check all accesses and keep them updated if new access is added in the future. Such a user will have an icon with a fully filled gear in the user list to indicate that they are an admin.
Custom Shortcuts
For each user access group, you can create custom shortcuts, such as links to other systems, Daktela documentation, or the option to create a new ticket. Choose an icon and color for each shortcut for better user experience.
Users will have these shortcuts available in their right sidebar at the bottom right.
Daktela Copilot Custom Prompts
If users have Daktela Copilot compose function enabled in their user rights, you can define custom GPT prompts that they can use while writing text-based responses (emails, chats, or ticket comments).
For more information about this function, visit the Daktela Copilot article and watch a video explaining this function.
Assigning Users to Accesses
If you have your accesses set up, you can go to Settings - Users - List of Users. There, you can edit any user and change their user type, user access, and user rights.
-
You can not change a user type, user access or user right, if the user is logged in and ready.
-
You can not assign user access or user rights to a user of Cloudphone type. See User types article for more information.
When saved, the user will imidiatly behave according to all settings.
Changing the Dashboard Settings
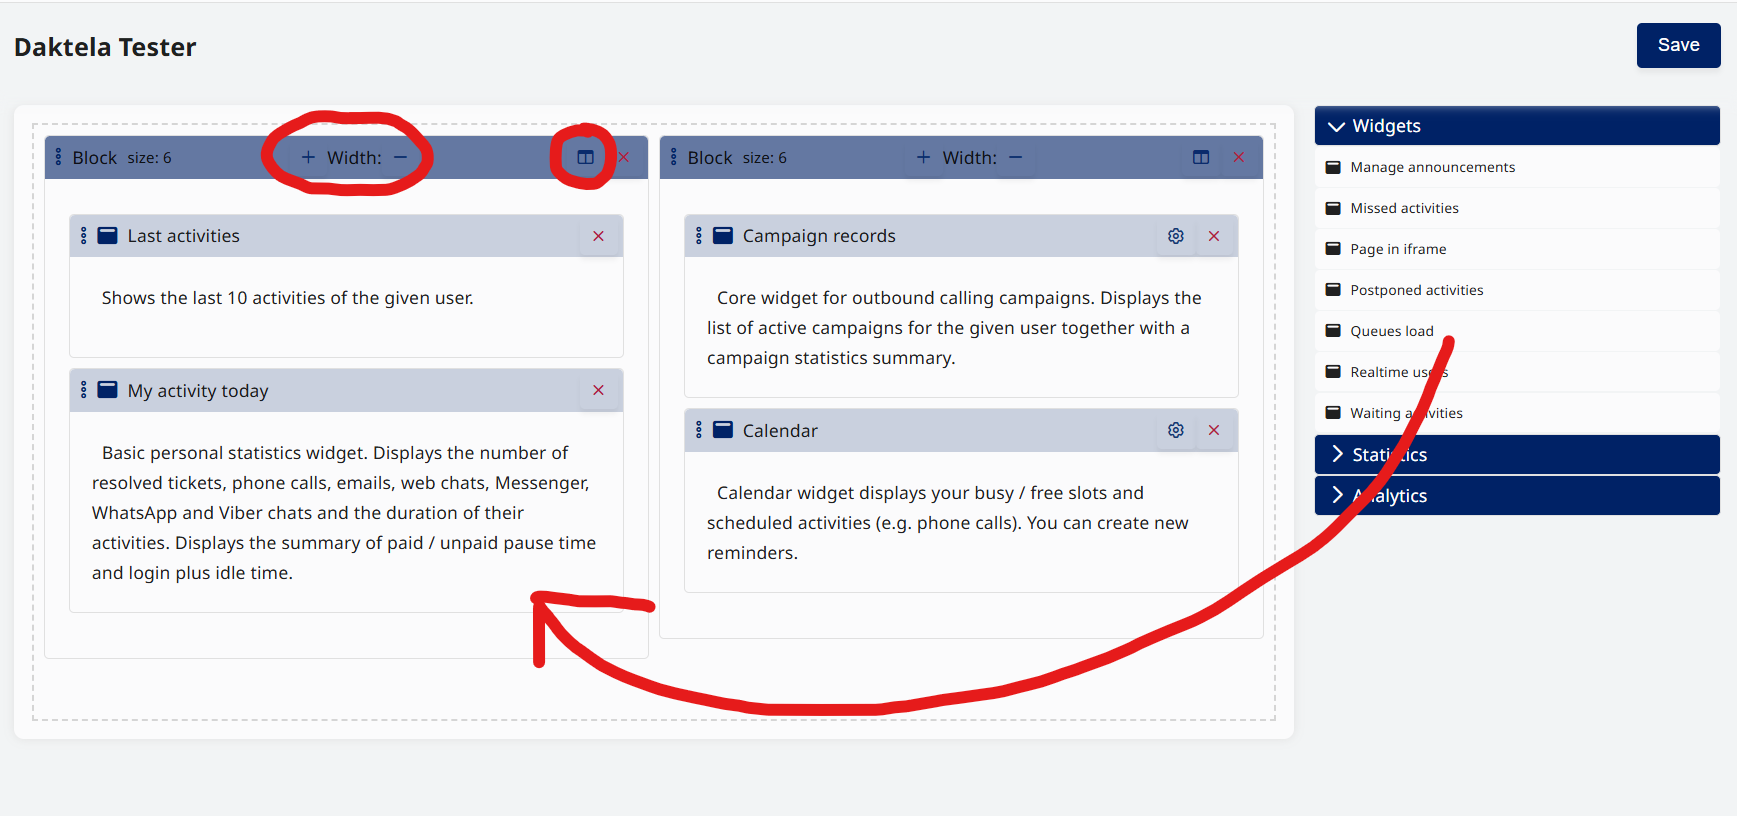
You can set up the dashboard layout of each Access. In Settings - Users - List of users - Accesses, click the Dashboard settings button in the actions column.
In this builder, you can drag and drop desired widgets, statistics, or analytics from the right panel of available items to the left. What you drag to the left will be present on the dashboard of every user with this user access.
You can configure most widgets to your liking via the cog icon (for example, setting a specific filter).
You can change the width of individual blocks or divide the blocks into up to 4 separate columns with the split button.