Email queues handle communication between an email server and Daktela.
Create a New Email Queue/Edit Queue
To set up your email queues, go to Manage → Queues.
To create a new queue from scratch, click Add new and select Email.
To use an existing queue as a template for your new one, click Clone in the Actions column.
To edit an existing queue, click its title.
The queue details will open.
Email Queue Details
Fill out the Unique queue number, Title and Description (optional), then sign in to your email server and set up your queue.
For your email queue to send and receive email, you need to set up Incoming mail server and Outgoing mail SMTP server at the bottom of the queue settings.
Queue Field Details
Queue Field Details
Open more settings using the Extended button in the top right corner.
Field
Description
Advanced settings
Queue active
By disabling the queue, you can quickly pause it. Call queues will stop dialling new calls. Already dialled calls will not be interrupted. Email queues will stop receiving emails. Outgoing emails will not be affected.
Auto response
Select a template to automatically send as a reply to all newly created tickets received using this queue. Will only be used during working hours if set up below. Go to Manage → Settings → Templates to set up your templates.
Working hours
Select your working hours from your Time groups. Go to Manage → Settings → Time groups to set up your Time groups.
Sender info
Title of sent email. Queue and user object can be used. e.g. {{user.alias}} - {{queue.title}}
Sender address
This address will appear as the sender’s address. Must be allowed on mail server!
Reply-to header
The email address to which replies should be sent. If left empty, replies will be sent to the default address.
Signature template
Select an Email signature template to automatically add to emails. Go to Manage → Settings → Templates to set up your templates.
NPS survey template
Template for adding Net Promoter Score surveys. Go to Manage → Settings → Templates to set up your templates.
Wrapup time
Select the amount of time that needs to pass before a new activity can be routed to an agent that has just finished an activity (the length of the Wrap pause).
Multiple statuses
Allow or disallow users to set multiple statuses for activities using this queue.
SSL Trusted
Allow trusted certificates only.
Helpdesk title
Select the helpdesk for this queue. Contact Daktela Support to set up a helpdesk.
Incoming mail server
Protocol
Select the protocol used to communicate with the email server (POP3 or IMAP, from 6.21+ Microsoft Office 365 OAuth2 or Google OAuth2).
Server
The server your email is located on. Contact your email provider to find your address.
Name
Your login name – usually the same as your email address.
Password
Your email login password.
SSL
Turn on to connect using SSL.
Don't keep emails (Extended)
Do you want to remove emails from the mail server after downloading them?
Outgoing mail SMTP server
Protocol
Select the protocol used to communicate with the email server (POP3 or IMAP).
Server
The server your email is located on. Contact your email provider to find your address.
Name
Your login name – usually the same as your email address.
Password
Your email login password.
Port
SMTP | Port 587 (Insecure Transport) SMTP | Port 465 (Secure Transport — SSL function enabled) SMTP | Port 25 (Outdated and not recommended. Username/password authentication MUST be enabled if using this port)
Tickets
Category
Select a category that will automatically be assigned to tickets created in activities using this queue.
Auto response exceptions
Auto responses will not be sent to these email addresses – checks both "from" and "reply-to" fields. You can enter only domain or use wildcards * (for anything) and ? (for any character).
AI Categorisation
Turn on to use AI to select the category that best fits your incoming emails based on your ticket history. Select the categories that the AI can choose from in the Categories field below. If the AI is not confident enough of its selected category, the category selected in the Category field above will be used. You must have a valid Text AI Features licence to use this feature. The AI model learns from your existing emails in this queue every night. When you turn AI Categorisation on for the first time, it will start working the next day.
AI Statuses
Turn on to use AI to select statuses that best fit your incoming emails based on your ticket history. Select the statuses that the AI can choose from in the Statuses field below. You must have a valid Text AI Features licence to use this feature. The AI model learns from your existing emails in this queue every night. When you turn AI Statuses on for the first time, it will start working the next day.
AI Template Suggestions
Turn on to use AI for Templates. You must have a valid Text AI Features licence to use this feature. The AI model learns from your existing emails in this queue every night. When you turn AI Template Suggestions on for the first time, it will start working the next day.
Under Incoming mail server, select the Google OAuth2 Protocol.
Enter your email address into the Name field.
Click the G button to authorise Gmail.
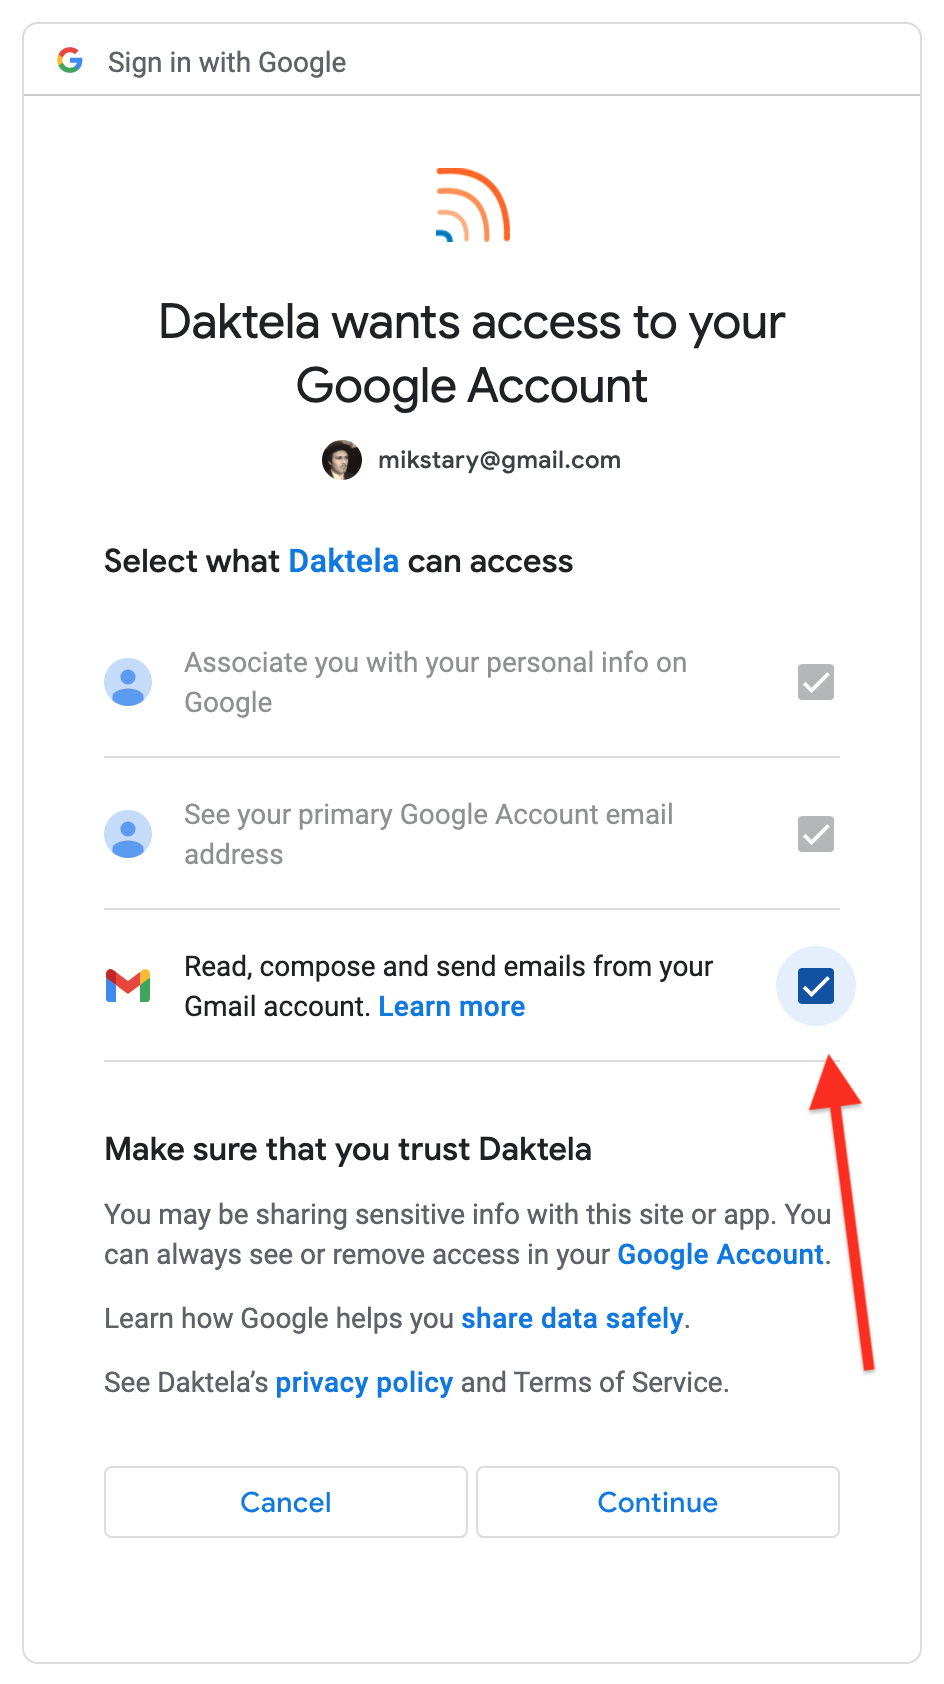
A new tab will open. Sign in to your Google Account.
Grant Daktela permission to access your Google Account. Make sure to check Read, compose and send emails from your Gmail account. Click Continue.
Outgoing email
Fill out the following under Outgoing mail SMTP server:
Field
Description
Server
smtp.gmail.com
Name
Enter your email address.
Password
There are 2 ways you can log in to your Gmail account in Daktela.
If you are using Less secure apps in your Google Account settings, enter your regular Gmail password.
If you are using 2-factor authorisation, you must use an App Password. Generate one and enter it here.
Port
Select 465 (Encrypted connection SSL).
How to Authorise Microsoft Office 365 For Use With Daktela
How to Authorise Microsoft Office 365 For Use With Daktela
Incoming email
In the Incoming mail server section, select Microsoft Office 365OAuth2 in the Protocol field.
Enter your email address into the Name field.
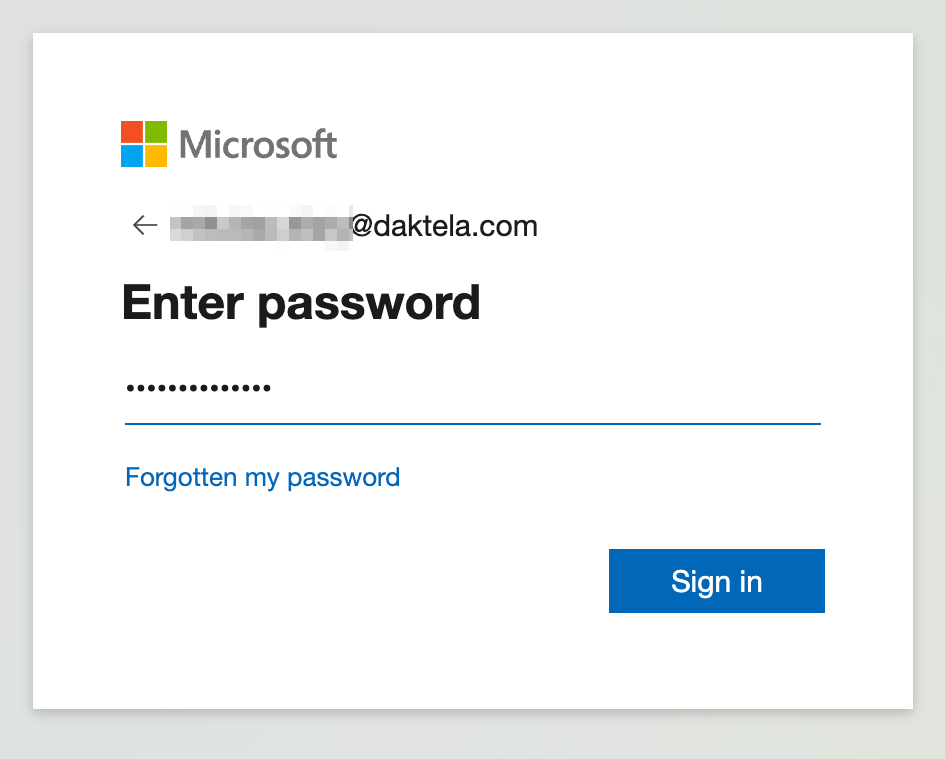
Click the MS window button to authorise your MS Account. a. A new tab will open. Enter your email address and click Next to continue.
b. Enter your password and click Sign in.
c. Click Yes to continue.
d. Finish the authorisation by click the Yes button.
After successful authorisation the MS Windows button will change colour to green.
Outgoing email
Fill out the fields in the Outgoing mail SMTP server section.
Field
Description
Server
smtp.office365.com
Name
Enter you email address.
Password
Enter your password.
For two-step verification you need to generate the App Password. Generate one and enter it here.
Port
587
Incoming Email Process
Incoming Email Process
Incoming emails, email routings, tickets, categories, views – how are they all connected?
When you receive an email at an address that you have linked with Daktela, it will be routed according to the chart below:
Step
Description
Incoming email and Mailbox
You receive an email on your mail server.
Email queue
The mail server is synchronised with Daktela via an email queue. The incoming email becomes a part of a ticket (a new ticket if it is a new email or an existing ticket it the email is a reply). The queue sets the ticket category.
Email routing
In email routings, you can define conditions under which further ticket parameters will be set. If none of the conditions are met, new tickets will only have a category set and the rest of the parameters will be blank. The category set in email routings will overwrite the category set in the email queue.
Ticket in All Tickets
The ticket is visible in All tickets to users that have rights to the ticket's category.
Ticket in another Ticket View
A ticket view is a predefined ticket filter that groups together tickets based on their parameters (either set up in the email queue or email routings, or selected manually in the ticket).
Consequently, a single ticket can be part of several views – e.g. one based on its category, one based on its status and one based on its age since the last activity.
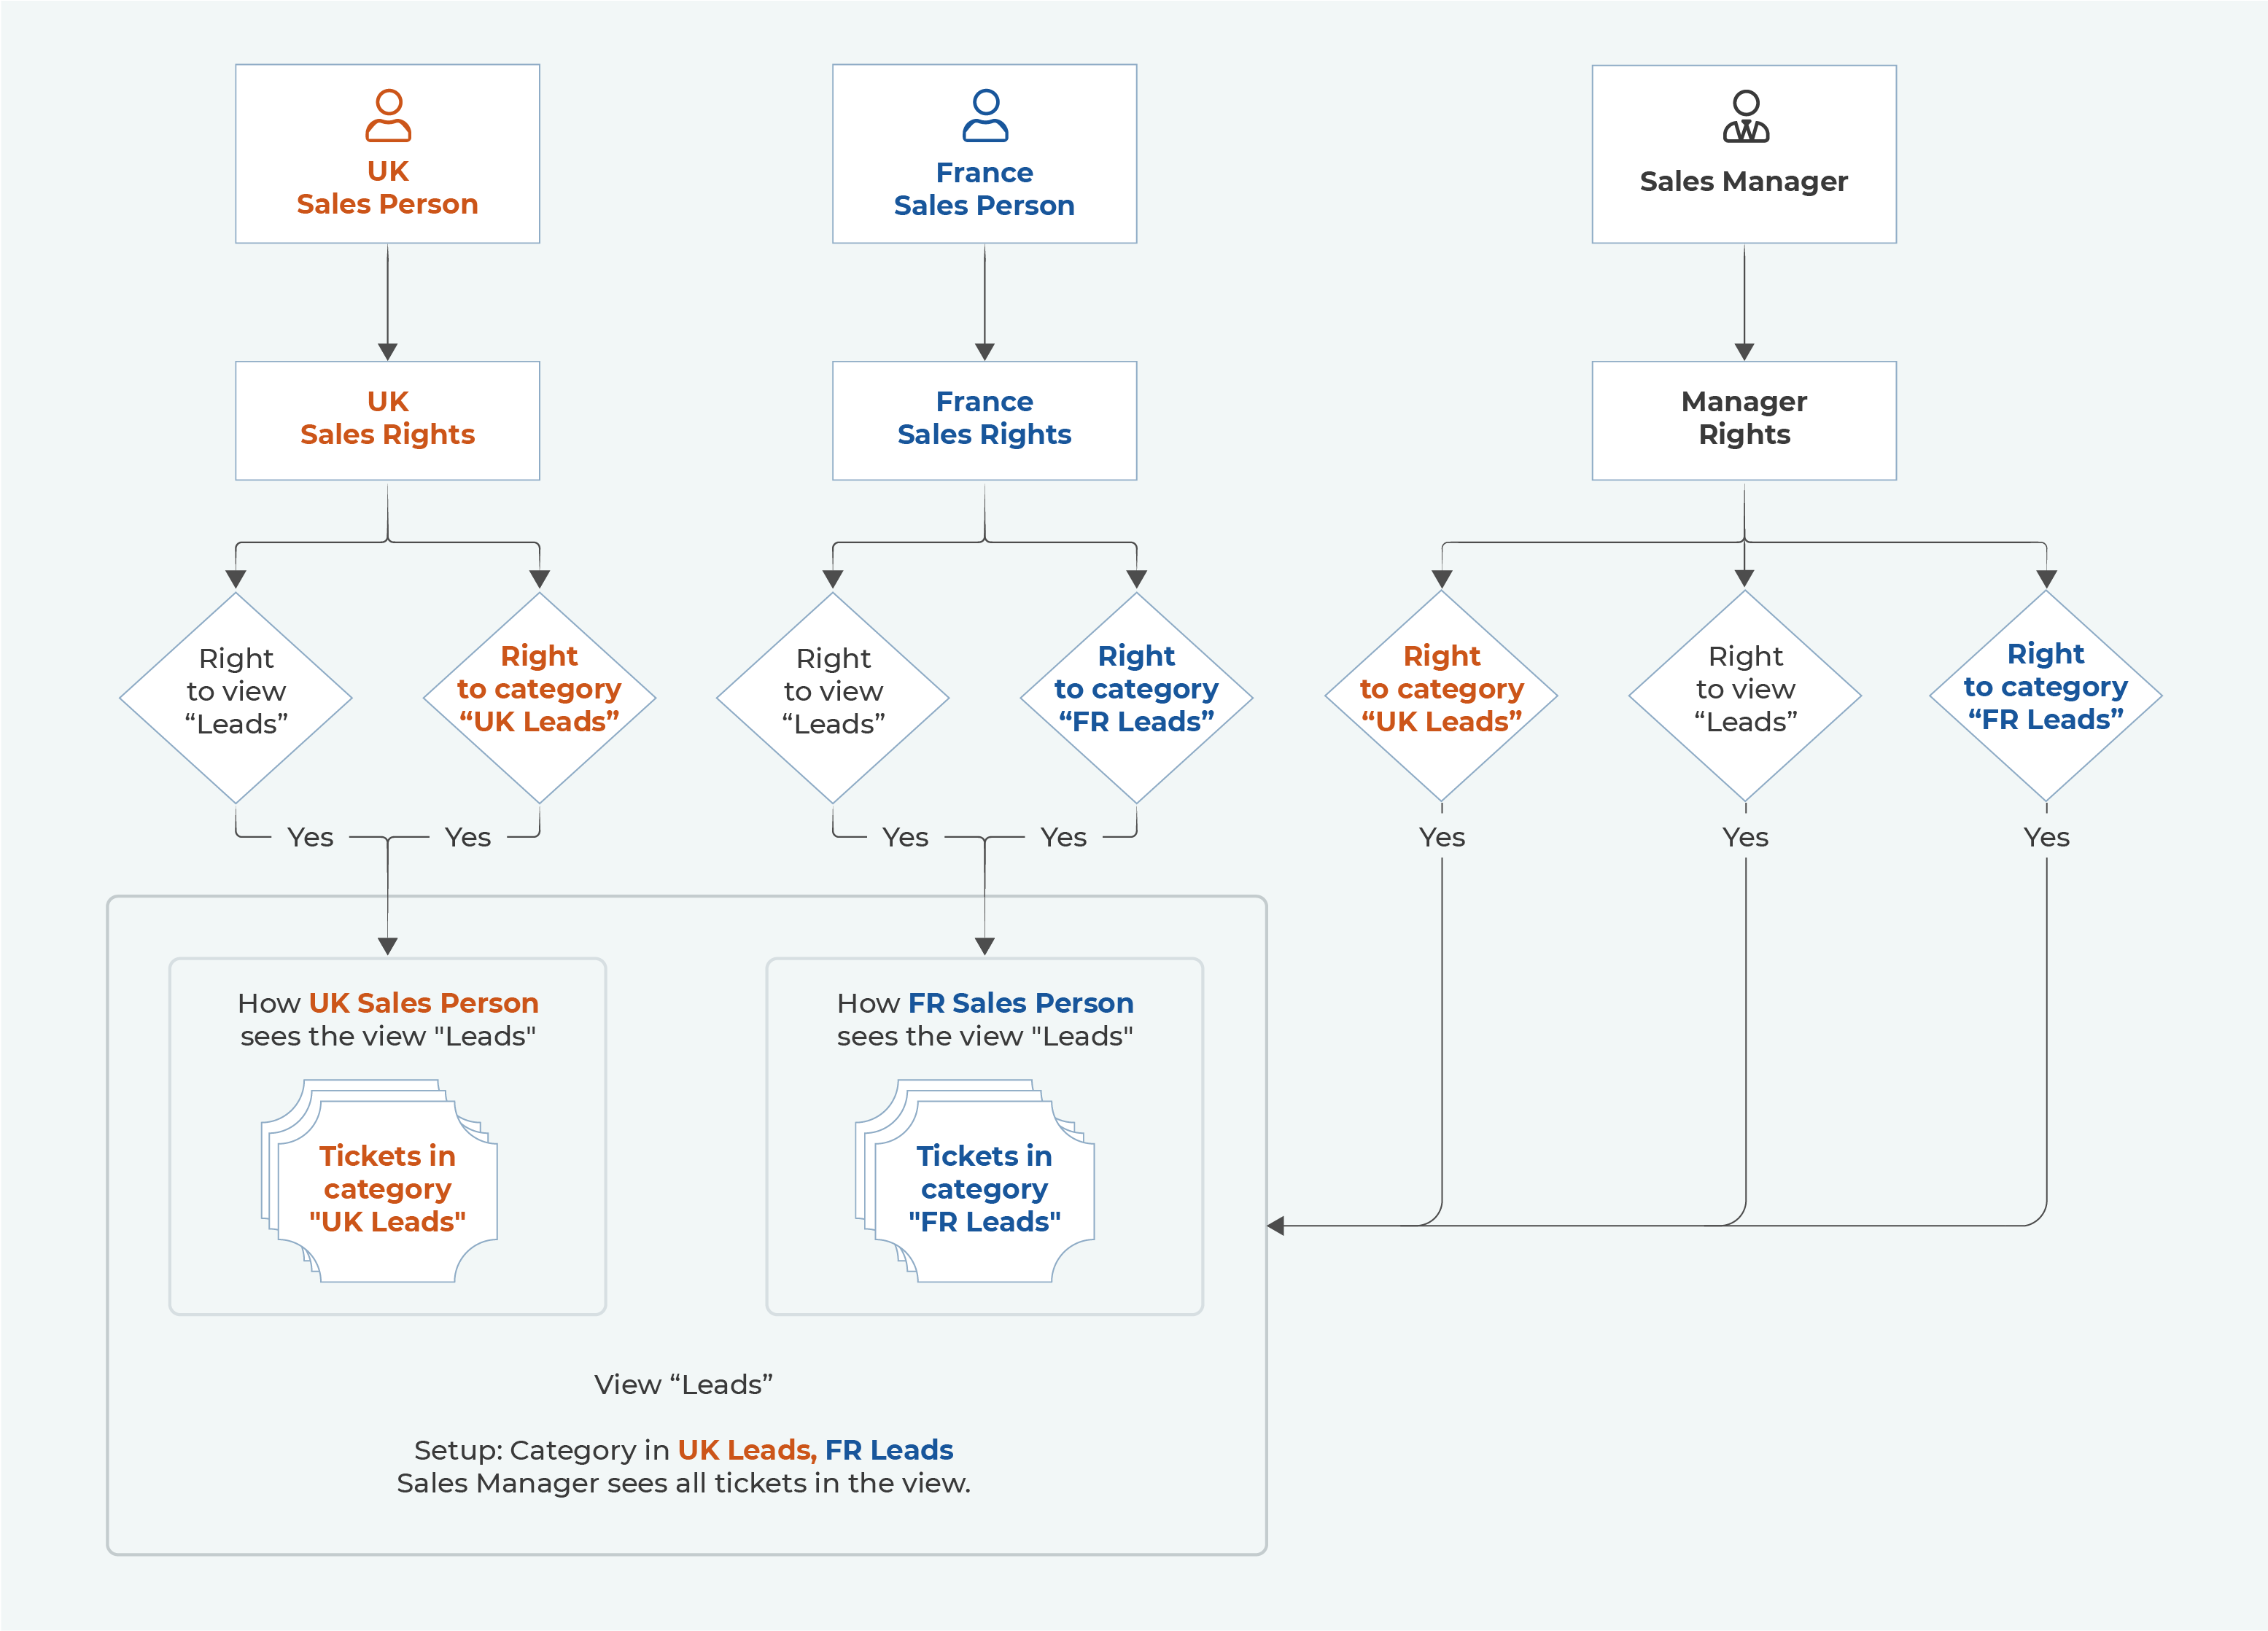
A view is accessible to all users that have rights to it. However, to view the tickets contained in the view, they must still have rights to their categories. This means that different users can see different tickets in the same view.
In the example below, there are 3 users that all have rights to the view "Leads".
UK Sales Person only sees tickets in the "UK Leads" category in the view.
FR Sales Person only sees tickets in the "FR Leads" category in the view.
Sales Manager sees tickets in both categories in the view.
JavaScript errors detected
Please note, these errors can depend on your browser setup.
If this problem persists, please contact our support.
%20-%20Copy.png?inst-v=0a276977-36e9-4a42-9759-075d5bd000f6)
%20-%20Copy.png?inst-v=0a276977-36e9-4a42-9759-075d5bd000f6)
%20-%20Copy.png?inst-v=0a276977-36e9-4a42-9759-075d5bd000f6)