SMS Routings
Set up chat routings for your SMS.
Automessages
Route your web chat to automessages if you want to send customers messages.
To set up automatic messages, go to Manage → Routings → SMS→ Automessages. You will see an overview of your automessages.
You can view a diagram tree of each automessage by clicking the grey tree button in the Actions column.
Click the Title of an automessage to open its details or click Add new to create a new automessage. The automessage details will open.
When you are done creating or editing an automesaage, click Save to return to the automessage overview and make sure to click the Apply configuration changes button in the top right corner.

It will take a few minutes for the changes to take effect on your website. If you want to see them immediately, open your website in a new incognito mode window.
Sandbox
Set up your automessages in this column. If you are editing an automessage, you can compare your new settings to those currently in use in the Production column.
All fields are mandatory except Description and Text.
Fill out the Title and Description.
Next destination: select where the web chat should be routed next.
You can select:
Another automessage.
Terminate. The chat will end or be offline – select which Terminate option to use.
Queue. Select which queue the web chat will be routed to.
Time condition. Decide where the chat will be routed depending on the date/time.
Decision tree. Route the chat to a chat bot.
Message
Time: select the delay between when the chat is routed to the automessage and when the message is sent. The timer starts as soon as the chat is routed here – take this into account when setting up multiple messages (Time is not the interval between messages).
Text: enter your message.
Time Conditions
To set up your business hours and bank holidays, go to Manage → Routings → SMS → Time conditions. You will see an overview of your time conditions.
You can view a diagram tree of each time condition by clicking the grey tree button in the Actions column.
Click the Title of a time condition to open its details or click Add new to create a new time condition. The time condition details will open.
When you are done creating or editing a time condition, click Save to return to the time conditions overview and make sure to click the Apply configuration changes button in the top right corner.

Sandbox
Set up your time conditions in this column. If you are editing a time condition, you can compare your new settings to those currently in use in the Production column.
All fields are mandatory except Description.
Title: enter your time condition title. Select the title in connectors to use the time condition in the routing/connector.
Description: enter a description.
Time group: select the Time group you would like to use from the drop down menu. You need to have at least one Time group set up to use Time conditions. You can also use the blue drop down menu to view or edit the selected time group or to create a new one – this will open Manage → Settings → Time groups.
If it is open: select what to do if the current day and time matches that of the time group.
You can select:
Terminate. The chat will end or be offline – select which Terminate option to use.
Queue. Select which queue the chat will be routed to.
Another time condition (we recommend to set up your time groups in a way that you don't need to route from a time condition to another one).
Decision tree. Route the chat to a chat bot.
If it is closed: select what to do if the current day and time does NOT match that of the time group. The options are the same as above.
Decision Trees
Use decision trees to set up your Messenger chatbot.
Go to Manage → Routings → SMS → Decision trees. You will see an overview of your Decision trees.
You can view a diagram tree of each decision tree by clicking the grey tree button in the Actions column.
Click the Title of a decision tree to open its details or click Add new to create a new decision tree. The decision tree editor will open.
When you are done creating or editing a decision tree, click Save to return to the decision tree overview and make sure to click the Apply configuration changes button in the top right corner.
The decision tree editor will display a diagram of individual decisions. When creating a new decision tree, you will only see the first step, "Welcome message". Click a decision to select it, then click the edit button on the right hand side:
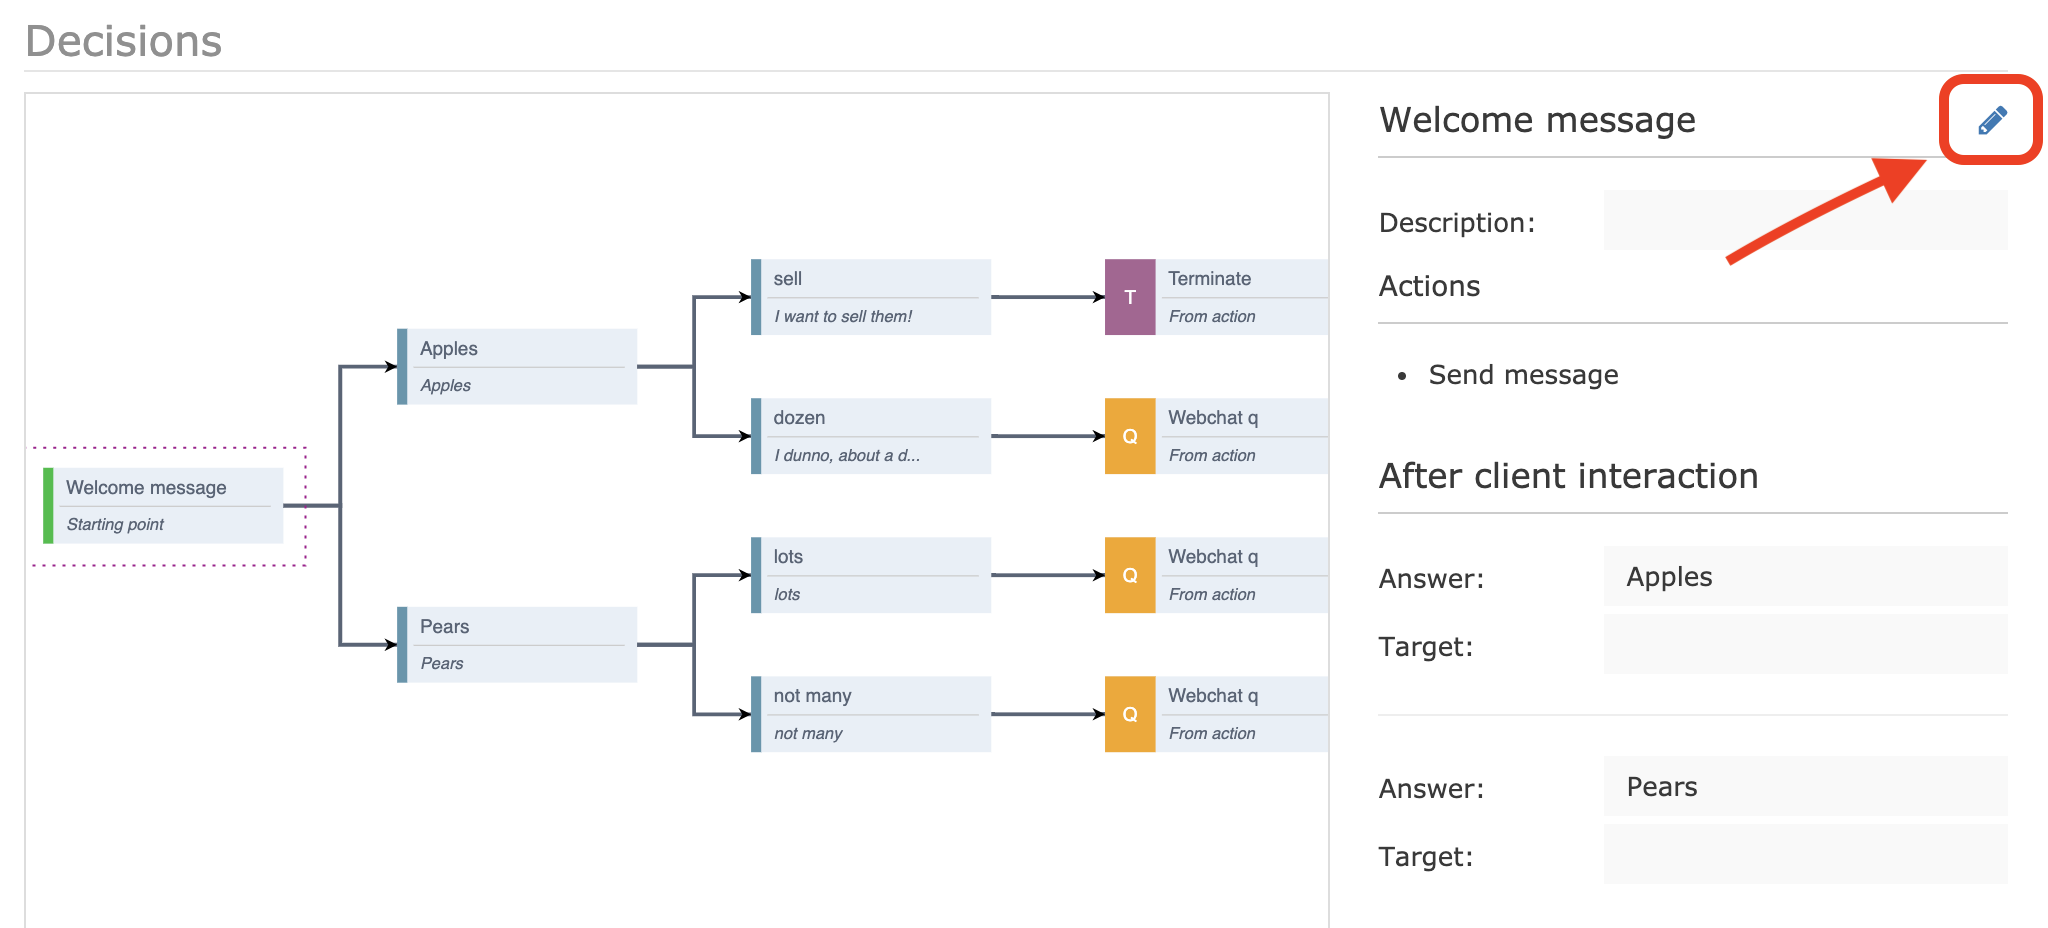
The decision details will open.
Fill out the decision Title and Description (optional) in the header, then set up your decision. We recommend reading through the templating language documentation.
Actions
Request: request data from a URL. Fill out the URL address where your data is stored and name the object that will contain the returned data so you can display it in the chat.
Send message: send a message in the web chat. Enter a default message and any language variations – the customer's language will be detected automatically.
Save data: store own data for later usage.
Create ticket: enter the ticket's Title, select a Category and enter a Comment.
Groups
Condition: set up conditional actions. First set up your condition parameters, click Done and then drag and drop actions into the fields in the condition.
Loop: walk through array items. If you use action Target, loop ends.
Targets
Target
Next destination: select if the target is another decision in the tree (Decision) or a final target such as a queue or a time condition (App).
If you have selected:Decision – choose a target decision from the drop down list or click the blue plus button to add a new decision. Type the new decision name. You can edit the new target decision in the diagram once you save the current one and return to the decision tree editor.
App – select the target type (Automessages, Terminate, Decision tree, Queue, Time condition) and the target.
Execution: select whether to go to the target as soon as the customer reaches the decision (Immediately) or whether action from the customer's side is necessary (When client choses it).
If you have selected When client choses it, select your Answer type:Pattern: the customer can type their answer. Enter a pattern in backslashes that the customer's answer must fit to trigger this action. E.g. /[0-9]{6}/ will fit if the customer enters at least a six digit number. See Regular expression syntax for more info.
Similar: the customer can type their answer. Enter a list of words that will trigger this action separated by commas.
You can set up language variants in all combinations except Decision-Immediately and Decision-When client chooses it-Generated buttons.
Add another target to set up different targets depending on the customer's answer.
If you use Similar or Pattern as an answer in your decision, a "Default answer" radio button will appear next to each answer. Select the answer that should be triggered when the customer's answer does not fit any of the patterns or words.
Chatbots
Set up a connection to a third-party chatbot.
Go to Manage → Routings → Messenger → Chatbots. You will see an overview of your chatbots.
Click the Title of a chatbot to open its details or click Add new to create a new one. The chatbot details will open.
When you are done creating or editing a chatbot, click Save to return to the chatbot overview and make sure to click the Apply configuration changes button in the top right corner.
It will take a few minutes for the changes to take effect on your website. If you want to see them immediately, open your website in a new incognito mode window.
Set up your chatbot set up in the Sandbox column. If you are editing a chatbot, you can compare your new settings to those currently in use in the Production column.
Title: enter a title.
Description : enter a description.
Fallback: select where the chat should be routed if the Callback URL is not available.
Callback URL: enter the endpoint where data from the chatbot should be sent. Filled in automatically – you do not need to change it.
Chatbot URL: enter the URL of your chatbot.
Send start message: forward the client initialisation message (if it exists) as part of the first chatbot request.
Terminate
Set up how your chats will end in different scenarios.
Go to Manage → Routings → SMS → Terminate. You will see an overview of your terminate set ups.
You can view a diagram tree of each terminate set up by clicking the grey tree button in the Actions column.
Click the Title of a terminate set up to open its details or click Add new to create a terminate set up. The terminate details will open.
When you are done creating or editing a terminate set up, click Save to return to the terminate overview and make sure to click the Apply configuration changes button in the top right corner.
Set up your terminate set up in the Sandbox column. If you are editing a terminate set up, you can compare your new settings to those currently in use in the Production column.
Title: enter a title.
Description : enter a description.
Disconnection cause: select from the dropdown list. This is for internal use only – the customer will not see this info.
Queue: select which queue the chat will belong to if it is terminated using this set up.
If you want to receive missed SMS notifications, you must select a queue.
Auto response: select a template to send to the customer if the chat is terminated using this set up.
Answered: toggle whether a chat terminated using this set up is logged as answered.