Templates
Go to Manage → Settings → Templates to set up texts that you use often, such as confirmations, signatures and NPS surveys. You can then insert them into your emails and chats.
Create a New Template/Edit a Template
Go to Manage → Settings → Templates to see a list of your templates.
To create a new template from scratch, click Add new.
To use an existing template as a template for your new one, click Clone in the Actions column.
To edit an existing template, click its title.
The template details will open.
Fill out the Title and Description (optional).
Select the template Type and follow the instructions below according to the type of Template you are setting up.
If you select a user, the template will be visible only to them.
Select None for the template to be visible to all users.
The user can only be selected during template creation and can't be changed later.
From version 6.20, you can also create a template from a sent email. Simply open the ticket that contains your email, open the options drop down list and click Create template. The template details will open with the Email type selected – you can change the type of template if you wish – and the subject, body and attachments filled out.
If you want the Template to be visible to one user only, select them under User. Select None for the template to be visible to all users.
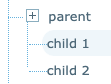
Select a Parent template. Use parent templates to group together similar templates. When you add the current template to your email, the parent template will be added too. You can't add parent templates to your emails without adding child templates – structure your template tree accordingly.
Enter the Subject of your email.
If you want to use external data in your Template, enter the URL where your data is stored under External URL. Enter the full URL even if you are loading data stored in Daktela. You can use variables from the activity in your URL. The response must be in json format.
Select your Template Format – Plain or Rich.
Enter your Template in the Content field. You can use {{activity.property}} to insert a defined property of the current user (e.g. {{activity.title}}), or <child_template> to insert content from a child template. You can use the variable {{externalData}} to enter responses from your external URL. See How to use variables below.
Upload any attachments at the bottom of the page.
Save your Template.
Select the Queues where you want to use your Template.
Load your Template in the Insert template section in an open email after selecting a queue.
Email Template Tips
Use the HTML <table> element to create the email structure.
To create columns and more complex structures, use nested HTML tables.
Use HTML element attributes such as cellpadding, valign and width to set table dimensions.
Use inline CSS, avoid the <style> element.
Keep your CSS styles simple.
Don’t use compound declarations (e.g. “font:#000 14px Arial, Helvetica, sans-serif;”).
Don’t use layout properties (e.g. slot, position, clear, visibility, etc.).
Don’t use complex selectors (e.g. child or sibling elements, pseudo-elements etc.).
Don’t shorten code (e.g. #fff instead of #ffffff).
Use absolute links for your images and store them on reliable servers.
Don’t forget your image ALT text – when an image doesn’t load, the ALT text will display instead.
If you use padding or margin, do so ideally in <td> elements.
Avoid using <div> elements.
Don’t use JavaScript or Flash.
Think about email responsiveness. Use media queries.
Test your emails. Ideally, you should know which email clients your customers use and test your emails on the most common ones before you send them out. Take extra care if your email will be displayed in MS Outlook. Before you send your email, use an HTML email validator to check everything works.
Email NPS survey
If you want to use external data in your Template, enter the URL where your data is stored under External URL. You can use variables the activity in your URL. The response must be in json format.
Select your Template Format – Plain or Rich.
Enter your Template in the Content field. You can use {{activity.property}} to insert a defined property of the current user (e.g. {{activity.title}}), or <child_template> to insert content from a child template. You can use the variable {{externalData}} to enter responses from your external URL. See How to use variables below.
Save your Template.
Go to Manage → Queues, open the Email queue(s) where you want to use the NPS survey and select it in the NPS survey template field.
Your NPS survey will automatically be added at the bottom of all emails sent using the queue(s) where you selected it.
You will not see the NPS survey in the email editor – it is added after the email is sent.
Once the customer clicks the survey, their selection will be recorded and they will be taken to a page where they can leave a comment or message. The page language is selected automatically based on browser cookies and the page text can't be edited.
View individual NPS scores and notes in Listings → Activities. You can filter activities with an NPS Score.
To view the customers' notes, open the activity detail using the Eye symbol and open the Activity tab. Notes are also a part of activity exports.
You can also see an overview of your NPS scores in Reporting → Statistics → Rating.
Chat NPS survey
If you want to use external data in your Template, enter the URL where your data is stored under External URL. You can use variables the activity in your URL. The response must be in json format.
Select your Template Format. You can edit the Template in Rich format but you must change the format to Plain before saving. Your Rich formatting will transformed into Plain.
Enter your Template in the Content field. You can use {{activity.property}} to insert a defined property of the current user (e.g. {{activity.title}}), or <child_template> to insert content from a child template. You can use the variable {{externalData}} to enter responses from your external URL. See How to use variables below.
Save your Template.
Go to Manage → Routings → Web chats → Inbound routings, open the web chat(s) where you want to use the NPS survey and select it in the NPS survey template field.
Your NPS survey will be displayed at the end of each chat that uses the routing where you selected the template.
View individual NPS scores in Listings → Activities. You can filter activities with an NPS Score.
You can also see an overview of your NPS scores in Reporting → Statistics → Rating.
Select queues
To select in which queues' activities the templates will be available, click Queues in the Actions column.
Check all the queues where you want to use the template and click Save.
You can select Queues for SMS, Chat, Facebook Messenger, WhatsApp, Viber and Email templates.
To use Email Signature and Email NPS templates, go to Manage → Queues, open the Email queue(s) where you want to use the template and select it in the Signature template and NPS survey template fields.
To use Chat NPS survey templates, go to Manage → Routings → Web chats → Inbound routings, open the web chat(s) where you want to use the template and select it in the NPS survey template field.
How to use variables
This is a list of example template variables that you can use. See below to learn how to put together your own variable.
Not all of these variables will work in all cases – the variable you want to use must not be empty and already be loaded when you insert your template in the activity.
Up to version 6.19.8, activity variables only work in Email and Email signature template types and you must enter https://localhost/api/v6/whoim.json in External URL.
Variable | Placeholder for | Comments |
|---|---|---|
{{user.title}} | Name of currently logged in user | |
{{user.alias}} | Alias of currently logged in user | |
{{activity.user.title}} | Name of activity's user | |
{{activity.contact.title}} | Name of activity's CRM contact | For email, this variable only works when replying to an email. In new emails, the contact is only loaded when the email is sent. |
{{activity.contact.firstname}} | First name of activity's CRM contact | You can also load the customer's last name by substituting "firstname" with "lastname". For email, this variable only works when replying to an email. In new emails, the contact is only loaded when the email is sent. |
{{activity.contact.account.title}} | Name of activity's CRM account | |
{{activity.contact.customFields.email[0]}} | CRM contact's email address | You can substitute "email" with any other custom field that you are using. [0] means the first entry in the custom field will be used. If you want to use the 2nd entry, replace it with [1] etc. |
{{activity.ticket.title}} | Subject of ticket the activity is part of | The activity must be part of a ticket when the template is used, otherwise it will be empty. |
{{activity.ticket.sla_deadtime}} | Deadline of ticket the activity is part of | The activity must be part of a ticket when the template is used, otherwise it will be empty. |
{{activity.ticket.statuses[0].title}} | First status of ticket the activity is part of | The activity must be part of a ticket when the template is used, otherwise it will be empty. |
You can put together your own variable using the Activity object model. Start your variable with {{activity., then go down the list, find the attribute you want to use in your variable and insert it.
If you want to use the activity's Display name in your template, you will end up with {{activity.title}}.
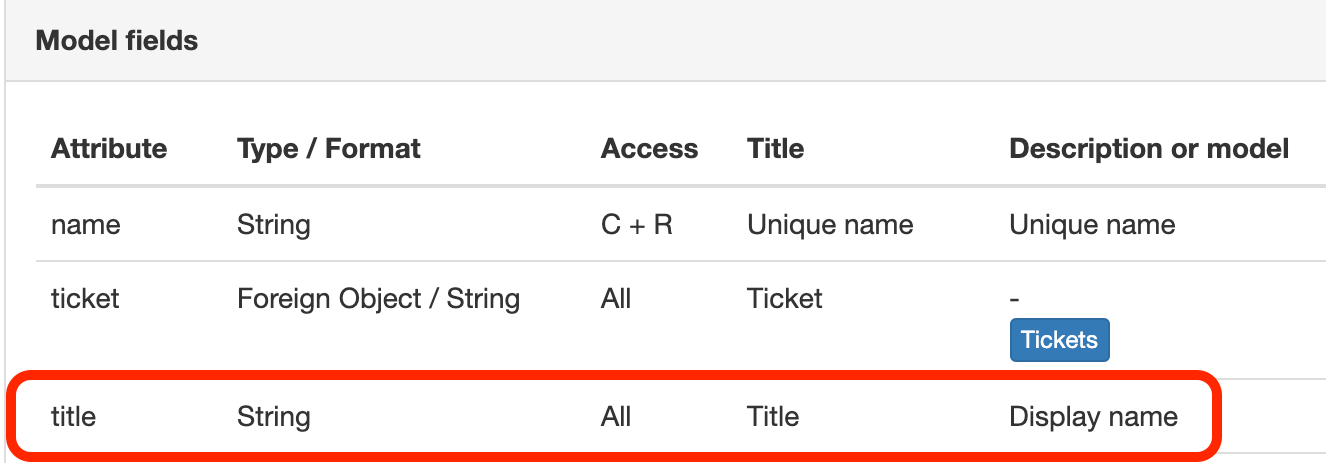
However, if you want to use some info about a ticket in your variable, you can see that ticket is a Foreign Object:
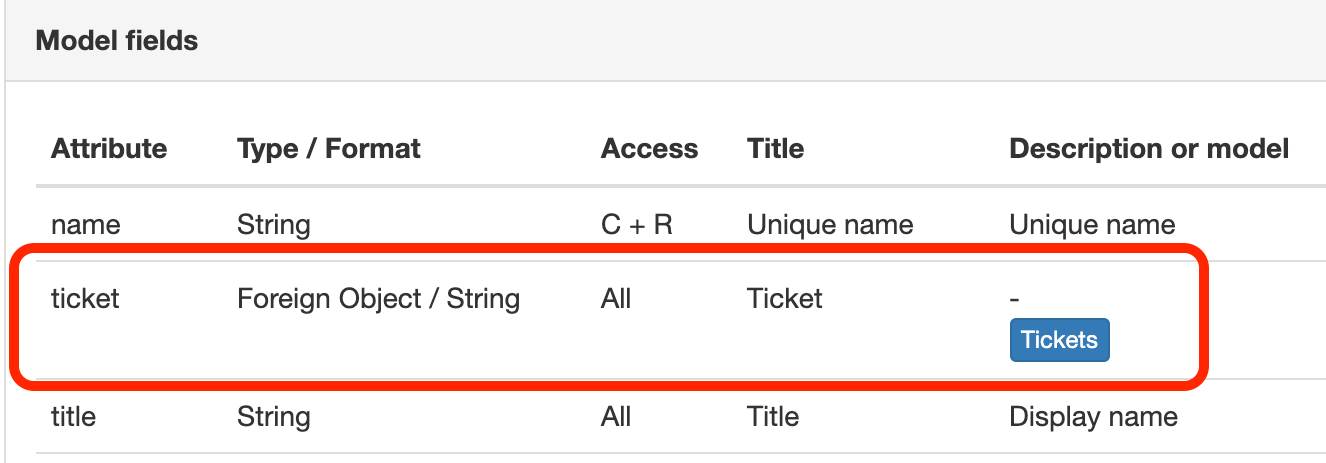
This means that you need to specify what information about the ticket you want to load. You now have {{activity.ticket. . To find the next attribute, click Tickets to open the Tickets object model. Again, go down the list and find the attribute you want to use.
If you want to use the Subject of the ticket, you will end up with {{activity.ticket.title}} as your variable.
If you want to use the ticket's category, you will add the category attribute – {{activity.ticket.category. – and click TicketsCategories to find the next attribute.
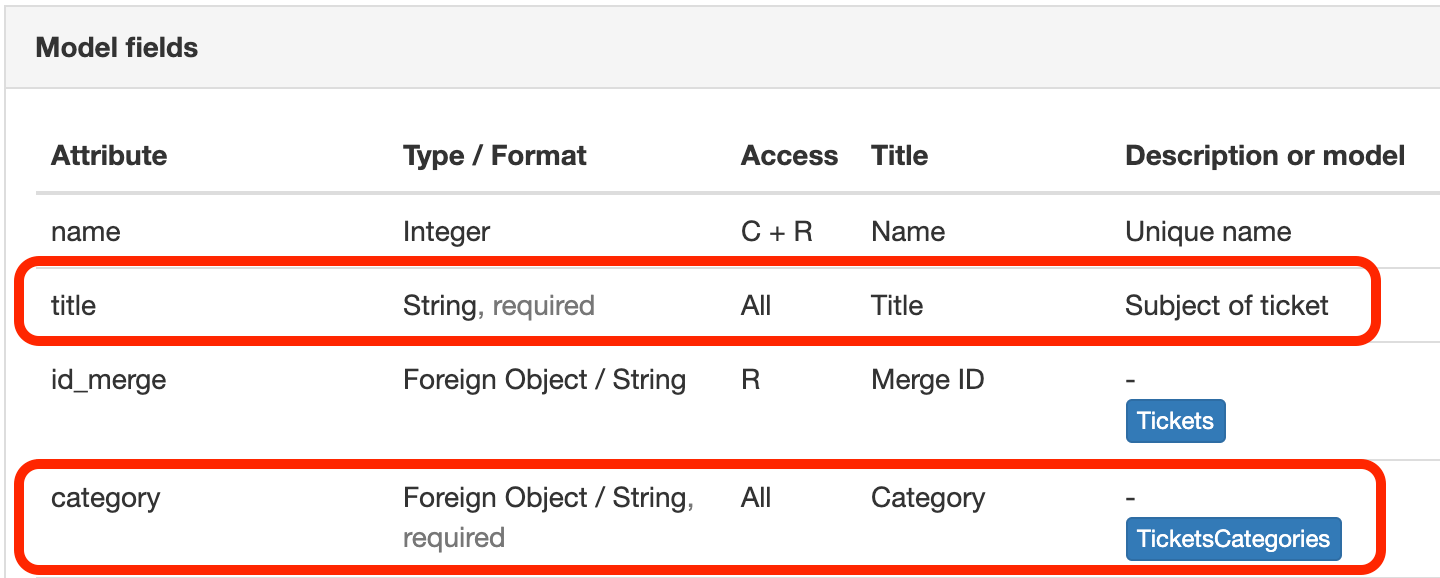
Repeat the process until you reach an attribute that is not a foreign object.
If you are entering an array in your variable (such a custom field or status), you need to specify which position in the array to use. See the examples in the table above.