Web Click To Call
Using click-to-call, your customers can request a call back from your contact centre. Go to Manage → Queues to set up a CTC queue.
Create a New Web Click-To-Call Queue/Edit a Web Click-To-Call Queue
Go to Manage → Queues.
To create a new queue from scratch, click Add new and select Web Click-To-Call.
To use an existing queue as a template for your new one, click Clone in the Actions column.
To edit an existing queue, click its title.
The queue details will open.
Web Click-To-Call Queue Details
Fill out the Unique queue number, Title and Description (optional), then set up your queue.
Queue Field Details
Open more settings using the Extended button in the top right corner.

Field | Description |
|---|---|
Alias | The queue's alias is used for example as a visible target for customers using web chat. |
Advanced settings | |
Allow description | Turn on to activate the description field as part of the activity created using this queue. Agents can enter a description of the activity. |
Queue active | By disabling the queue, you can quickly pause it. |
Working hours | Select your working hours from your Time groups. Go to Manage → Settings → Time groups to set up your Time groups. |
Form save time | Select the time agents have to fill out and save the activity form after the interaction with the customer ends. The "Lazy" pause will automatically be set after this time runs out. |
Outbound number | Enter the numbers that are presented to the called party for calls from this queue. If you want to use multiple numbers, separate them with a comma. The numbers are then selected randomly for each call. Leave empty to use default numbers. |
CID prefix | You can optionally prefix the Caller ID name for extensions using this queue. ie: If you prefix with "Sales:", a call from John Doe would display as "Sales:John Doe" on the extensions that use this queue. |
Allowed numbers | Enter a regular expression for phone numbers that the customer can enter into the form. |
Max. waiting count (Extended) | Select the maximum count of activities waiting for distribution in the queue (empty action). Activities already ringing at an agent are not included in this limit. The next activity after max is reached will be routed to the next target. Only checked once when the call enters the queue. |
Priority | Set the queue's priority for distribution of activities to agents: 0 – highest, 10 – lowest. When agents are logged in to several queues, activities from queues with a higher priority will be distributed to them first. |
Search agent by CRM | Turn on if you want the caller to be connected to the user of the CRM contact. This setting can't be used simultaneously with the "Call last agent" option. |
Call last agent | Turn on if you want the caller to be connected to the same agent as during their last call. Don't forget to set up Last agent hours. |
Last agent hours | How many hours into the past should the system look when searching for the last agent? This parameter will only be used if Call last agent is set to Yes. |
Automatic Pause | Select if an agent that rejects or doesn't answer an activity should automatically be put on the Lazy pause. |
Ring time / Agent ring time | Select how long the agent has to answer the call. Calls will be routed to the next agent after this time passes. |
Wrapup time | Select the amount of time that needs to pass before a new activity can be routed to an agent that has just finished an activity (the length of the Wrap pause). |
Auto answer (Extended) | Turn on if incoming activity should be answered automatically. |
Distribution strategy | See more information below. |
Multiple statuses | Allow or disallow users to set multiple statuses for activities using this queue. |
Idle activity notification | Select the time when the toast notification for a long-standing activity will be displayed. |
Monitoring | |
Show monitoring notification to agent | An icon is placed in the call activity showing that call monitoring is active for the specific agent. |
Play monitoring audio notification in call | A recording played in the call which notifies the agent about monitoring start and stop. Select your recordings in the fields below. |
Recording at monitoring start | Select a recording that will be played when call monitoring is started. |
Recording at monitoring stop | Select a recording that will be played when call monitoring is ended. |
Recordings | |
Record calls | Select if and when calls using this queue should be recorded. Note that these settings can be defined on user and queue level and if they are set differently, the earlier recording option prevails. |
Allow call recording interruption | Select if the user or users calling via this queue can pause and resume call recording. Note that if this setting is different in the user or the queue, if one of these is set to "Yes", then recording can be interrupted. |
Recording retention | Select how many days to keep recordings of calls made using this queue. The value can't be more than the Maximum recording retention value which is set globally for the entire contact centre. |
Notification when recording is started | Select notification sound when recording is started. |
Notification when recording is stopped | Select notification sound when recording is stopped. |
Thresholds (Extended) | |
Threshold max time (Extended) | Calls waiting longer than the set time will turn red in the realtime panel and on wallboards. |
Threshold free users (Extended) | When fewer than the set number of agents is available, agents will turn red in the realtime panel and on wallboards. |
Threshold waiting calls (Extended) | When more than the set number of calls is waiting, calls will turn red in the realtime panel and on wallboards. |
Next targets | |
Target if answered | Select where the call will be routed after an answered call is ended by the agent. |
Tickets | |
Category | Select a category that will automatically be assigned to tickets created in activities using this queue. |
Distribution Strategy
The distribution strategy you select determines how activities that use the queue will be allocated to your agents.
Each strategy takes into account agents' priority (also know as penalty) in the queue depending on the rights they use (0 – highest priority, 10 – lowest priority). You can set up the priorities in each queue by clicking Change in the Agents column.
Examples below illustrate how each distribution strategy distributes activities to agents. We will work with 6 agents and their priorities in the queue:
Rachel and Paul – priority 0 – the most competent to deal with activities in the queue
Tom and Sophie – priority 5 – can help out if Rachel and Paul are busy
Julia and Terry – priority 9 – should only answer activities in the queue if there is no other option
Everyone
This strategy first distributes the activity to all the users with the highest priority at once. If they are available, it will ring there until Wait time runs out or all agents reject the activity.
If there are no agents with the highest priority available or if no one in the group answers the activity, it will be distributed to all users of the next priority group.
If there are no agents available or if the activity is rejected or not answered before Wait time runs out, it will distributed to all agents
with higher priority if they become available while it is ringing.
with lower priority.
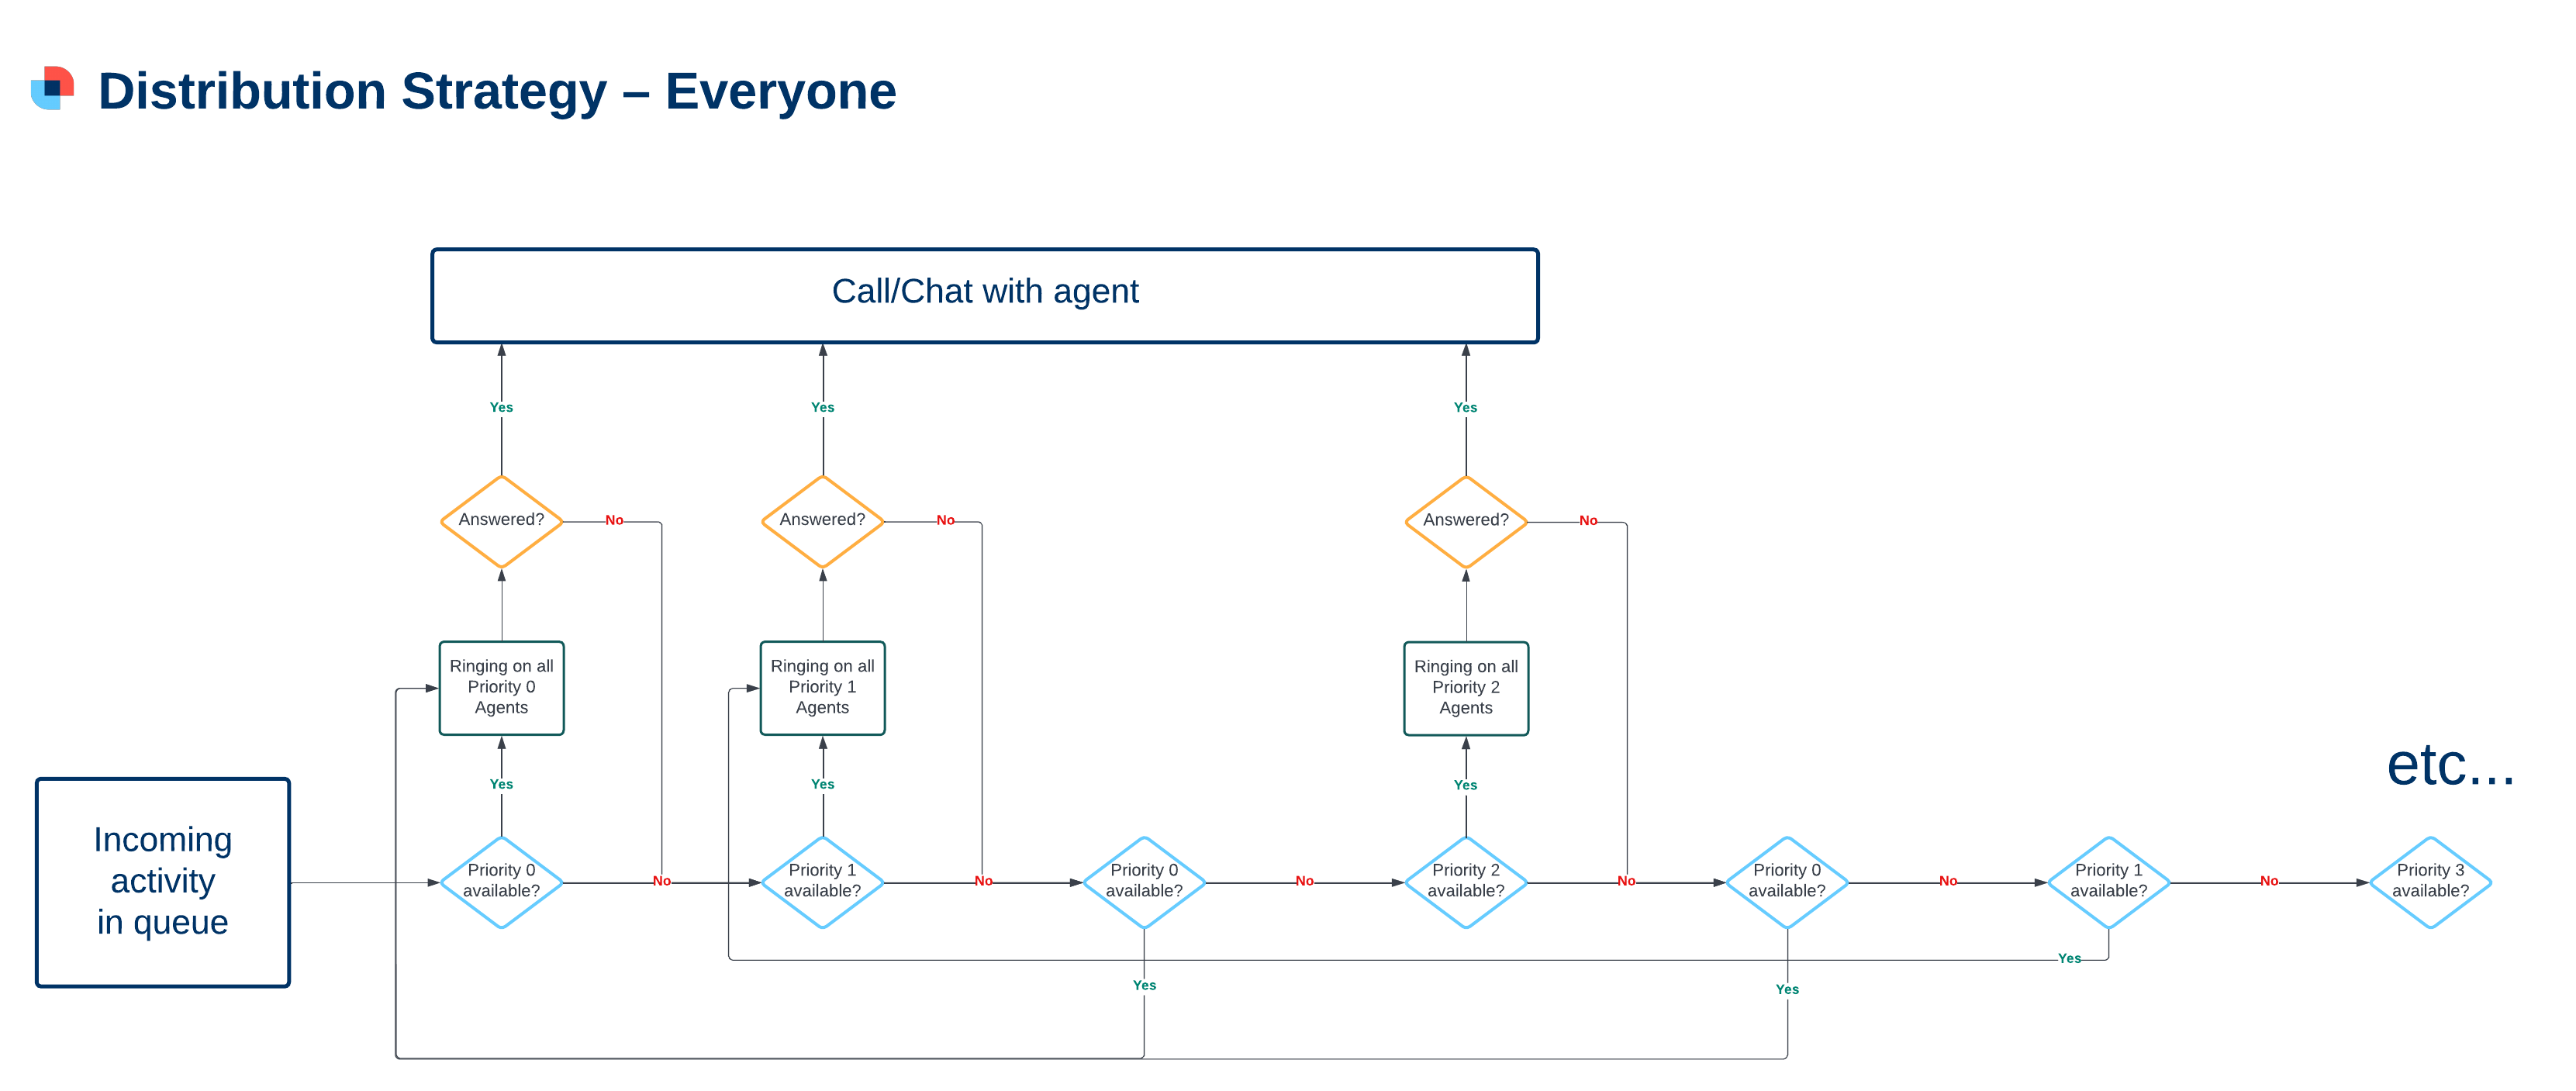
Example 1:
All agents are available.
An activity comes in via the queue and starts ringing for Rachel and Paul. Neither of them answer and Wait time runs out.
The activity starts ringing for Tom and Sophie as they have the next priority. They both reject the activity.
The activity goes back to Rachel and Paul as they are available and have the highest priority.
Example 2:
Everyone but Julia is chatting to customers.
An activity comes in via the queue and starts ringing for Julia. As it's ringing, Tom's and Sophie's activities end. Julia doesn't answer and Wait time runs out.
The activity starts ringing for Tom and Sophie. Meanwhile, Rachel's activity ends. Tom rejects the activity, Sophie doesn't answer and Wait time runs out.
The activity starts ringing for Rachel as she has the highest priority.
Everyone in Priority Order
This strategy first distributes the activity to all the users with the highest priority at once. If they are available, it will ring there until Wait time runs out or all agents reject the activity.
If there are no agents with the highest priority available or if no one in the group answers the activity, it will be distributed to all users of the next priority group.
If there are no agents with the next priority available or if no one in the group answers the activity, it will be distributed to all users of the next priority group in line, regardless of any agents that have become available in higher priorities.
If the activity is not answered even in the group with the lowest priority, distribution will start again from step 1.
.png?inst-v=0a276977-36e9-4a42-9759-075d5bd000f6)
Example 1:
All agents are available.
An activity comes in via the queue and starts ringing for Rachel and Paul. Neither of them answer and Wait time runs out.
The activity starts ringing for Tom and Sophie as they have the next priority. They reject the activity.
The activity starts ringing for Julia and Terry as they have the next priority. They reject the activity.
The activity goes back to Rachel and Paul – the distribution starts again from the beginning.
Example 2:
Everyone but Julia is chatting to customers.
An activity comes in via the queue and starts ringing for Julia. As it's ringing, Tom's and Sophie's activities end. Julia doesn't answer and Wait time runs out.
Because Julia is in the lowest priority, the activity goes back to the beginning, but Rachel and Paul are busy, so it starts ringing for Tom and Sophie. They don't answer and Wait time runs out.
The activity goes back to Julia as she is the only agent available in the next priority group.
Least Recent
This strategy first distributes the activity to an available agent with the highest priority.
If there are several agents that have the highest available priority, the one with the longest time since closing their last activity will be selected. If that is the same as well, the agent that has been logged in to the queue longest will be selected.
If there are no agents available or if the activity is rejected or not answered before Wait time runs out, it will go to another agent
with higher priority if they become available while the activity is ringing.
with the same priority.
with lower priority if there are no agents with the same or higher priority available.
If an agent is the last available one with the highest priority and they reject or don't answer an activity, it will be distributed to them again straight away (unless Automatic pause is turned on).
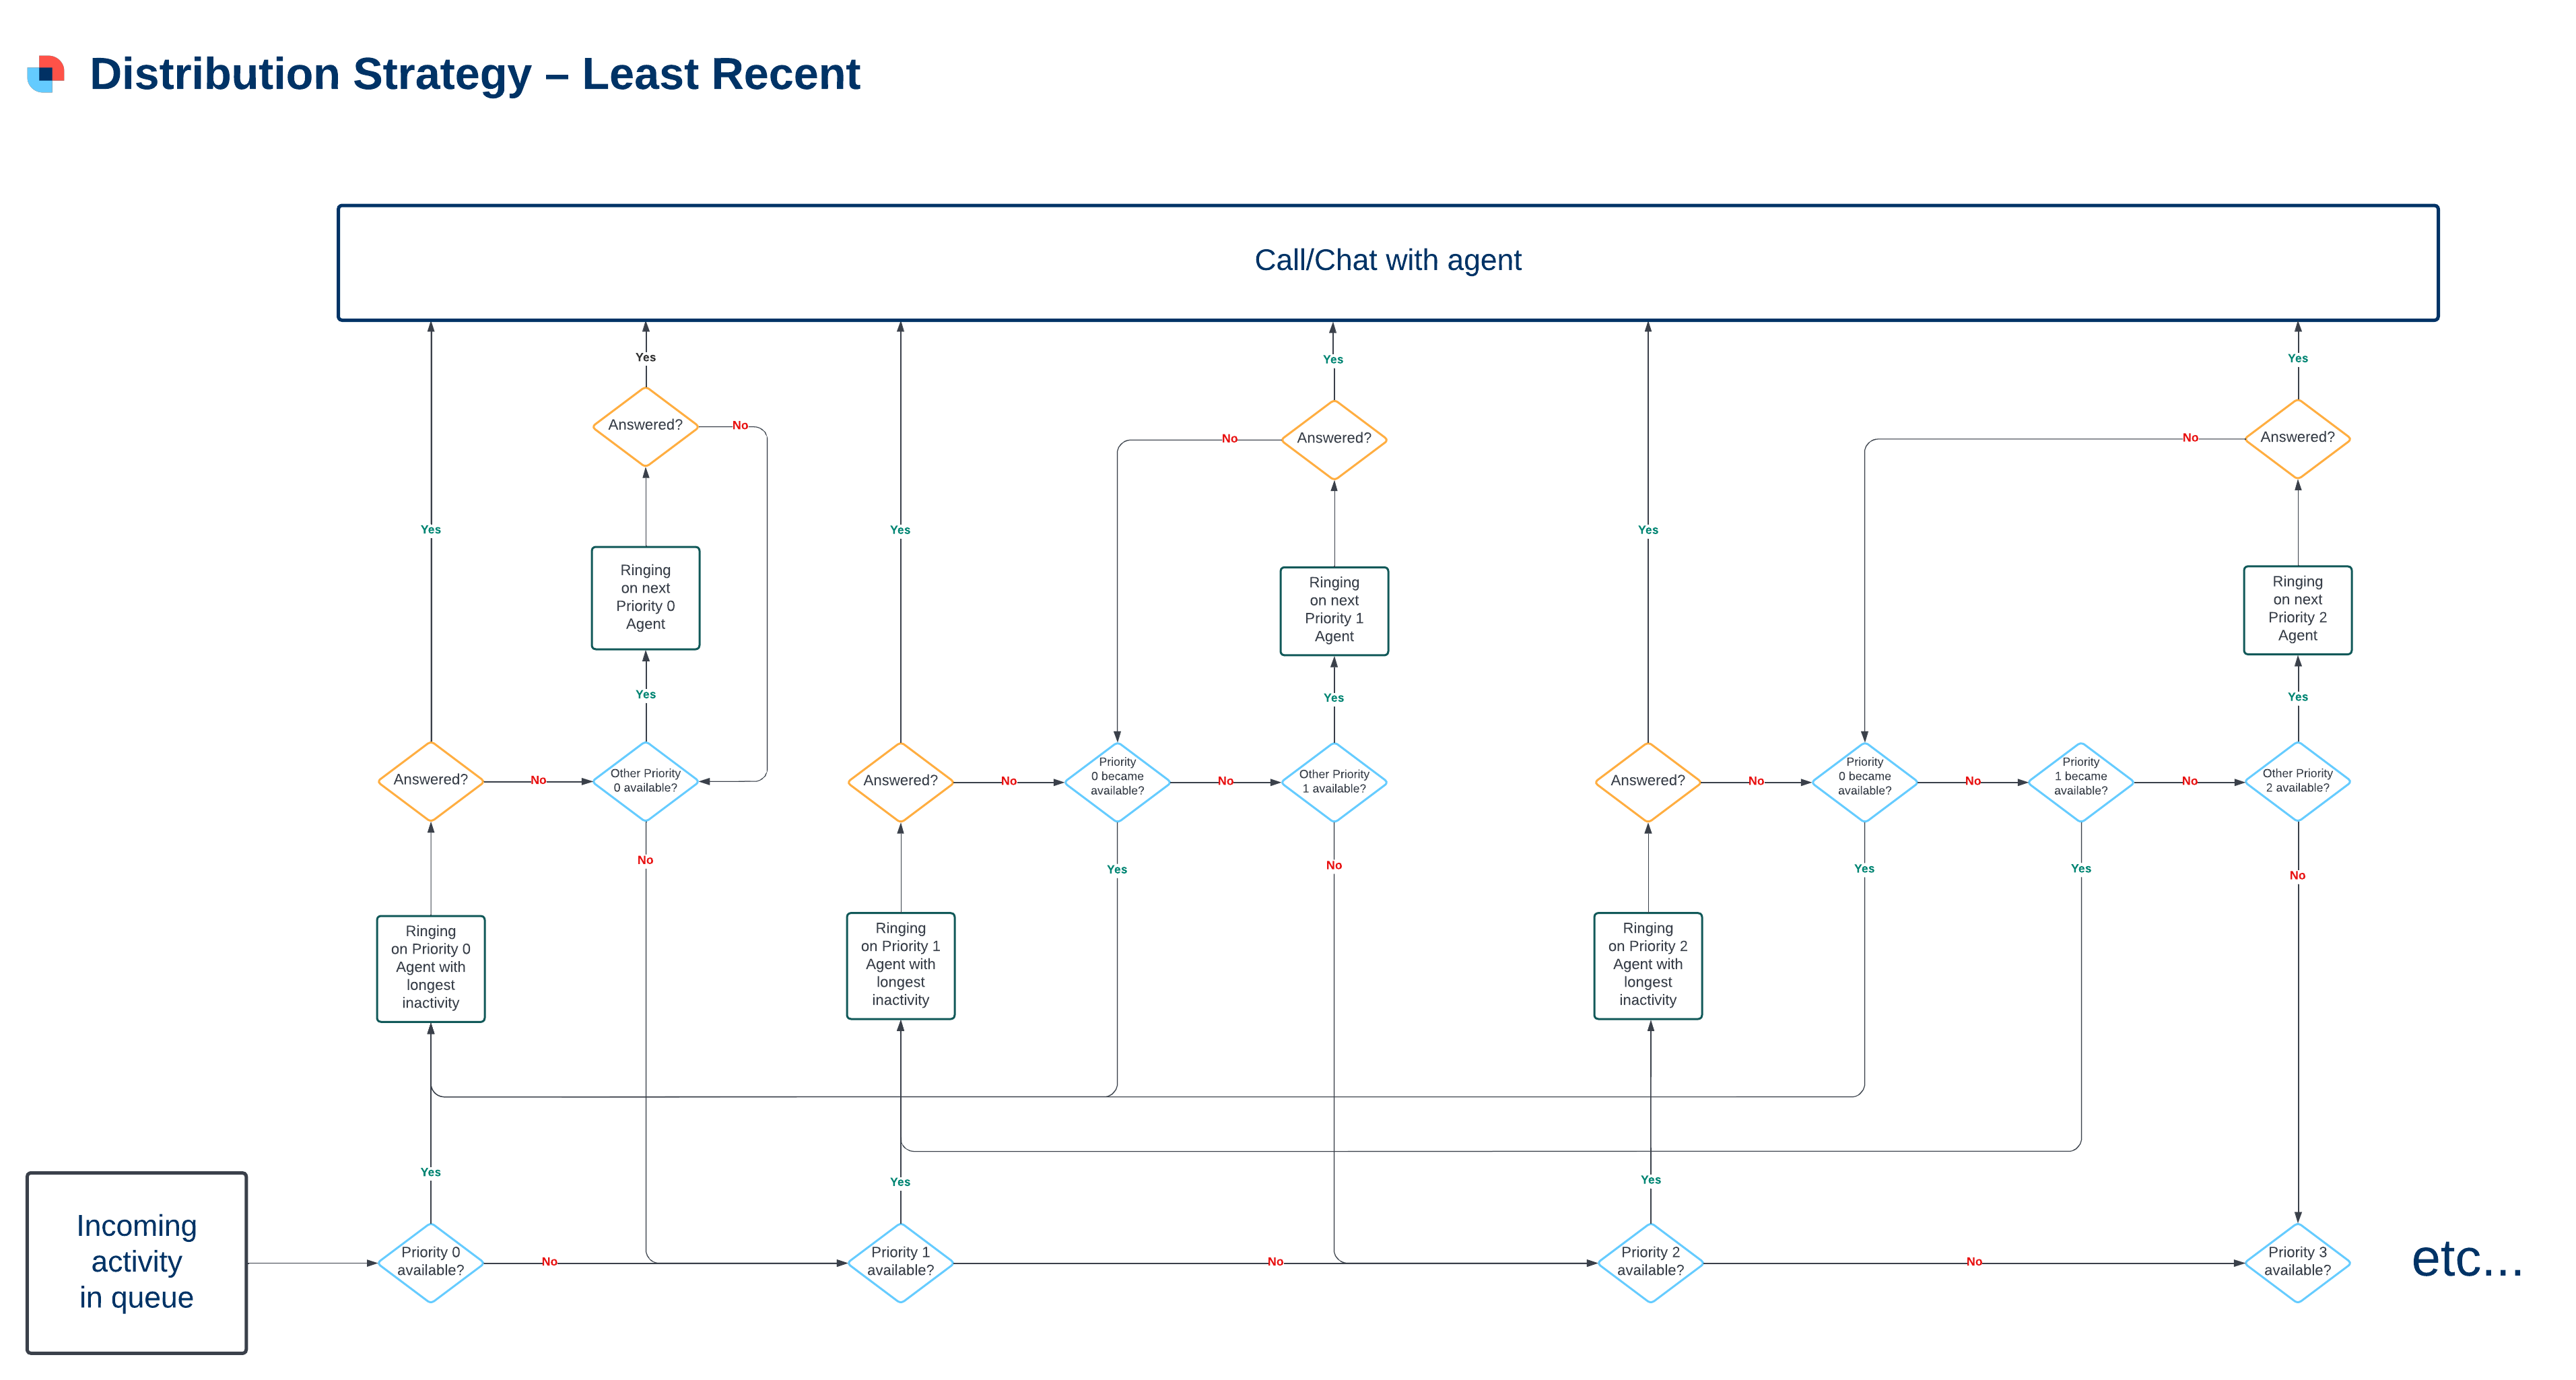
Example 1:
All agents are available.
An activity comes in via the queue and starts ringing for Rachel. She doesn't answer and Wait time runs out.
The activity goes to Paul. He doesn't answer and Wait time runs out.
The activity goes back to Rachel. She doesn't answer and Wait time runs out.
The activity goes back to Paul.
Unless both Paul and Rachel Go Unready or start a pause, the activity will never go to a lower priority.
Example 2:
Everyone but Julia is chatting to customers. Automatic pause is turned on in the queue, meaning that if an agent doesn't answer an activity, they will be put on an unpaid pause.
An activity comes in via the queue and starts ringing for Julia. As it's ringing, Tom's, Sophie's and Rachel's activities end (in that order). Julia doesn't answer and Wait time runs out – she is put on an unpaid pause.
The activity goes to Rachel because she has the highest priority. She doesn't answer and Wait time runs out – she is put on an unpaid pause.
Paul is still busy, so the activity proceeds to the next priority.
The activity goes to Tom as he has been inactive longer than Sophie.
Random in Priority Order
This strategy first distributes the activity to a random available agent with the highest priority to whom the activity has not yet been distributed.
If the activity is rejected or not answered before Wait time runs out, it will go to another agent to whom the activity has not yet been distributed
with the same priority.
with lower priority if there are no agents with the same priority available.
Once the activity has been distributed to all agents in all priority groups and no one has answered, the process begins again from step 1.
.png?inst-v=0a276977-36e9-4a42-9759-075d5bd000f6)
Example 1:
All agents are available.
An activity comes in via the queue and starts ringing for Rachel. She doesn't answer and Wait time runs out.
The activity goes to Paul. He doesn't answer and Wait time runs out.
The activity goes to the next priority group, to a random agent –Tom. He doesn't answer and Wait time runs out.
The activity goes to Sophie. She rejects it.
The activity goes to the next priority group, to a random agent – Julia. She doesn't answer and Wait time runs out.
The activity goes to Terry. He rejects it.
The process starts again from step 1.
Example 2:
Everyone but Julia is chatting to customers.
An activity comes in via the queue and starts ringing for Julia. As it's ringing, Tom's, Sophie's and Rachel's activities end. Julia doesn't answer and Wait time runs out.
Julia was the only available agent in the lowest priority – the activity will go to Rachel (Paul is still busy). She doesn't answer and Wait time runs out.
The activity goes to the next priority – first to Tom, then Sophie. They both don't answer.
The activity goes back to Julia.
Open more settings using the Extended button in the top right corner.
To make your queue work correctly:
After you are done creating your CTC queue, don't forget to make it the destination of one of your CTC routings.
Forms
For CTC to work correctly, the number field in the CTC widget on the customer's side must be paired with a field in the record type form that is used to call the customer back. This is done by selecting the record type form field in the Number input setting of the queue.
Create a record form in Manage → Record types
It must contain at least one field of the Phone type.
Pair the Record type with the current queue by selecting it while creating the Record type or by clicking Form in the Queue list in the Relations column and selecting it from the list.
Select one of the Phone fields in the dropdown list in Number input.
Custom Inputs
If you want your customers to enter more data than just a phone number, you can set up fields for this purpose here.
Set them up in the same way as in Forms above. Enter a Custom title (visible to customer) and decide if filling out the custom input is mandatory using the toggle switch.
Save your queue.
Tip
Don't forget to set up:
which Agents can use the queue.
the queue's relations.
the queue's widget scheme.
See Queues for instructions.