Web Chat Routings
Set the up the look and feel of your web chat and manage its behaviour during and outside business hours.
Inbound Routings/Connectors
It is recommended to first create a corresponding web chat queue before creating a routing/connector so you can pair them in the routing/connector. You can however set up several routings'/connectors' destinations at the same web chat queue.
Go to Manage → Routings → Web chats. You will see a list of your inbound routings/connectors. Each routing/connector corresponds to a separate web chat.
You can view a diagram tree of each routing/connector by clicking the grey Tree button in the Actions column.
Click the Title of a routing/connector to open its details or click Add new to create a new routing/connector. The routing/connector details will open.
When you are done creating or editing a routing/connector, click Save to return to the routing overview and make sure to click the Apply configuration changes button in the top right corner.

It will take a few minutes for the changes to take effect on your website. If you want to see them immediately, open your website in a new incognito mode window.
When you set up a new web chat routing/connector, click the blue Get code button at the top of the Preview section in the routing/connector details, copy the code and paste it into your web page.

For further customisation, use the toggle switches under Default values and Events to insert script templates into the code.
To follow these instructions, you must already have the Google Tag Manager code installed on your website. If you don't, follow the Google documentation first.
Log in to your Google Tag Manager, open Workspace and click Add a new tag.
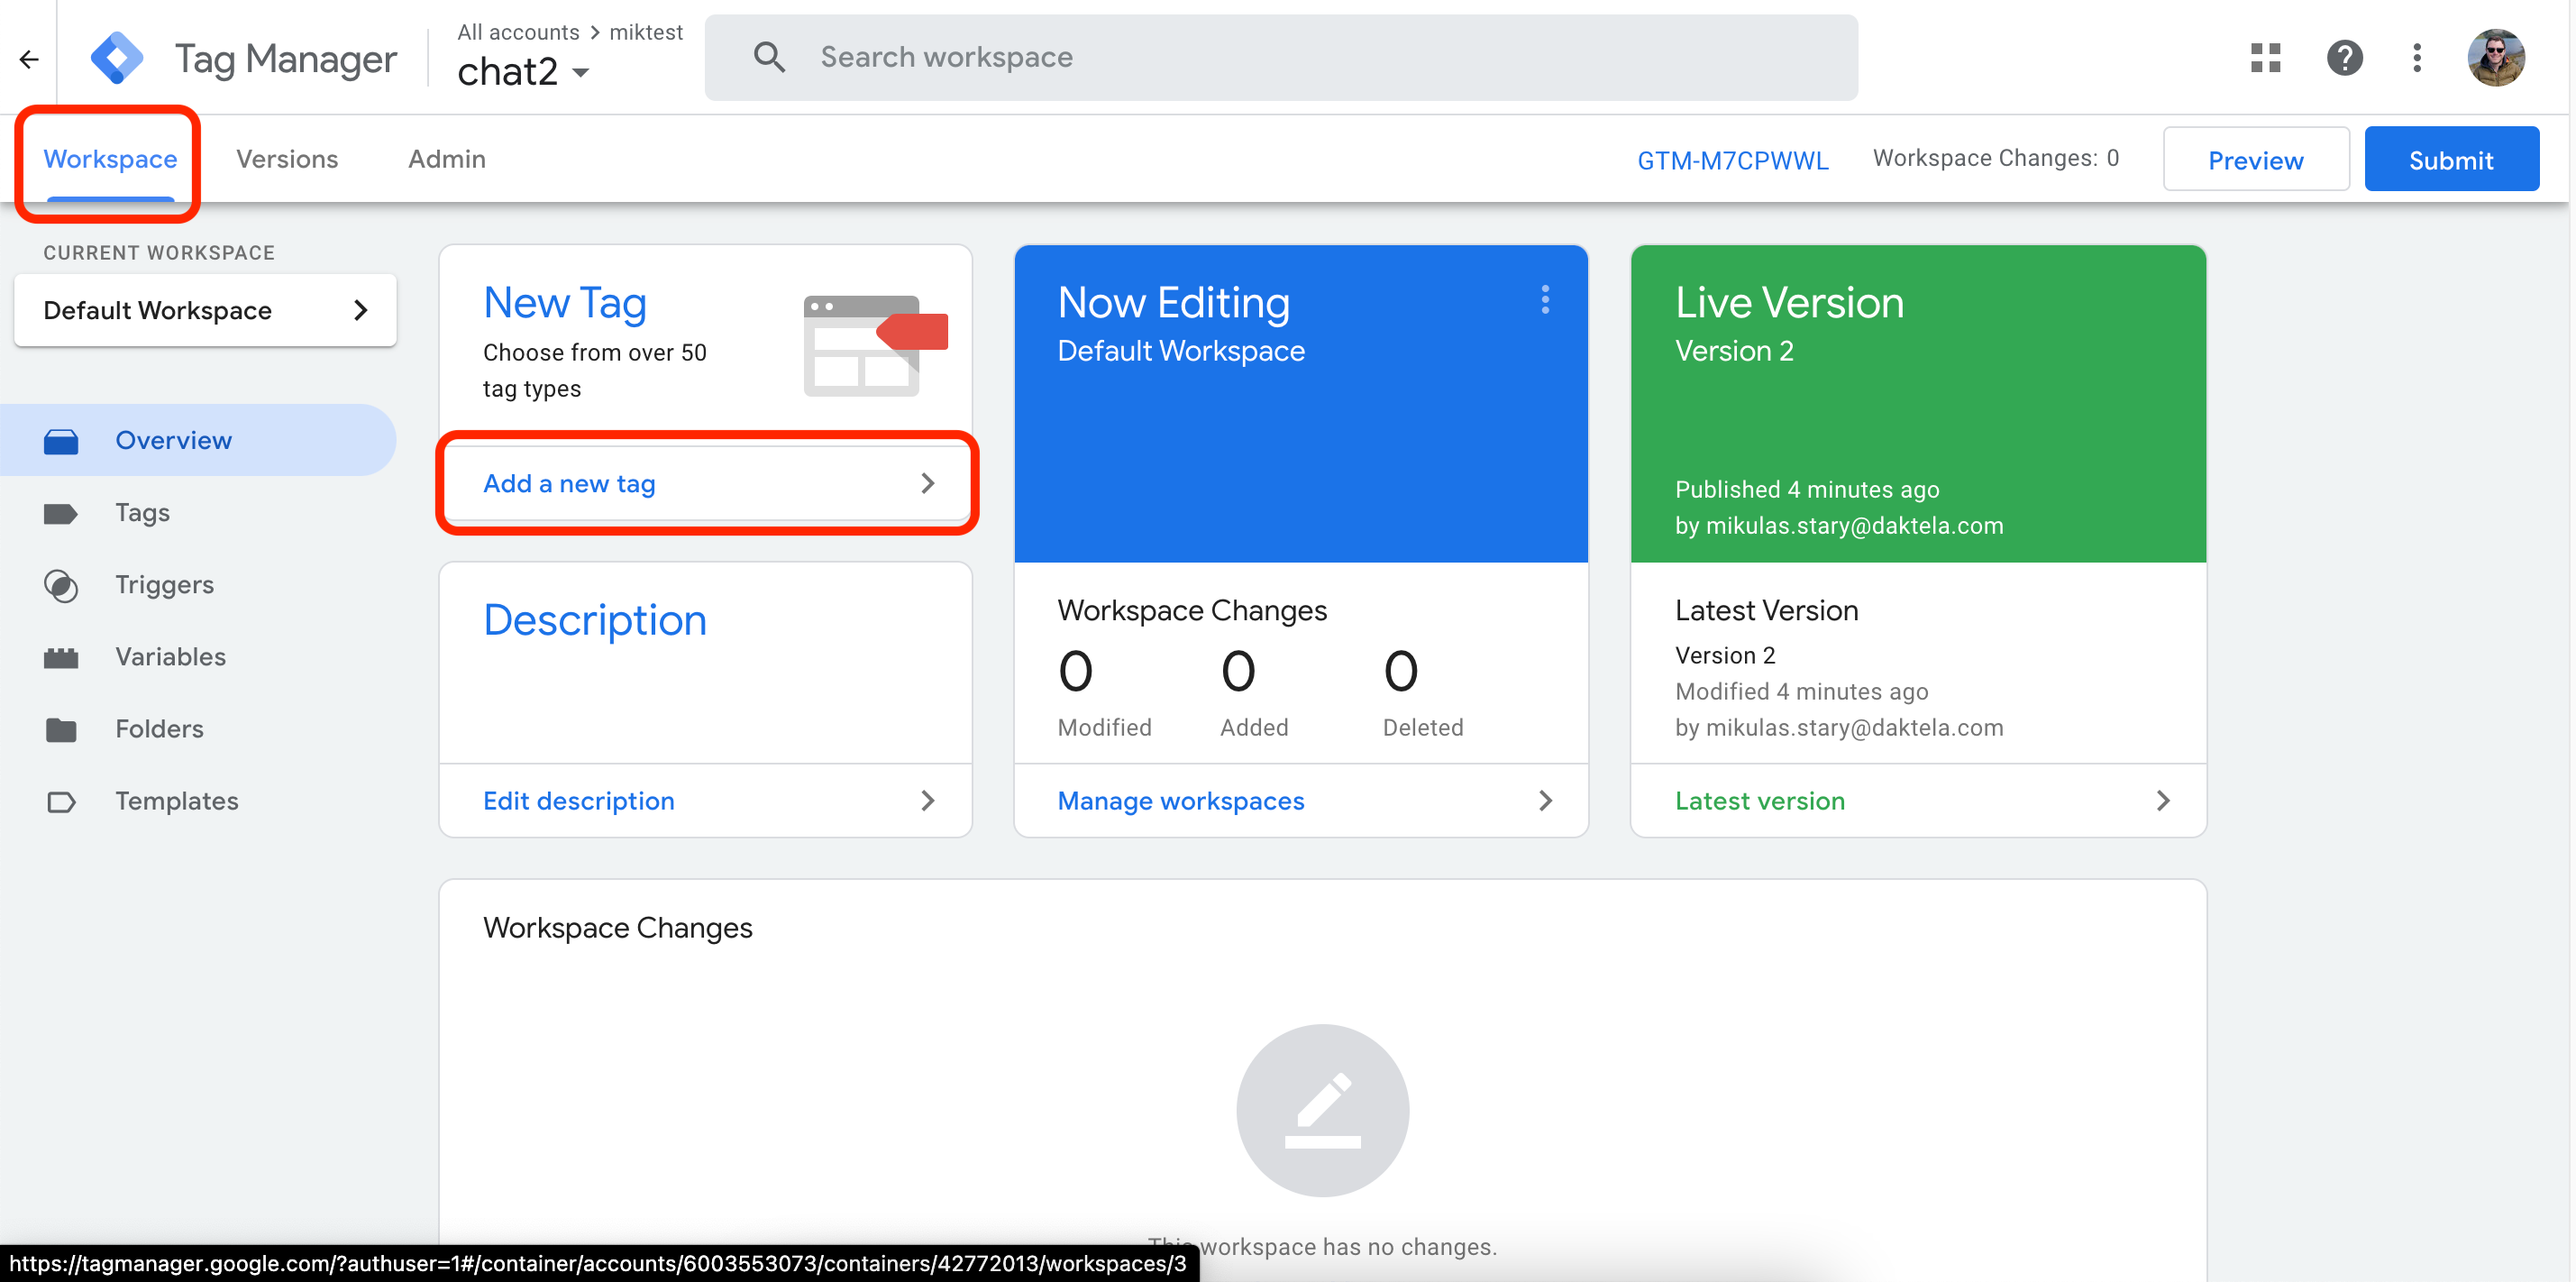
Enter a tag name, then click Tag Configuration.
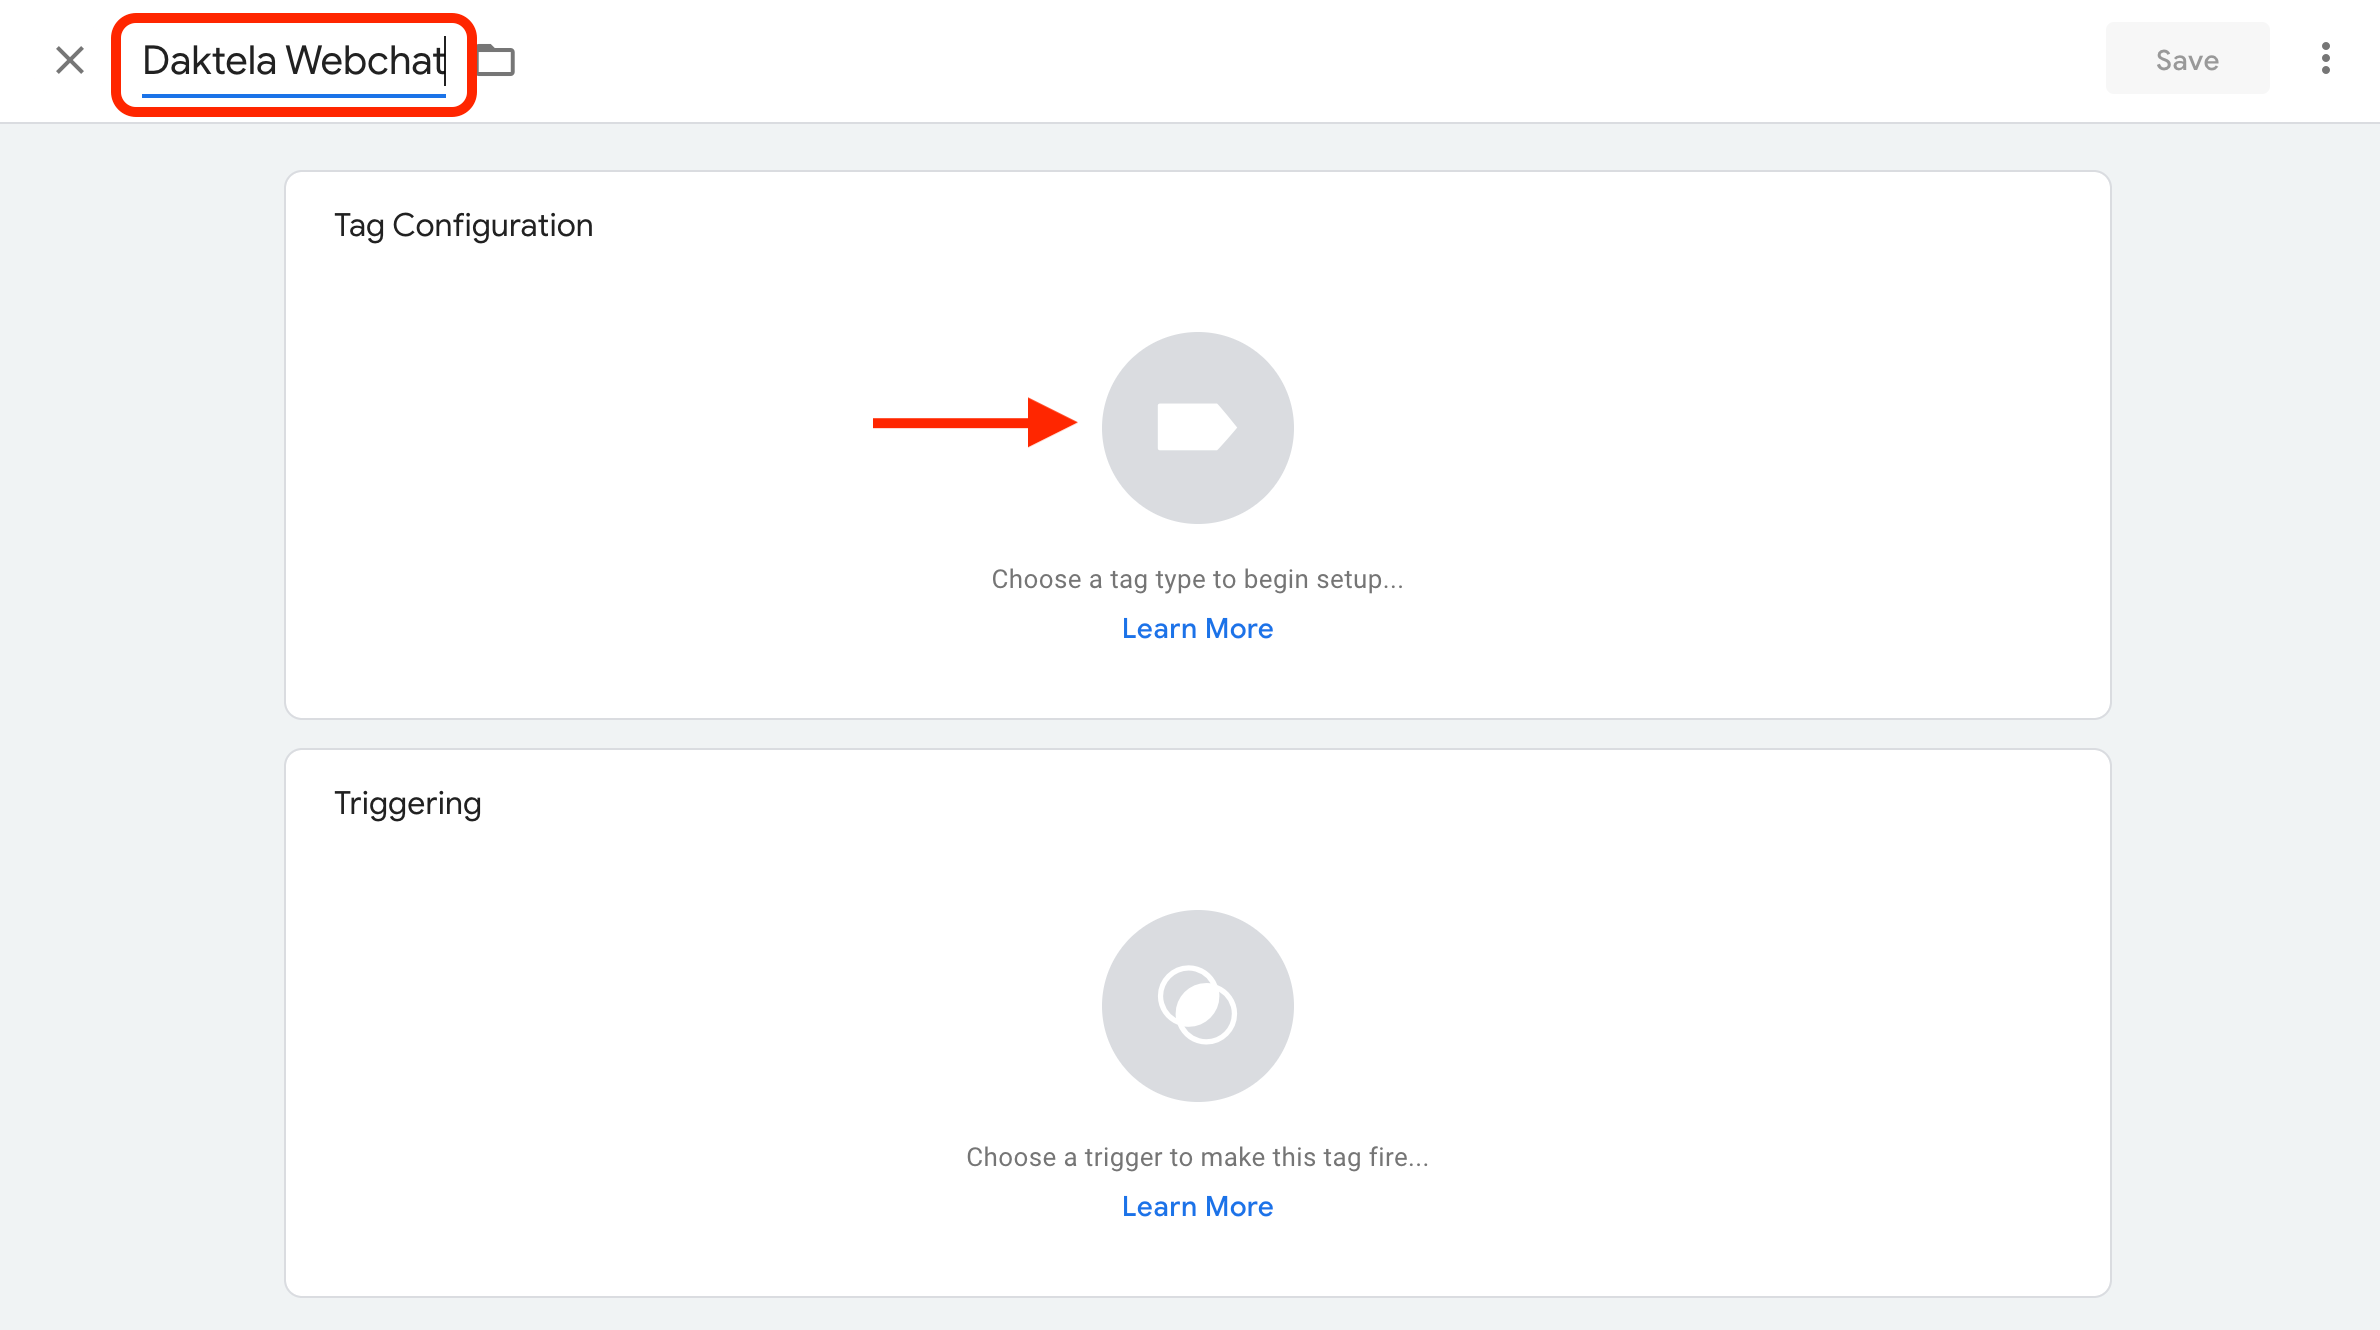
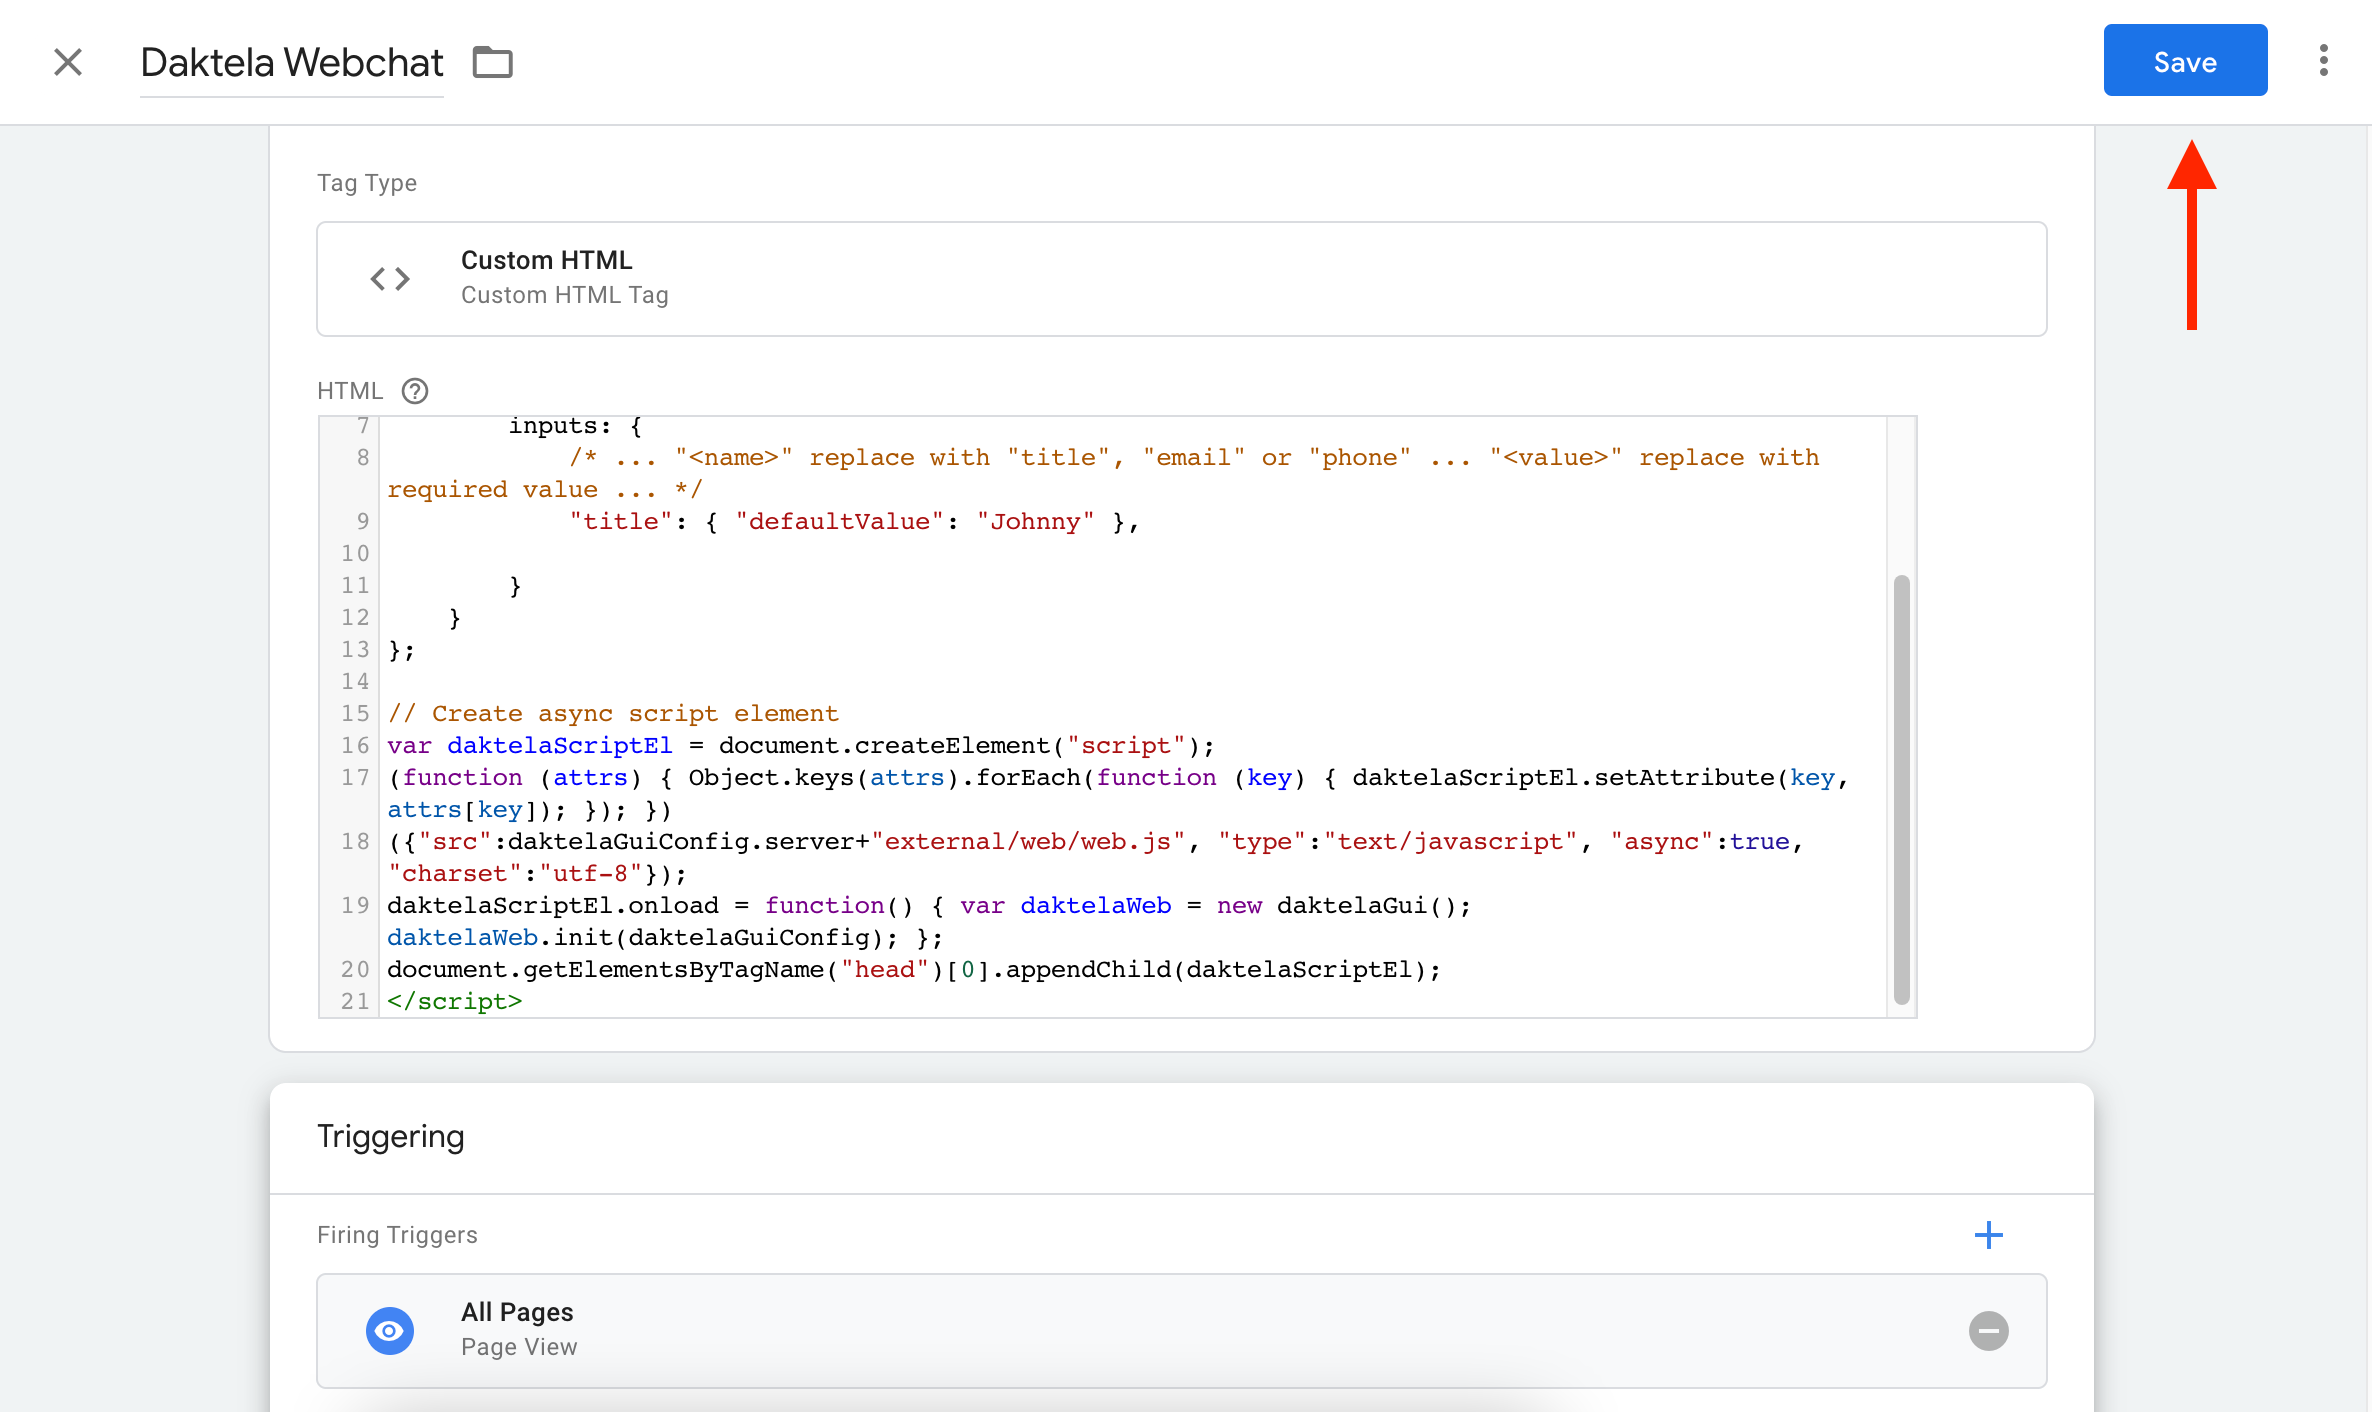
Select Custom HTML.

Paste the web chat code from Daktela into the HTML field.
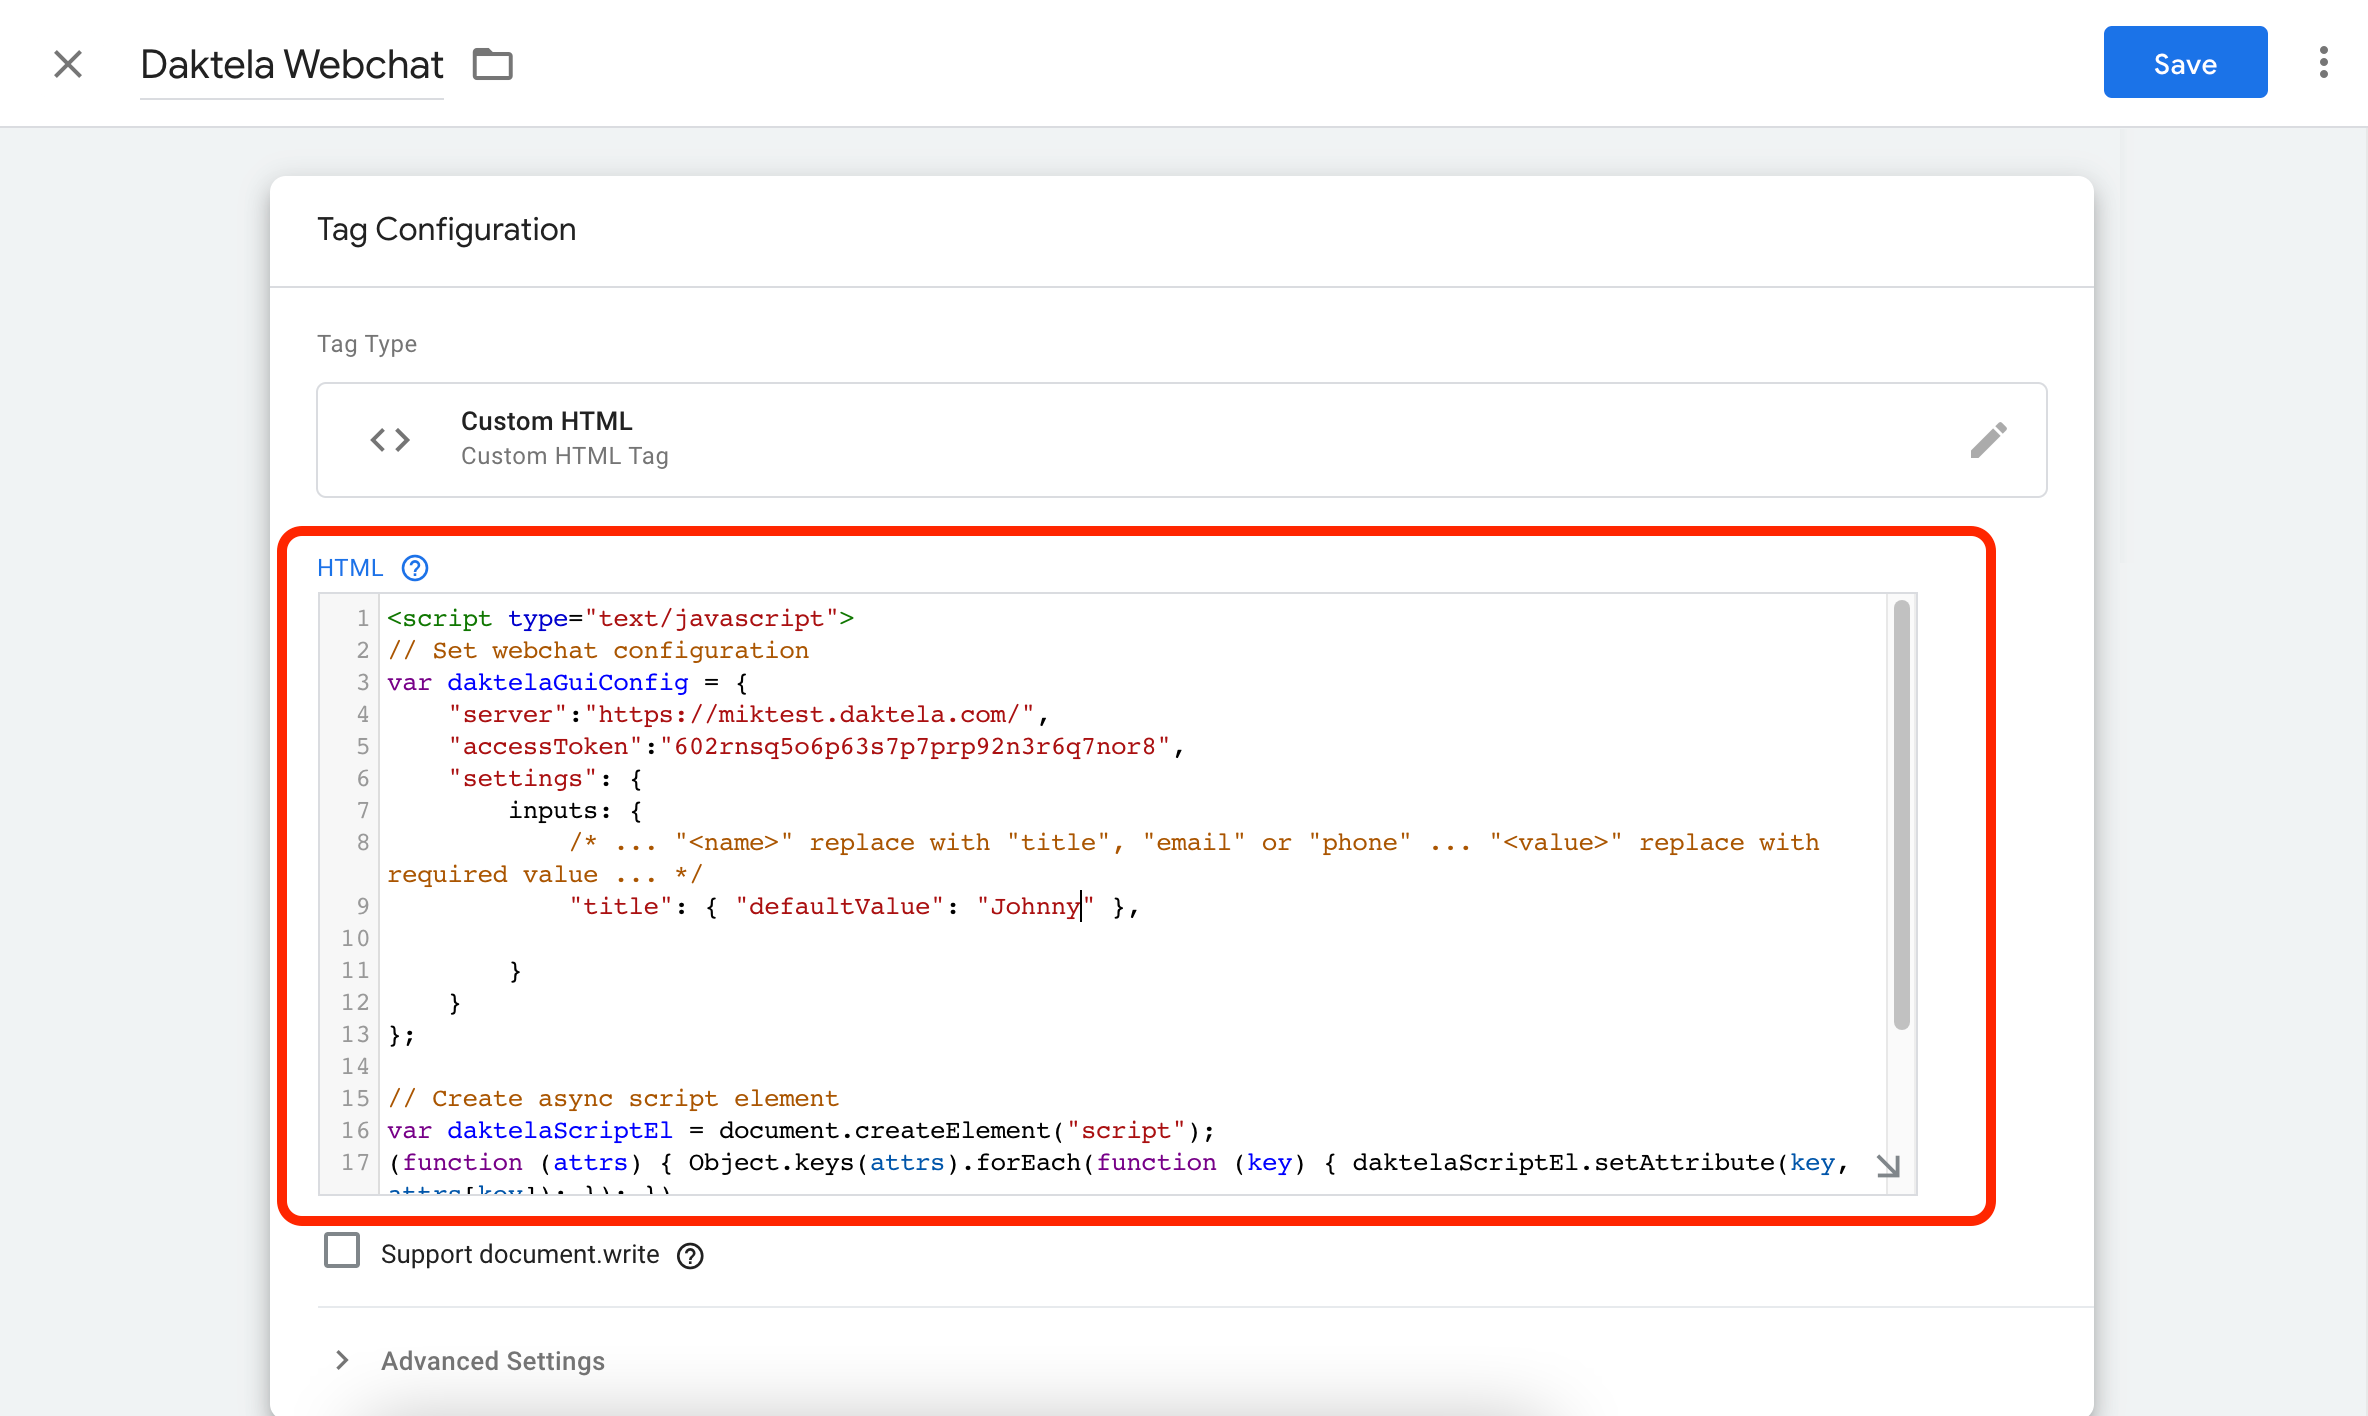
Open Triggering.
Select All pages if you want to display it everywhere on your website.

Click Save.
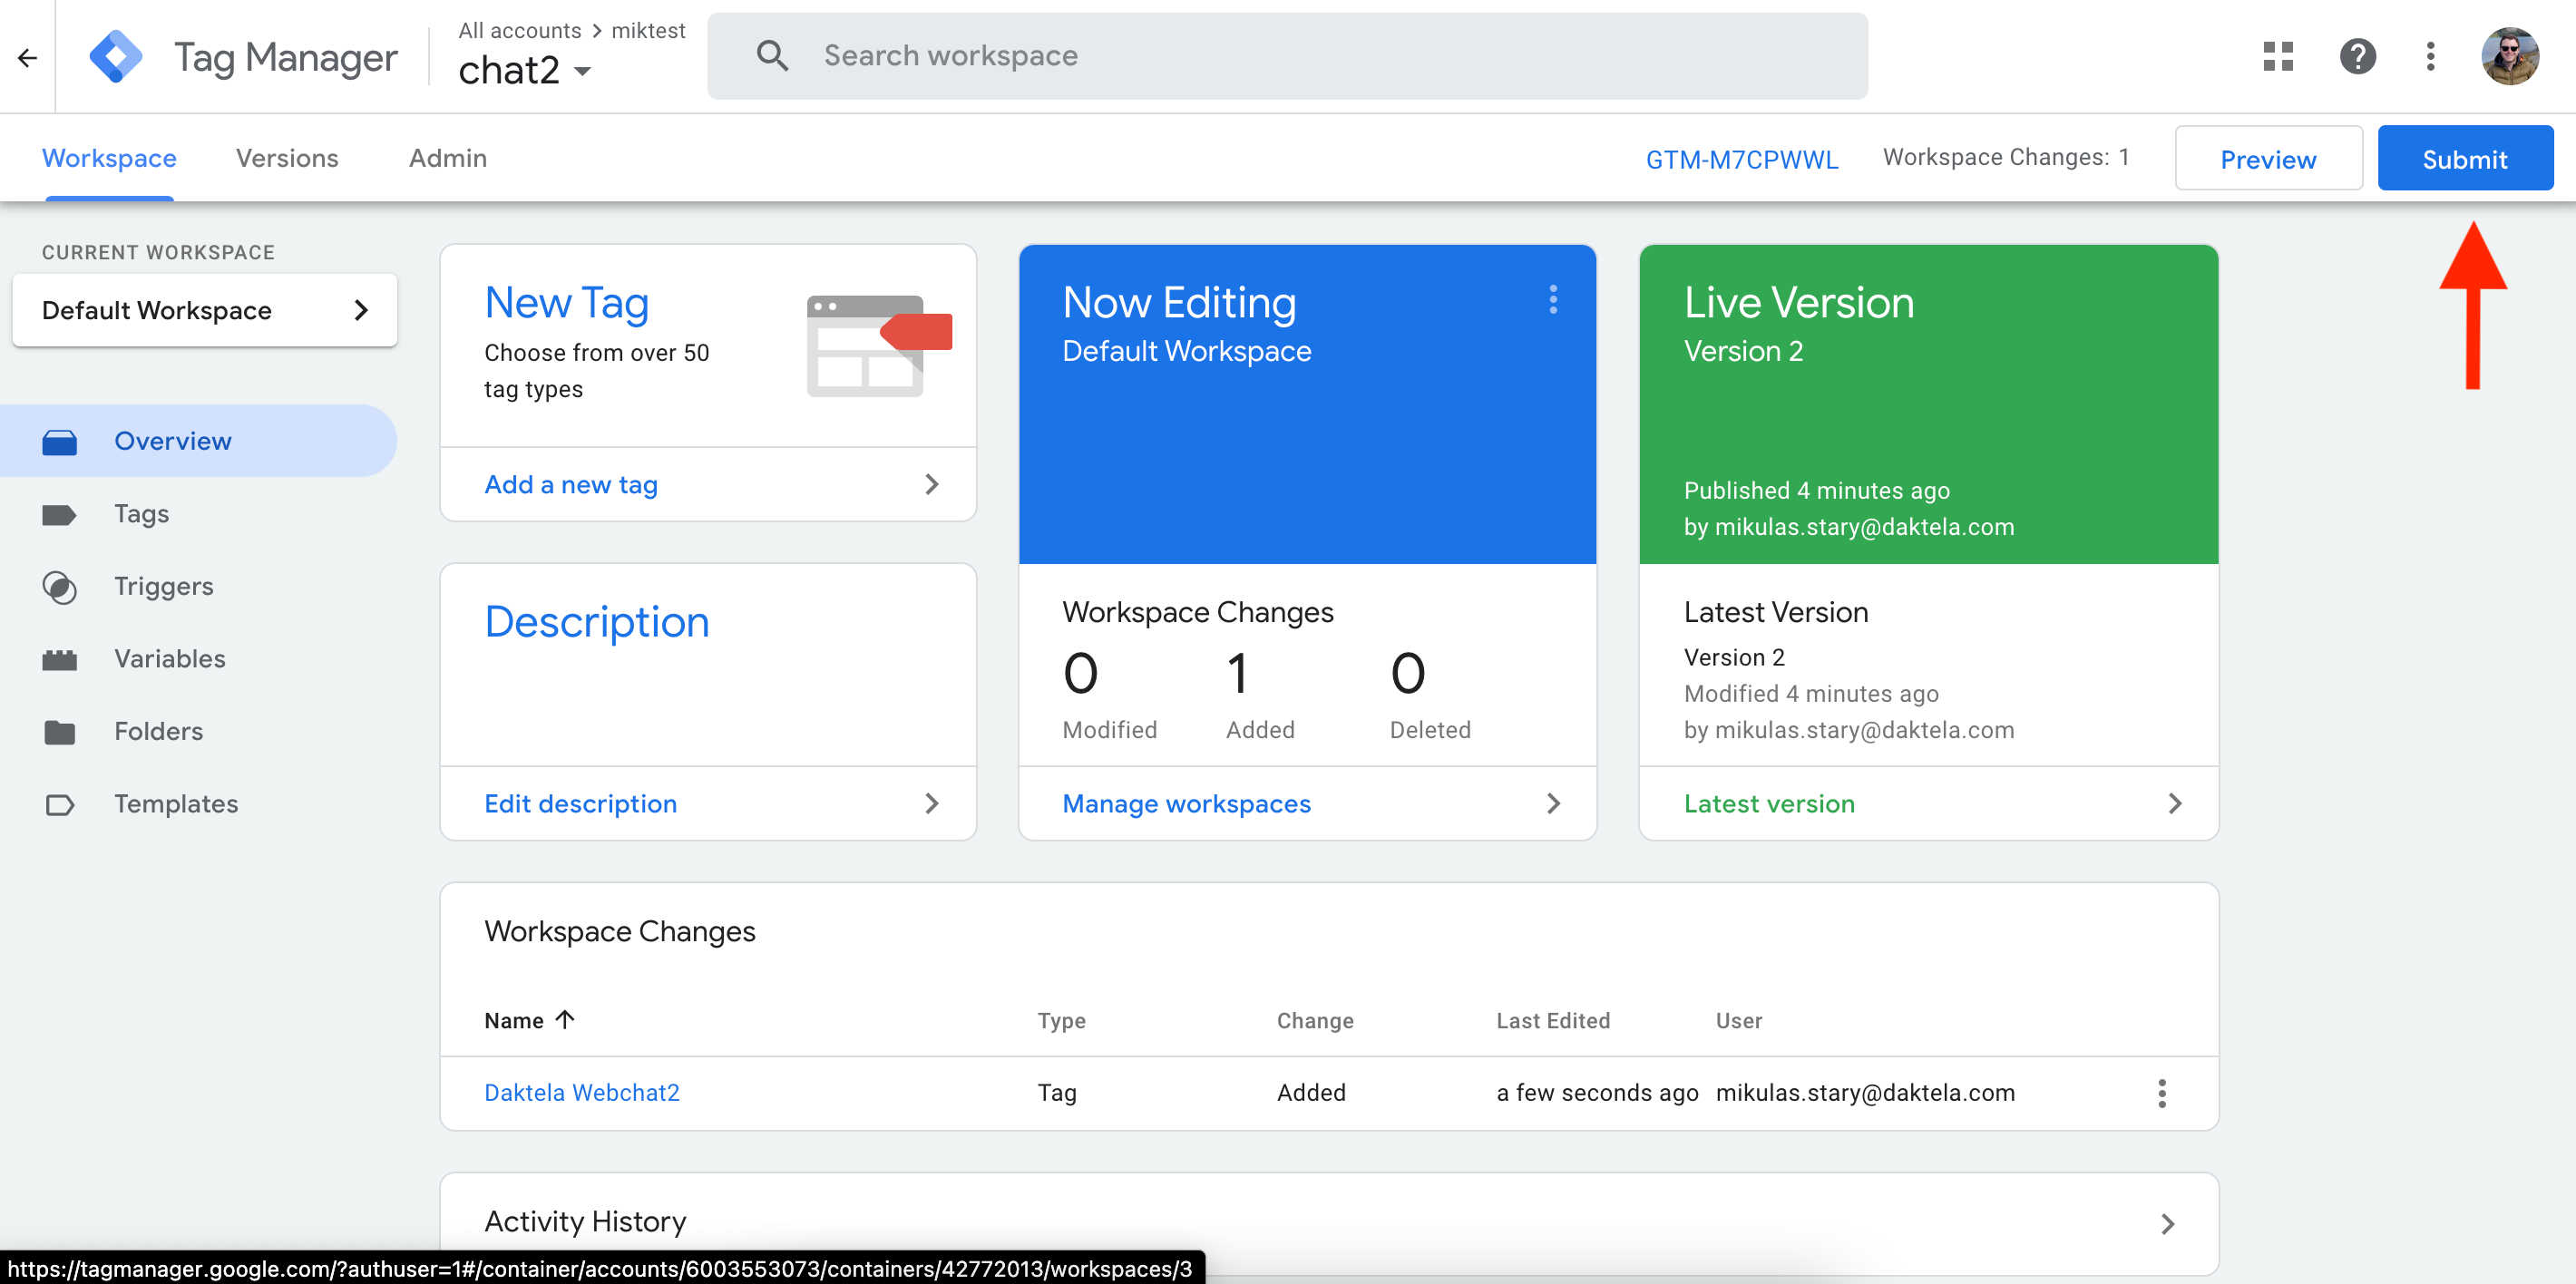
Click Submit.
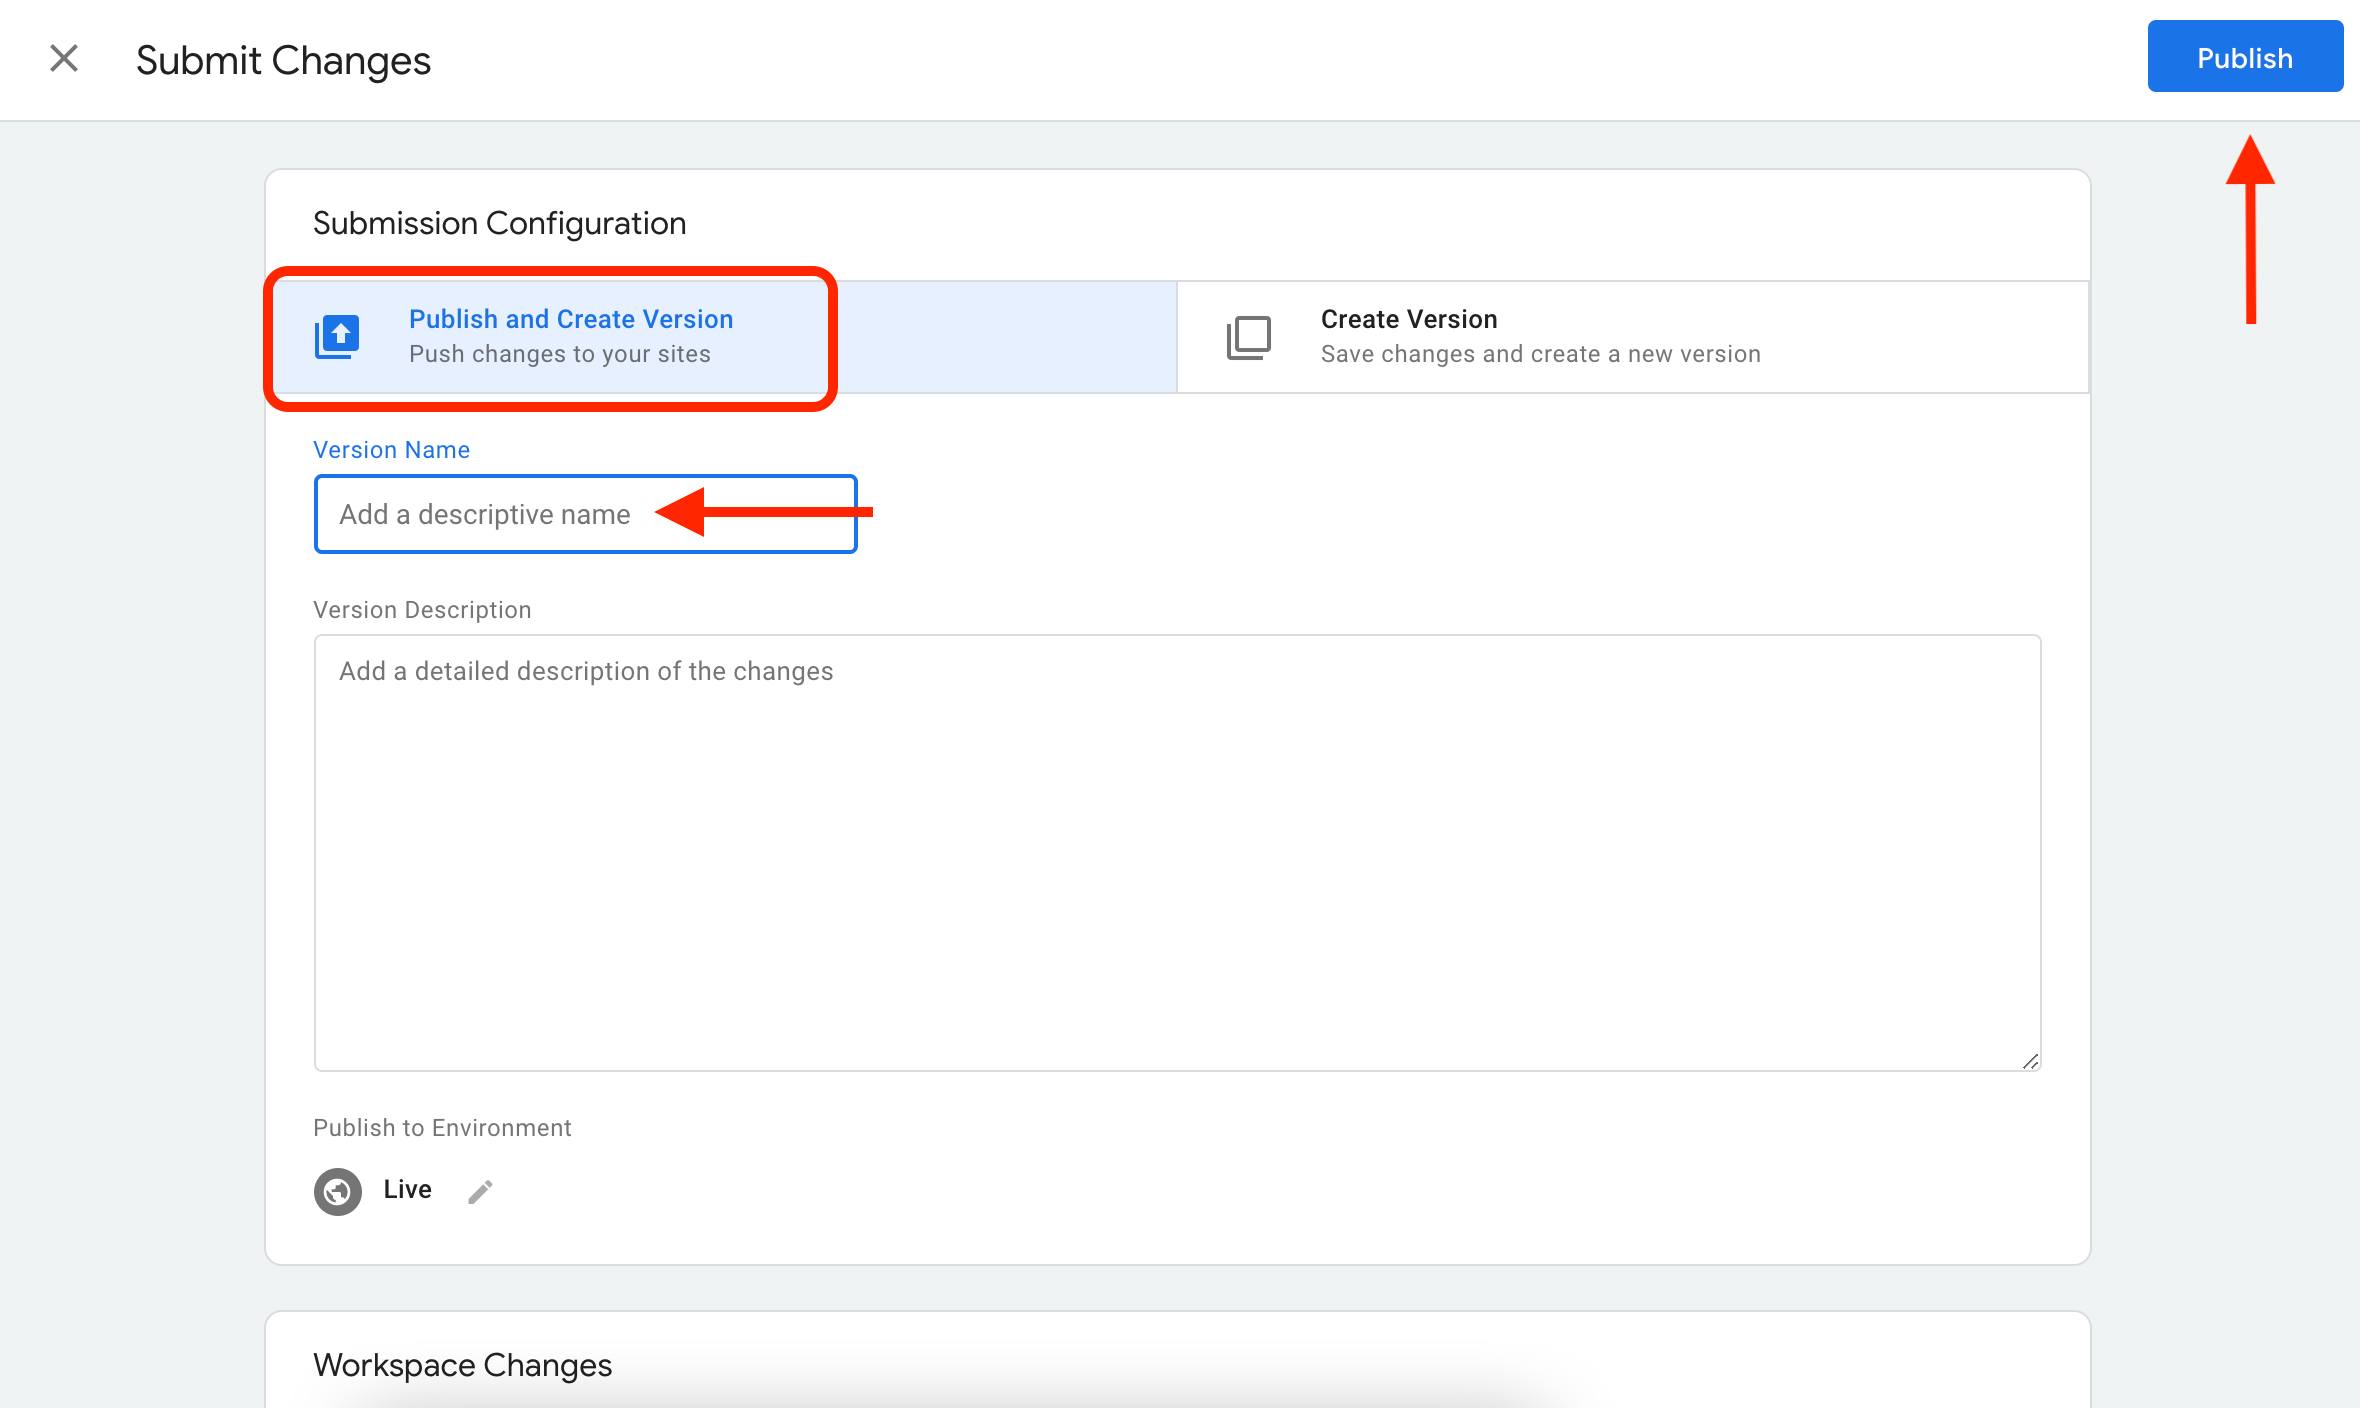
Select Publish and Create Version, enter a Version Name and click Publish.
General Settings
Title: enter a title.
Description : enter a description.
Language: select your web chat language.
NPS survey template: select a Net Promoter Score survey template. If you wish to use a NPS survey and have not created a template yet, you can come back and select it later.
CTC queues: select a Click-To-Call queue to use with your web chat. If you wish to use CTC and have not created a queue yet, you can come back and select it later. Make sure your CTC queue is active!
If you want to use click-to-call without a web chat, go to Click-to-Call Routings.
Next destination: select where the web chat will be routed.
You can select:
Automessages. Send an automatic message to your customer or offer to switch to click-to-call.
Terminate. The chat will be offline – select which Terminate option to use.
Queue. Select which queue the web chat will be routed to.
Time condition. Decide where the chat will be routed depending on the date/time.
Decision tree. Route the chat to a chat bot.
Client Settings
Set up web chat behaviour.
You can see a preview of your web chat on the right hand side as you edit different settings.
Send previous URLs: see which URLs the customer visited before they got the page with the chat.
Send URL changes: see any changes in URL while the chat is running.
Send draft message: the agent will see customer messages as they are typed, before the customer sends them. Do not enable this if you have not legally resolved displaying client's unsent messages!
Allow sending of transcript: the customer can request a transcript of the web chat.
Clean chat on client: chat data will be removed from the client if the chat is terminated and the customer refreshes/displays the page after the selected time.
Allow file uploads: choose whether to allow uploads from customer, from agent, both directions or to disallow altogether.
Agreement input: choose whether to display an agreement checkbox and whether checking it is mandatory before starting the web chat.
Agreement text: create your own agreement text. If left empty, the text will be "By submitting this form, you agree to the conditions of personal data processing."
Welcome message online: create your own welcome message for when you are online. If left empty, the message will be "To start the chat, enter your contact information."
Welcome message offline: create your own welcome message for when you are offline. If left empty, the message will be "We are not online at the moment, please leave us a message."
Welcome message busy: Create your own welcome message for when you are busy. The default message is "We are busy at the moment but we will respond shortly. Please enter your contact information."
Window timeout: choose if you want your chat to stay closed (the customer needs to click it to open it), to open immediately when the customer reaches your website or to open with a certain delay.
Hide on mobile device: choose whether to display the chat on mobile devices.
Hide in offline: choose whether to display the chat when you are offline. If displayed, customers can send you a message that you can answer later– in this case we recommend to make email input mandatory (see below) so you have a way of getting back to the customer. Select Hide only chat to display click-to-call only (if using).
Behaviour in overload: choose how the chat should be displayed when no agents are available.
Hide in overload: choose whether to display the chat when no agents are available. Select Hide only chat to display click-to-call only (if using).
Client disconnection: Number of seconds after which the webchat will remain live when a connection is lost. From 60 to 3600 seconds.
Allowed numbers: Enter a regular expression for phone numbers that the customer can enter into the form.
Design
Set up how your web chat will look.
Html holder: The html element CSS selector where the chat will be placed. If left empty, BODY will be used.
Window design: select a design. Only one default design is available. Use the blue + button to create your own design.
Enter your new design title.
You can add CSS styles or change translations directly in the Create new design window (see the tooltips directly in Daktela to guide you).
If you want to change whole files, first save your new design and reopen it by clicking the blue drop down button and selecting Update. Download the Translation, Template, Style and/or Script files, edit them to suit your needs, and re-upload them.
A disadvantage of using custom design files in your template designs is that any changes made in a Daktela upgrade will not be applied, meaning that new functionalities, potential bug fixes and other changes to the web chat logic will not be applied. When using own files, it is necessary to manually check the differences in the old and new version of the template after an upgrade. If you are able to achieve your design using CSS, we recommend using the Add styles field rather than using Custom files.
Button type: select Bookmark (minimised chat) or Icon (small and round).
Window position: left or right.
Widow tint: select your preferred design – see the changes in the preview window.
Window rounding: 0 = square, 50 = max. rounding.
Window shadow: 0 = no shadow, 50 = max. shadow.
Window colour: select a colour from the palette or enter a hex code.
Allow font: select No to use your website's font in the chat.
Automessages
Route your web chat to automessages if you want to send customers messages or offer them to switch to click-to-call while they are waiting in a queue to be connected with an agent.
To set up automatic messages, go to Manage → Routings → Web chats → Automessages. You will see an overview of your automessages.
You can view a diagram tree of each automessage by clicking the grey tree button in the Actions column.
Click the Title of an automessage to open its details or click Add new to create a new automessage. The automessage details will open.
When you are done creating or editing an automesaage, click Save to return to the automessage overview and make sure to click the Apply configuration changes button in the top right corner.
It will take a few minutes for the changes to take effect on your website. If you want to see them immediately, open your website in a new incognito mode window.
Sandbox
Set up your automessages in this column. If you are editing an automessage, you can compare your new settings to those currently in use in the Production column.
All fields are mandatory except Description and Text.
Fill out the Title and Description.
Next destination: select where the web chat should be routed next.
You can select:
Another automessage.
Terminate. The chat will end or be offline – select which Terminate option to use.
Queue. Select which queue the web chat will be routed to.
Time condition. Decide where the chat will be routed depending on the date/time.
Decision tree. Route the chat to a chat bot.
Message
Time: select the delay between when the chat is routed to the automessage and when the message is sent. The timer starts as soon as the chat is routed here – take this into account when setting up multiple messages (Time is not the interval between messages).
Type: select message to send an automatic message, select CTC to offer to switch to click-to-call. Enter your invitation in the Text field. The customer will be able to enter their phone number in the chat. If they do, the chat will end and the activity will be transferred to CTC.
Text: enter your message.
CTC queues: select which queue to use if the customer decides to switch to click-to-call. Only visible when CTC is selected under Type.
Time Conditions
To set up your business hours and bank holidays, go to Manage → Routings → Web chats → Time conditions. You will see an overview of your time conditions.
You can view a diagram tree of each time condition by clicking the grey tree button in the Actions column.
Click the Title of a time condition to open its details or click Add new to create a new time condition. The time condition details will open.
When you are done creating or editing a time condition, click Save to return to the time conditions overview and make sure to click the Apply configuration changes button in the top right corner.
It will take a few minutes for the changes to take effect on your website. If you want to see them immediately, open your website in a new incognito mode window.
Sandbox
Set up your time conditions in this column. If you are editing a time condition, you can compare your new settings to those currently in use in the Production column.
All fields are mandatory except Description.
Title: enter your time condition title. Select the title in Inbound routings/connectors to use the time condition in the routing/connector.
Description: enter a description.
Time group: select the Time group you would like to use from the drop down menu. You need to have at least one Time group set up to use Time conditions. You can also use the blue drop down menu to view or edit the selected time group or to create a new one – this will open Manage → Settings → Time groups.
If time matches: select what to do if the current day and time matches that of the time group.
You can select:
Automessages. Send an automatic message to your customer or offer to switch to click-to-call.
Terminate. The chat will end or be offline – select which Terminate option to use.
Queue. Select which queue the web chat will be routed to.
Another time condition (we recommend to set up your time groups in a way that you don't need to route from a time condition to another one).A Time condition. Select which time condition you want to route to.
Decision tree. Route the chat to a chat bot.
If time does not match: select what to do if the current day and time does NOT match that of the time group. The options are the same as above.
Decision Trees
Use decision trees to set up your web chatbot.
Go to Manage → Routings → Web chats → Decision trees. You will see an overview of your Decision trees.
You can view a diagram tree of each decision tree by clicking the grey tree button in the Actions column.
Click the Title of a decision tree to open its details or click Add new to create a new decision tree. The decision tree editor will open.
When you are done creating or editing a decision tree, click Save to return to the decision tree overview and make sure to click the Apply configuration changes button in the top right corner.
It will take a few minutes for the changes to take effect on your website. If you want to see them immediately, open your website in a new incognito mode window.
The decision tree editor will display a diagram of individual decisions. When creating a new decision tree, you will only see the first step, "Welcome message". Click a decision to select it, then click the edit button on the right hand side:
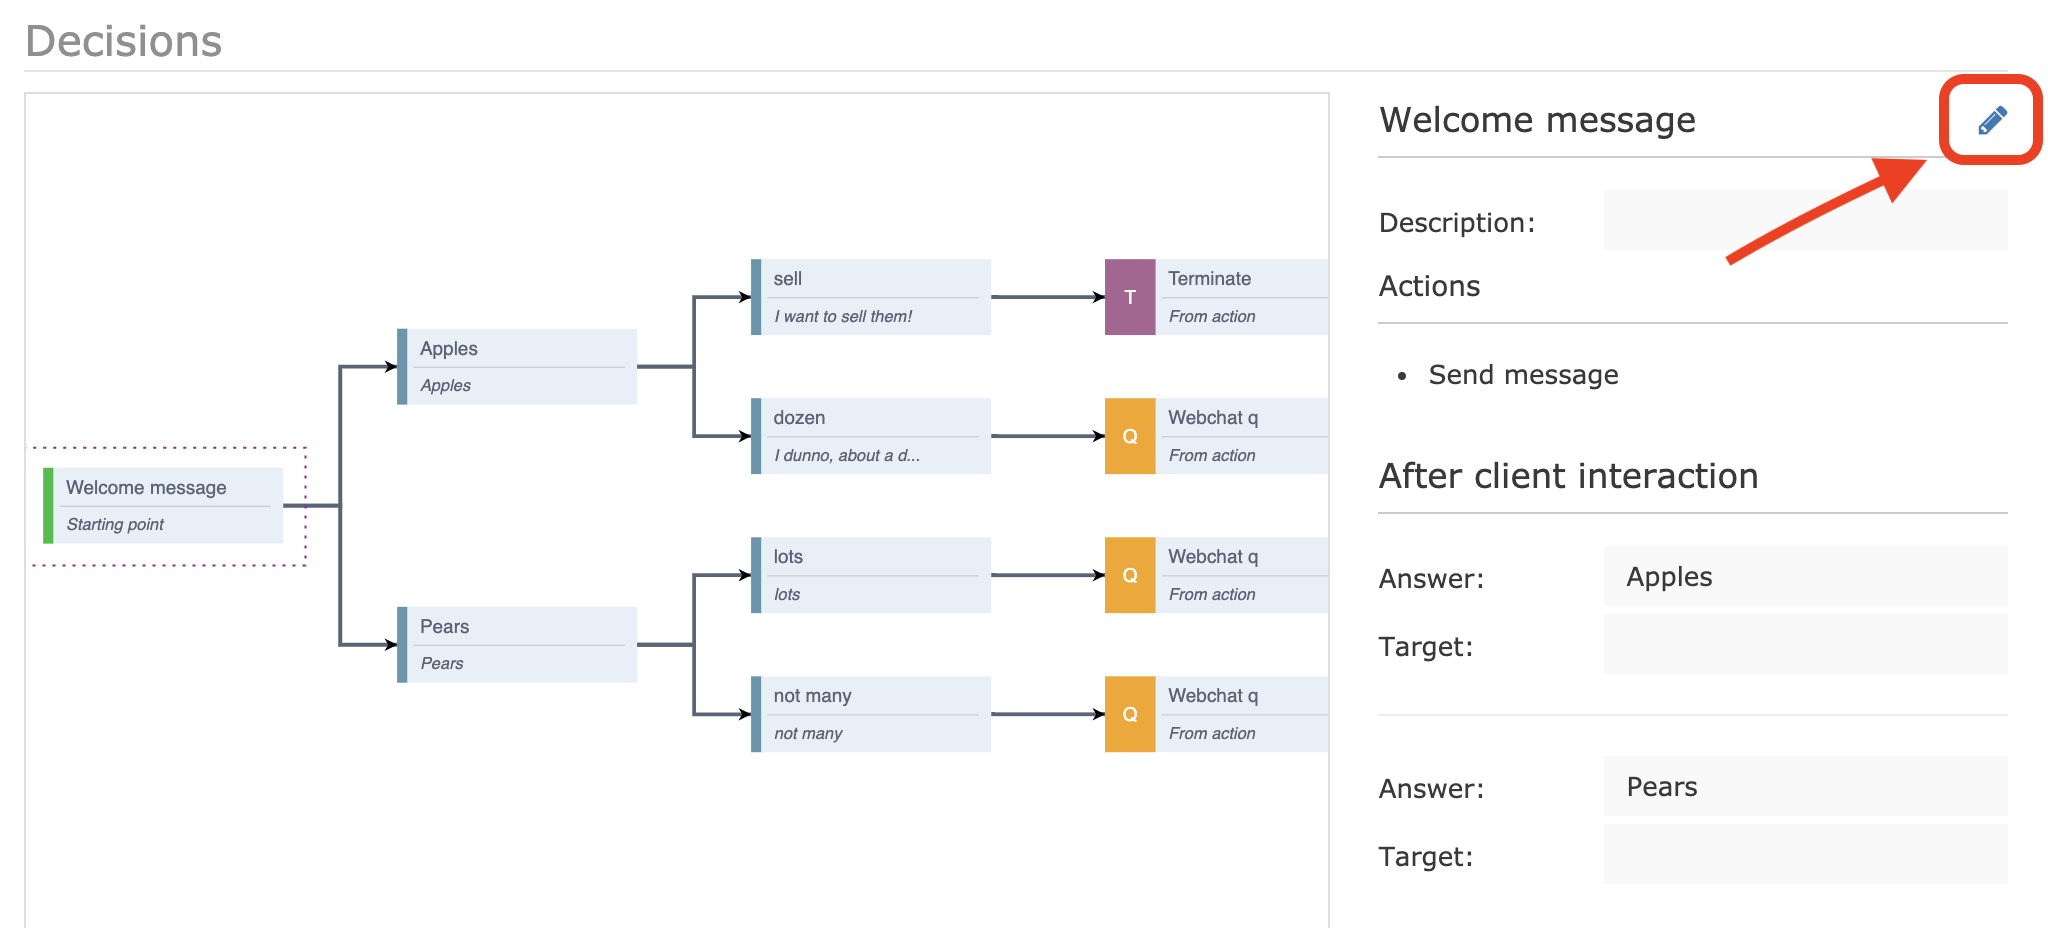
The decision details will open.
Fill out the decision Title and Description (optional) in the header, then set up your decision. You can use all available objects – we recommend reading through the templating language documentation.
Drag and drop items from the Actions, Groups and Targets into your decision. We recommend entering a description of each item as you add them.
Actions
Action | Description |
|---|---|
Request | Request data from a URL. Fill out the URL address where your data is stored and name the object that will contain the returned data so you can display it in the chat. |
Send message | Send a message in the web chat. Enter a default message and any language variations – the customer's language will be detected automatically. |
Save data | Store own data for later usage. Enter your data in Value and enter a key that will load the data under Key name. E.g.:
CODE
To use your data in a message or a request, simply enter:
CODE
|
Create ticket | Enter the ticket's Title, select a Category and enter a Comment. |
Groups
Type | Description |
|---|---|
Condition | Set up conditional actions. First set up your condition parameters, click Done and then drag and drop actions into the fields in the condition. |
Loop | Walk through array items. If you use action Target, loop ends. |
Targets
Target
Next destination: select if the target is another decision in the tree (Decision) or a final target such as a queue or a time condition (App).
If you have selected:Decision – choose a target decision from the drop down list or click the blue plus button to add a new decision. Type the new decision name. You can edit the new target decision in the diagram once you save the current one and return to the decision tree editor.
App – select the target type (Automessages, Terminate, Decision tree, Queue, Time condition) and the target.
Execution: select whether to go to the target as soon as the customer reaches the decision (Immediately) or whether action from the customer's side is necessary (When client choses it).
If you have selected When client choses it, select your Answer type:Button: the customer will use buttons to reply to the bot's questions. Enter the button text in the field below.
Generated buttons: generate buttons from an external source.
Pattern: the customer can type their answer. Enter a pattern in backslashes that the customer's answer must fit to trigger this action. E.g. /[0-9]{6}/ will fit if the customer enters at least a six digit number. See Regular expression syntax for more info.
Similar: the customer can type their answer. Enter a list of words that will trigger this action separated by commas.
If you use Similar or Pattern as an answer in your decision, a "Default answer" radio button will appear next to each answer. Select the answer that should be triggered when the customer's answer does not fit any of the patterns or words.
You can set up language variants in all combinations except Decision-Immediately and Decision-When client chooses it-Generated buttons.
Add another target to set up different targets depending on the customer's answer.
For practical examples of how to use the different decision tree options, see Decision tree example below.
Decision Tree Example
This example describes a decision tree where a customer can request a holiday quotation or check the status of their previous request and add more information into it. A web chat routing/connector is created with the Name and Email inputs switched to mandatory and the decision tree is set up as the routing's Next destination.
You can try going through the decision tree yourself at https://miktest.daktela.com/demo/DT.html.
An overview of the decision tree:
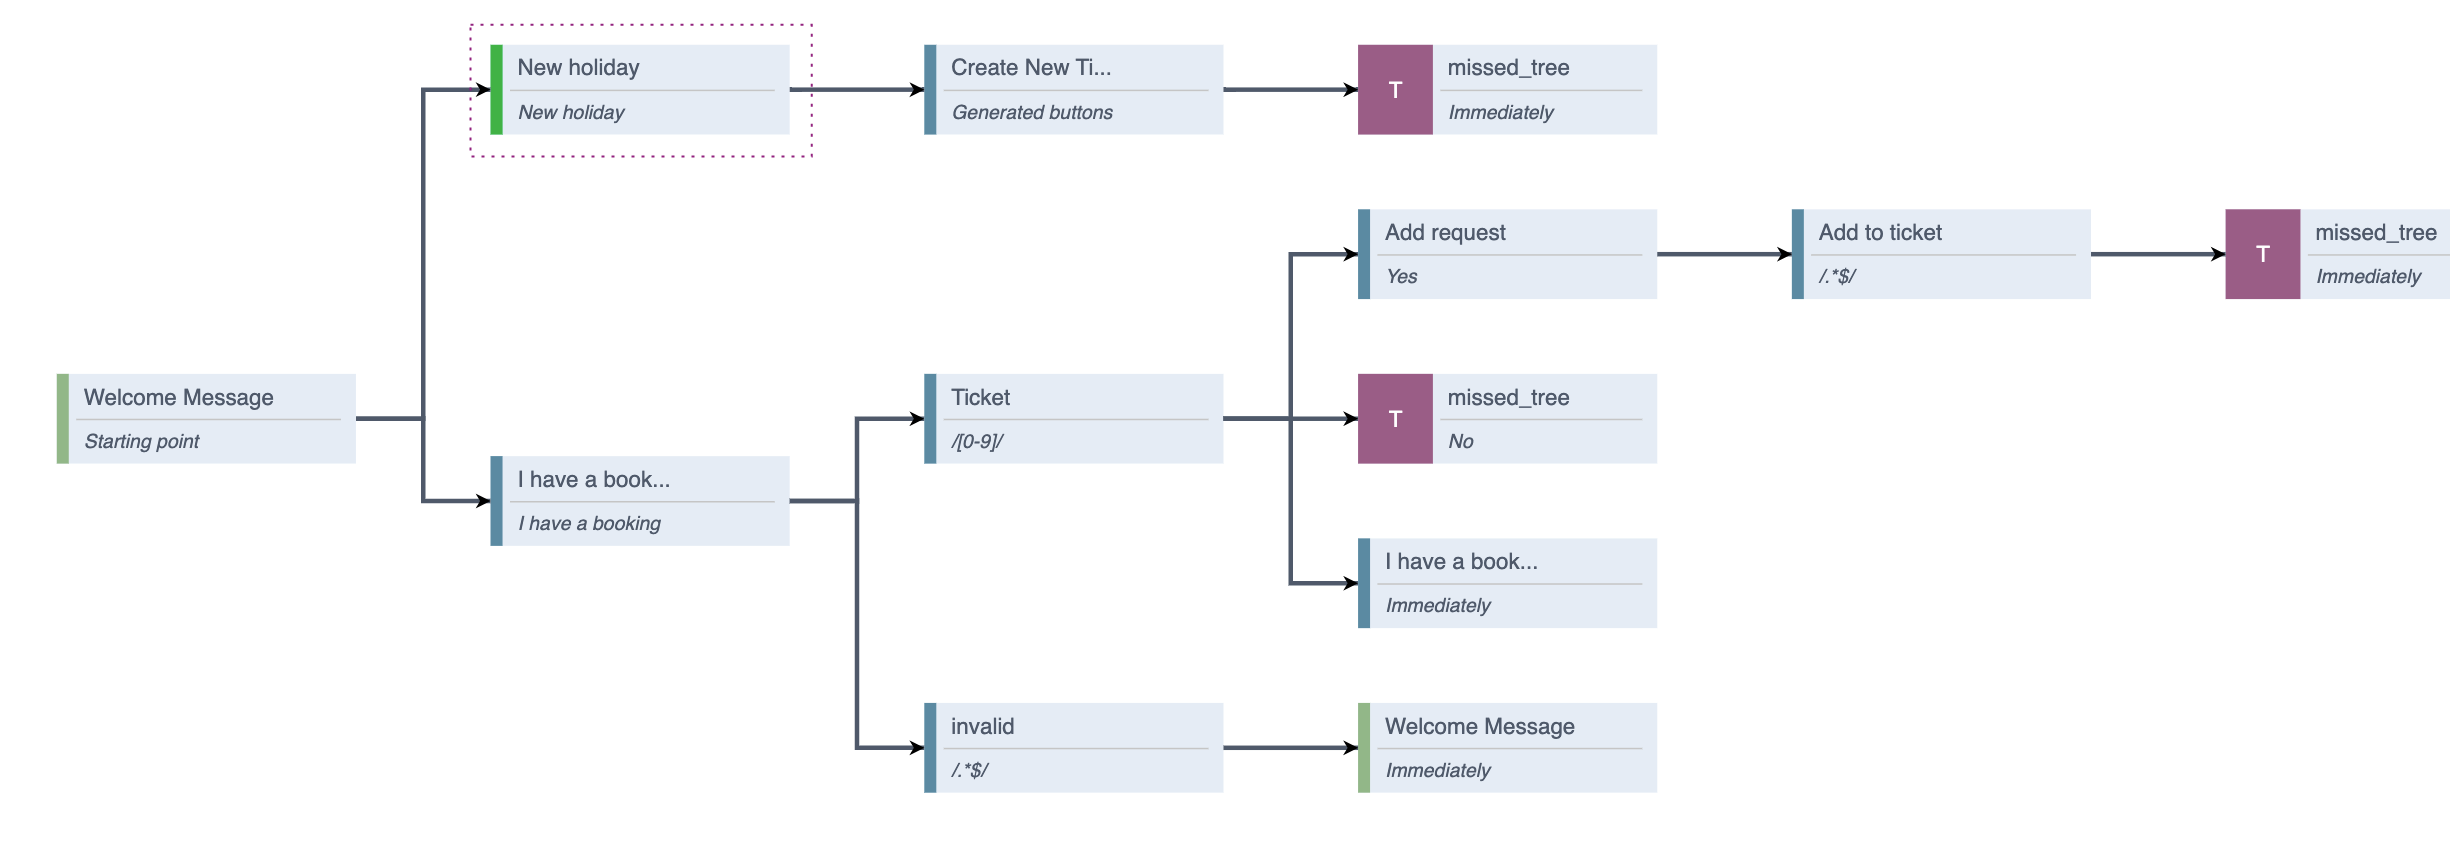
Welcome Message
In the first decision, the customer decides which branch of the decision tree they will go through. They can click on one of the two buttons set up in the targets.
Step | Setup |
|---|---|
Send message | Hi, have you got a holiday booked or do you want to book a new one? |
Target | Go to decision: New holiday Execution: After client interaction Answer type: Button Answer: New holiday |
Target | Go to decision: I have a booking Execution: After client interaction Answer type: Button Answer: I have a booking |
New Holiday
In this decision, we will save the web chat's interaction and a user's accessToken and use the data to put together a URL request. The interaction title is the customer's name that they enter before starting the chat, so we will take the name from the response and use in the message. You can find all the available attributes of the interaction object in the API documentation.
Step | Setup | Comments |
|---|---|---|
Save data | Value: {{lastMessage.interaction}} Key name: chatName | We are saving {{lastMessage.interaction}}, which is the title of the chat's interaction in Daktela, e.g. web_608144b8b7c1f169851283. We will use the key name chatName to use the interaction later on. |
Save data | Value: aaa111bbb222 Key name: accessToken | We are saving the user's access token. This will make it easier to use it in subsequent requests. You can find the user's access token in Manage → Users → List of users → User details. |
Request | URL address:
CODE
Object: interaction_response | We are requesting info about the web chat interaction available at api/v6/activitiesWeb/. {{chatName}} and {{accessToken}} will be replaced by the values set up in the previous two steps, so the actual request sent out will look like this:
CODE
We have named the response received interaction_response. We will use the response in the next step. |
Send message | OK {{interaction_response.result.title}}, where would you like to go? | The title of the interaction is the customer's name that they enter before starting the chat. This way, we can send a personalised message to the customer. The message will be displayed e.g. as OK John, where would you like to go? |
Request | URL address:
CODE
Object: destination_list | We are requesting a list of select box options in the custom field "Destination options" available at api/v6/formFields/. These can be set up in Manage → Tickets → Categories → Form. The response contains the destinations that are being offered in this web chat. We have named the response received destination_list. We will use the response in the next step to generate buttons. |
Target | Go to decision: Create new ticket Execution: After client interaction Answer type: Generated buttons Source: {{destination_list.result.items}} Value / Title: {{item.title}} / {{item.title}} | The customer can click a button, selecting their holiday destination. The buttons are generated automatically from the list of select box options received in the previous step. Each destination is an item and you can use its properties. The Value part in Value / Title is what the decision tree will send as the web chat message when the customer clicks the corresponding button. The Title part is the button text. In this case, both these variables are the same and just contain the titles of the destinations: Egypt, Morocco, Tunisia. |
Create a New Ticket
In this decision, we will use the customer's destination selection from the previous decision to create a new ticket.
Step | Setup | Comments |
|---|---|---|
Request | URL address: (note that the URL is separated into lines for ease of explanation but should be entered as a whole)
CODE
Object: new_ticket | We are using the POST method (at the end of the request) so we will be creating a new entry in the list of tickets available at api/v6/tickets.json.
|
Send message | Great choice {{interaction_response.result.title}}! We will get right on it and one of our reps will be in touch soon. | A message summarises the ticket created in the previous step, giving the customer some of the data received in the new_ticket response. |
Target | Next destination: Terminate Execution: Immediately | The chat is ended as soon the customer receives the message from the previous step. You could of course connect them with an agent via a queue if they have any questions or use any of the other possible routing options. |
I Have a Booking
If the customer selects I have a booking in the very first decision, they will be taken here.
Step | Setup | Comments |
|---|---|---|
Save data | Value: {{lastMessage.interaction}} Key name: chatName | We are saving {{lastMessage.interaction}}, which is the title of the chat's interaction in Daktela, e.g. web_608144b8b7c1f169851283. We will use the key name chatName to use the interaction later on. |
Save data | Value: aaa111bbb222 Key name: accessToken | We are saving the user's access token. This will make it easier to use it in subsequent requests. You can find the user's access token in Manage → Users → List of users → User details. |
Request | URL address:
CODE
Object: interaction_response | We are requesting info about the web chat interaction available at api/v6/activitiesWeb/. {{chatName}} and {{accessToken}} will be replaced by the values set up in the previous two steps, so the actual request sent out will look like this:
CODE
We have named the response received interaction_response. We will use it in the next step. |
Send message | Great {{interaction_response.result.title}}, what's your booking number? | The title of the interaction is the customer's name that they enter before starting the chat. This way, we can send a personalised message to the customer. The message will be displayed e.g. as OK John, what's your booking number? |
Target | Go to decision: Ticket Execution: After client interaction Answer type: Pattern Answer: /[0-9]/ | If the customer enters a set of numbers, they will be taken to this target. See Regular expression basics for more info on how to enter patterns. |
Target | Go to decision: invalid Execution: After client interaction Answer type: Pattern Answer: /.*$/ | If the customer enters anything but numbers, they will be taken to this target. See Regular expression basics for more info on how to enter patterns. They will get a message that the booking number does not exist and be taken to the beginning of the chat. |
Ticket
In this decision, we will try to find the ticket that the customer entered in the previous step and return the ticket details in a message if it is found.
Step | Setup | Comments |
|---|---|---|
Save data | Value: {{lastMessage.text}} Key name: ticketName | We are saving the ticket number the customer entered in the previous decision and calling it ticketName. |
Request | URL address:
CODE
Object name: check_ticket | We are requesting info about the ticket available at api/v6/tickets/. {{ticketName}} is the ticket number saved in the previous step. Object: we have named the response received check_ticket. We will use it in the next step. |
Condition | If {{check_ticket.result}} ISNOTNULL:
Else:
| If the response to the request in the previous step contains data, 2 messages will be sent and 2 targets created. In any other case, a different message will be sent and target created. See below. |
Send message 1 | Ticket number: {{check_ticket.result.name}}. Destination: {{check_ticket.result.customFields.destination_option[0]}}. Stage: {{check_ticket.result.stage}}. Last edit: {{check_ticket.result.edited}}. Owner: {{check_ticket.result.user.title}}. Additional requests: {{check_ticket.result.customFields.additional_requests[0]}}. | If the ticket number is found, the details about the ticket are sent in a message. They are taken from the check_ticket response. |
Send message 2 | Would you like to add something to your request? | |
Target 1 | Go to decision: Add request Execution: After client interaction Answer type: Button Answer: Yes | The customer will go to the next decision. |
Target 2 | Next target: Terminate Execution: After client interaction Answer type: Button Answer: No | The chat will be ended. |
Send message 3 | Sorry, we don't have that booking number on file. | This message will be sent if the ticket number is not found. |
Target 3 | Go to decision: I have a booking Execution: Immediately | The customer will be taken back to the I have a booking decision where they can enter their booking number again. |
Add Request
In this decision, the customer can type what they would like to add to their booking.
Step | Setup | Comment |
|---|---|---|
Send message | What would you like to add to your booking? | |
Target | Go to decision: Add to ticket Execution: After client interaction Answer type: Pattern Answer: /.*$/ | The customer will be taken to the next step after they type their request. |
Add to Ticket
In this decision, the customer's additional request will be added to any previous requests.
Step | Setup | Comment |
|---|---|---|
Request | URL address:
CODE
Object: update_ticket | We are updating the ticket available at api/v6/tickets/ using the PUT method (at the end of the request). We do not want to overwrite any previous data that was saved in the Additional requests custom field. First, we will enter any data that was already there in the check_ticket response in the Ticket decision – {{check_ticket.result.customFields.additional_requests[0]}}. Then we will enter the new additional request from the previous decision – {{lastMessage.text}}. Object: we have named the response received update_ticket. We will use it in the next step. |
Send message | Ticket number: {{update_ticket.result.name}}. Destination: {{update_ticket.result.customFields.destination_option[0]}}. Additional requests: {{update_ticket.result.customFields.additional_requests[0]}} Stage: {{update_ticket.result.stage}}. Last edit: {{update_ticket.result.edited}}. Owner: {{update_ticket.result.user.title}}. | Again, a summary is sent to the customer using the response from the previous line. |
Target | Next destination: Terminate Execution: Immediately | The chat is ended. |
Chatbots
Set up a connection to a third-party chatbot.
Go to Manage → Routings → Web chats → Chatbots. You will see an overview of your chatbots.
Click the Title of a chatbot to open its details or click Add new to create a new one. The chatbot details will open.
When you are done creating or editing a chatbot, click Save to return to the chatbot overview and make sure to click the Apply configuration changes button in the top right corner.
It will take a few minutes for the changes to take effect on your website. If you want to see them immediately, open your website in a new incognito mode window.
Set up your chatbot set up in the Sandbox column. If you are editing a chatbot, you can compare your new settings to those currently in use in the Production column.
Title: enter a title.
Description : enter a description.
Fallback: select where the chat should be routed if the Callback URL is not available.
Callback URL: enter the endpoint where data from the chatbot should be sent. Filled in automatically – you do not need to change it.
Chatbot URL: enter the URL of your chatbot.
Send start message: forward the client initialisation message (if it exists) as part of the first chatbot request.
Send attachments: send the structure of any attachments the client sends.
Send customFields: select the custom input fields that should be sent to the chatbot.
Terminate
Set up how your web chats will end in different scenarios.
Go to Manage → Routings → Web chats → Terminate. You will see an overview of your terminate set ups.
You can view a diagram tree of each terminate set up by clicking the grey tree button in the Actions column.
Click the Title of a terminate set up to open its details or click Add new to create a terminate set up. The terminate details will open.
When you are done creating or editing a terminate set up, click Save to return to the terminate overview and make sure to click the Apply configuration changes button in the top right corner.
It will take a few minutes for the changes to take effect on your website. If you want to see them immediately, open your website in a new incognito mode window.
Set up your terminate set up in the Sandbox column. If you are editing a terminate set up, you can compare your new settings to those currently in use in the Production column.
Title: enter a title.
Description : enter a description.
Disconnection cause: select from the dropdown list. This is for internal use only – the customer will not see this info.
Queue: select which queue the chat will belong to if it is terminated using this set up.
If you want to receive missed chat notifications, you must select a queue.
Auto response: select a template to send to the customer if the chat is terminated using this set up.
Answered: toggle whether a chat terminated using this set up is logged as answered.