Call Routings
Set up how your calls will be routed to your agents.
Open one of the Call routings modules from the menu on the left.
In each module, you can:
create a new item from scratch by clicking Add new in the top right corner.
use an existing item as a template for your new one by clicking Clone in the Actions column.
edit an existing item by clicking its title.
See the individual modules below for instruction on how to set them up.
After you create or edit an item and return to the list, don't forget to apply your changes by clicking the Apply configuration changes button in the top right corner.

Inbound Routings
In Inbound routings, you can set up the destinations which your PBX will use for incoming calls. When a call comes in from the network, the dialled number and caller number are checked and used to direct the call to a device or application that you select.
The In production column displays the latest setup, who created it and when. You can edit the setup in the Sandbox column.
Enter a Title and a Description, then set up your routing settings:
Sandbox fields | Description |
|---|---|
DID number | Enter the expected DID Number if your trunk passes DID on incoming calls. This will be the number the caller dialled – if it matches the one entered here, the call will be routed according to this routing. Leave the field blank to match any or no DID number. You can use a pattern to match a range of numbers. If you use a pattern, start it with an underscore _ . |
Caller ID | Enter the Caller ID Number to be matched on incoming calls. This will be the caller's phone number – if it matches the one entered here, the call will be routed according to this routing. Leave the field blank to match any or no CID info. In addition to standard dial sequences, you can also enter Private, Blocked, Unknown, Restricted, Anonymous and Unavailable in order to define these special cases if the Telco transmits them. |
Fax | Enable if you are routing a fax number. |
Settings fields | Description |
|---|---|
Alert info | This can be used to set up a distinctive ring on SIP devices. |
CID Name Prefix | You can optionally prefix the Caller ID name. E.g: If you prefix with "Sales:", a call from John Doe would display as "Sales:John Doe" on the extensions that ring. |
Next destination fields | Description |
|---|---|
Next destination | Select where calls that match this routing will go next. You can select:
After you select the type of destination in the first dropdown menu, select a specific instance of the type in the second dropdown menu. E.g. first select Queue, then select a specific queue that you have previously created, e.g. Accounts payable. You will only see the types of destinations where you have already created some items. E.g. if you have not created any queues, you will not see Queue as one of your options. |
Announcements
Using Announcements, you can play back a recording to the caller.
The In production column displays the latest setup, who created it and when. You can edit the setup in the Sandbox column.
Enter a Title and a Description, then set up your announcement settings:
Field | Description |
|---|---|
Allow skip | Turn on to let the caller skip the announcement by pressing any key. |
Recording | Select a recording from the drop-down list. Go to Manage → Routings → Calls → System recordings to manage, record or upload your recordings. |
No answer | Check this to keep the channel from explicitly being answered. When checked, the message will be played and if the channel is not already answered it will be delivered as early media if the channel supports that. When not checked, the channel is answered followed by a 1 second delay. When using an announcement from an IVR or other sources that have already answered the channel, that 1 second delay may not be desired. |
Repeat character | Select a key that will replay the message when pressed. If you choose this option, there will be a short delay inserted after the message. If a longer delay is needed, incorporate it into the recording. |
Next destination | Select where call will be routed after the announcement is played back. You can select.
After you select the type of destination in the first dropdown menu, select a specific instance of the type in the second dropdown menu. E.g. first select Queue, then select a specific queue that you have previously created, e.g. Accounts payable. You will only see the types of destinations where you have already created some items. E.g. if you have not created any queues, you will not see Queue as one of your options. |
TTS Announcements
Text-to-Speech uses Google Cloud Text-to-Speech technology to generate voice announcements from static or parameterised text. It is often used to give customers information about their accounts, such as states of their orders or amounts due, e.g. using Robocaller queues.
You need a valid Text-to-speech licence to use TTS Announcements.
Announcement Details
Fill out the Title and Description (optional), then set up your announcement.
The In production column displays the latest setup, who created it and when. You can edit the setup in the Sandbox column.
There is a detailed description of each setting in the tooltips directly in Daktela.
In Next destination, select where the call will be routed after the TTS Announcement is played back. You can select:
Another TTS Announcement
Announcements to play back a recording
IVR to go to an interactive voice response tree
Time conditions to decide where the call should be routed based on the date and time
Ring groups to make the call ring at multiple users
Call steerings to decide where the call should be routed based on the callers speech input
Queue to put the call in one of your queues
Missed calls to create a missed call in Missed
User to route the call to a specific user
Terminate to end the call.
After you select the type of destination in the first dropdown menu, select a specific instance of the type in the second dropdown menu.
E.g. first select Queue, then select a specific queue that you have previously created, e.g. Accounts payable.
You will only see the types of destinations where you have already created some items. E.g. if you have not created any queues, you will not see Queue as one of your options.
Save your TTS Announcement.
Make your TTS Announcement the destination of your Robocaller queue or one of your call routings.
Text Examples
Dynamic text:
Callback: https://yourcompany.com/parcels.json?clid={{clid}}&id_call={{id_call}}
Text: Your parcel number {{result.parcels.parcel_number[0]}} is located in {{result.parcels.parcel_location[0]}} and is currently {{result.parcels.parcel_state[0]}}.
Robocaller:
Text: Hello {{customFields.first_name[0]}}, your amount due is {{customFields.amount[0]}} dollars, due on {{customFields.due_date[0]}}. Stay on the line to speak to our representative, otherwise hang up.
The Campaign record must have all the custom fields that you are using filled out.
IVR
The Interactive voice response system is used to guide callers to the correct department or person by selecting a number from a list of options. You can set up what options the customer will hear, what the IVR will do in case of invalid or no selection and how many times the whole process can be repeated.
The In production column displays the latest setup, who created it and when. You can edit the setup in the Sandbox column.
Set up your IVR:
Field | Description |
|---|---|
Title | Enter a title. |
Shortcut | Abbreviation of the IVR used in statistics where you will see which key the caller pressed. Must be unique. Allowed characters (maximum 8) are: A-Z, a-z, 0-9 and underscore. |
Description | Enter a description. |
Recording | Select a recording from the drop-down list. It will be played at the start of each loop. Go to Manage → Routings → Calls → System recordings to manage, record or upload your recordings. The recording should contain information about the possible Destination Options that you set up at the bottom of the IVR settings, ie. what numbers callers can press and where they lead. |
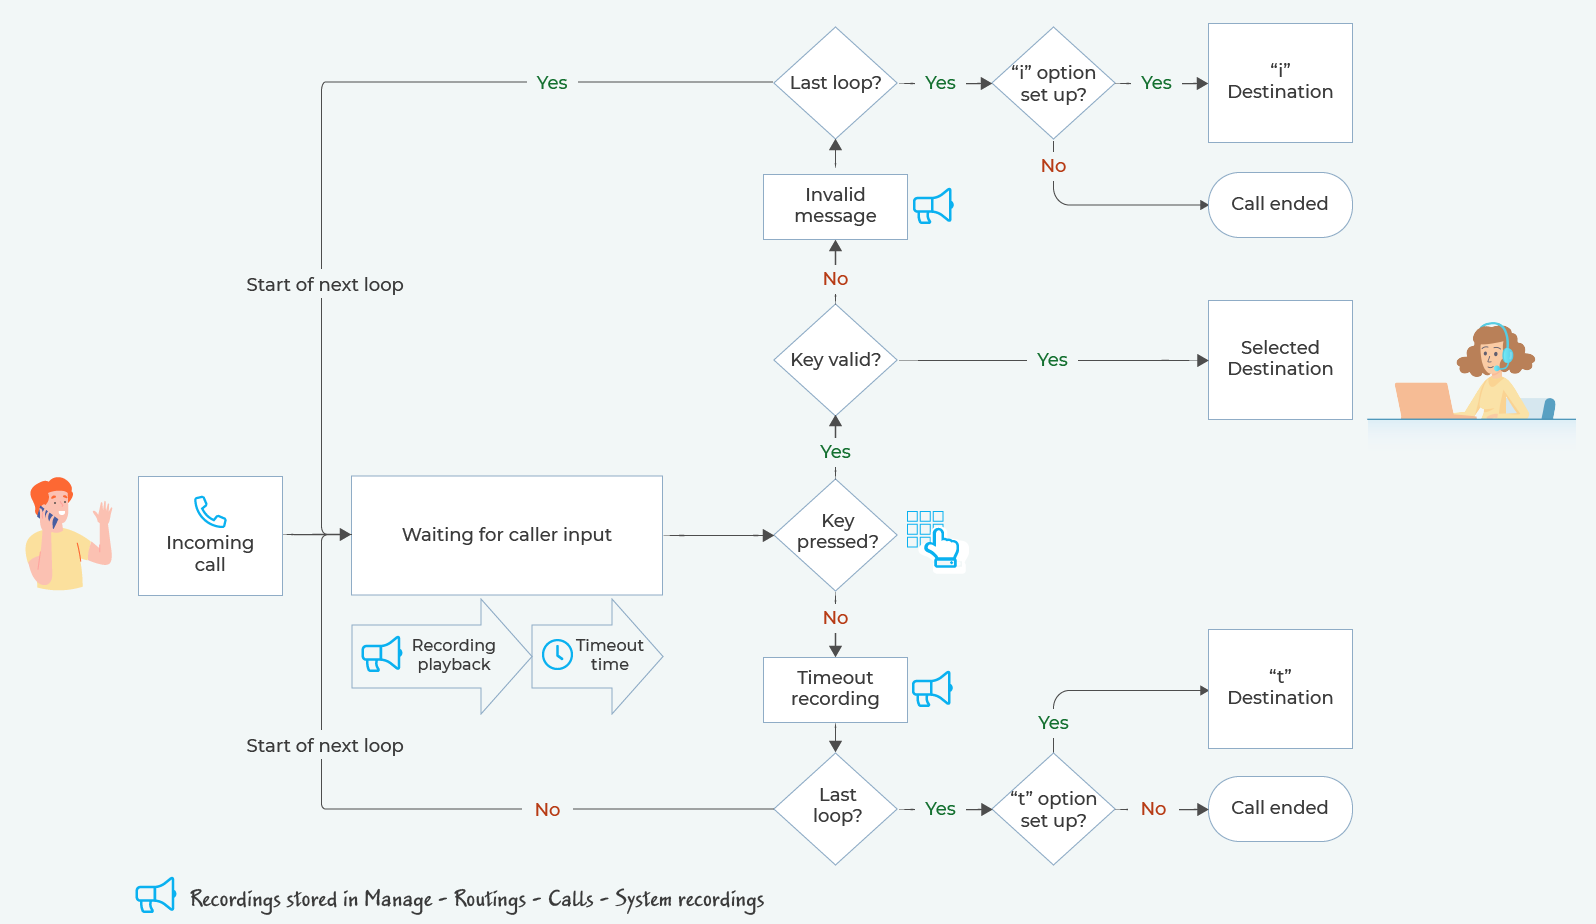
Timeout | The amount of time (in seconds) before the timeout message is played in each loop after the Recording has finished playing and the caller hasn't press any key. After the last loop, the call will be routed to the 't' destination if set up. Otherwise it will be ended. |
Timeout recording | Select a recording from the drop-down list. It will be played if the caller doesn't press any key before the time set up in Timeout above runs out. Go to Manage → Routings → Calls → System recordings to manage, record or upload your recordings. |
Invalid message | Select a recording from the drop-down list. It will be played if the caller presses a key that you have not set up as one of your Destinations below. After the recording is played back, the next loop will begin or, if an invalid option is selected during the last loop, the call will be routed to the 'i' destination if set up. Other it will be ended. Go to Manage → Routings → Calls → System recordings to manage, record or upload your recordings. |
Loops | Select the number of times the IVR can reach a Timeout or Invalid input before it is routed to 'i' or 't' destinations if set up, or ended if not set up. |
Max. digits | Select the maximum number of digits the caller can enter (min. 1, max. 20). E.g. if you set Max. digits to 1, the caller will be able to enter 0-9. If you set Max. digits to 2, they will be able to enter 0-99 etc. |
Timeout max. digits | Select the maximum amount of time in seconds permitted between digits. E.g. if a caller wants to enter 15, they will first press 1, then they will have the selected amount of time to press 5, otherwise the IVR will treat the input as 1. |
Next, set up your Destinations:
Field | Description |
|---|---|
Option | Enter a number or option that the caller needs to press to go to the Destination set up below. You can enter:
|
Destination | Select where the call will be routed if the caller selects this Option. You can select:
After you select the type of destination in the first dropdown menu, select a specific instance of the type in the second dropdown menu. E.g. first select Queue, then select a specific queue that you have previously created, e.g. Accounts payable. You will only see the types of destinations where you have already created some items. E.g. if you have not created any queues, you will not see Queue as one of your options. |
General Incoming Call IVR Flow Chart:
Interactive Example of IVR Setup
This example demonstrates how you can set up a simple IVR.
Call +420 246 034 620, listen to the recordings in the IVR and follow the different branches in the diagram and screenshot below. The numbers in the flow chart correspond to those in the screenshot. They are also mentioned in the IVR.
The language selection IVR at the beginning is not included in the diagram.
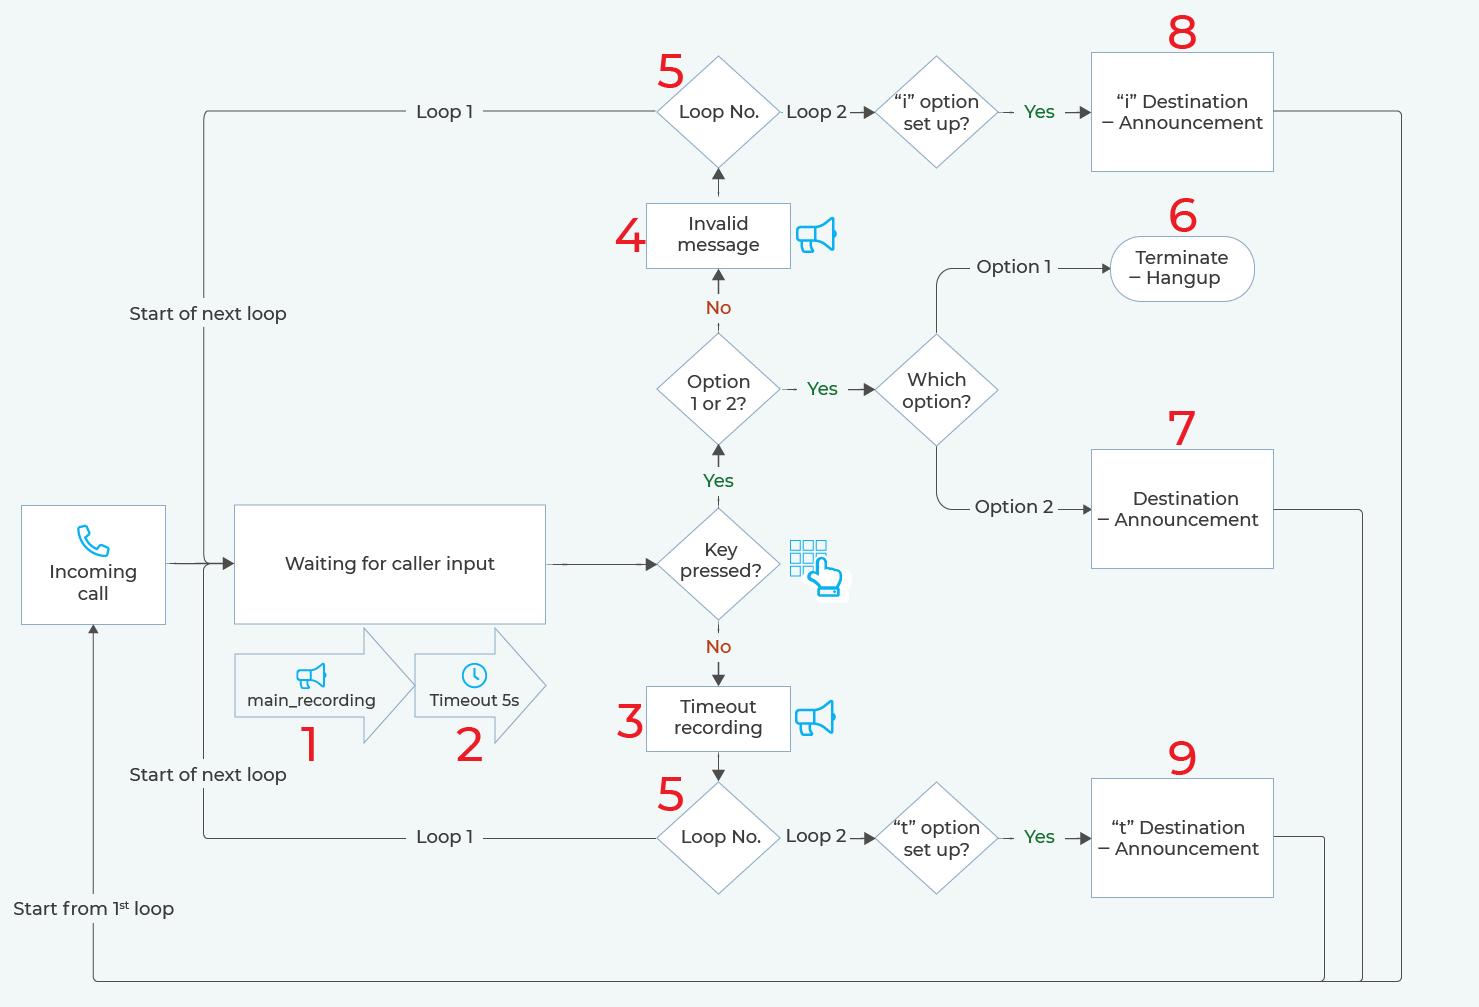
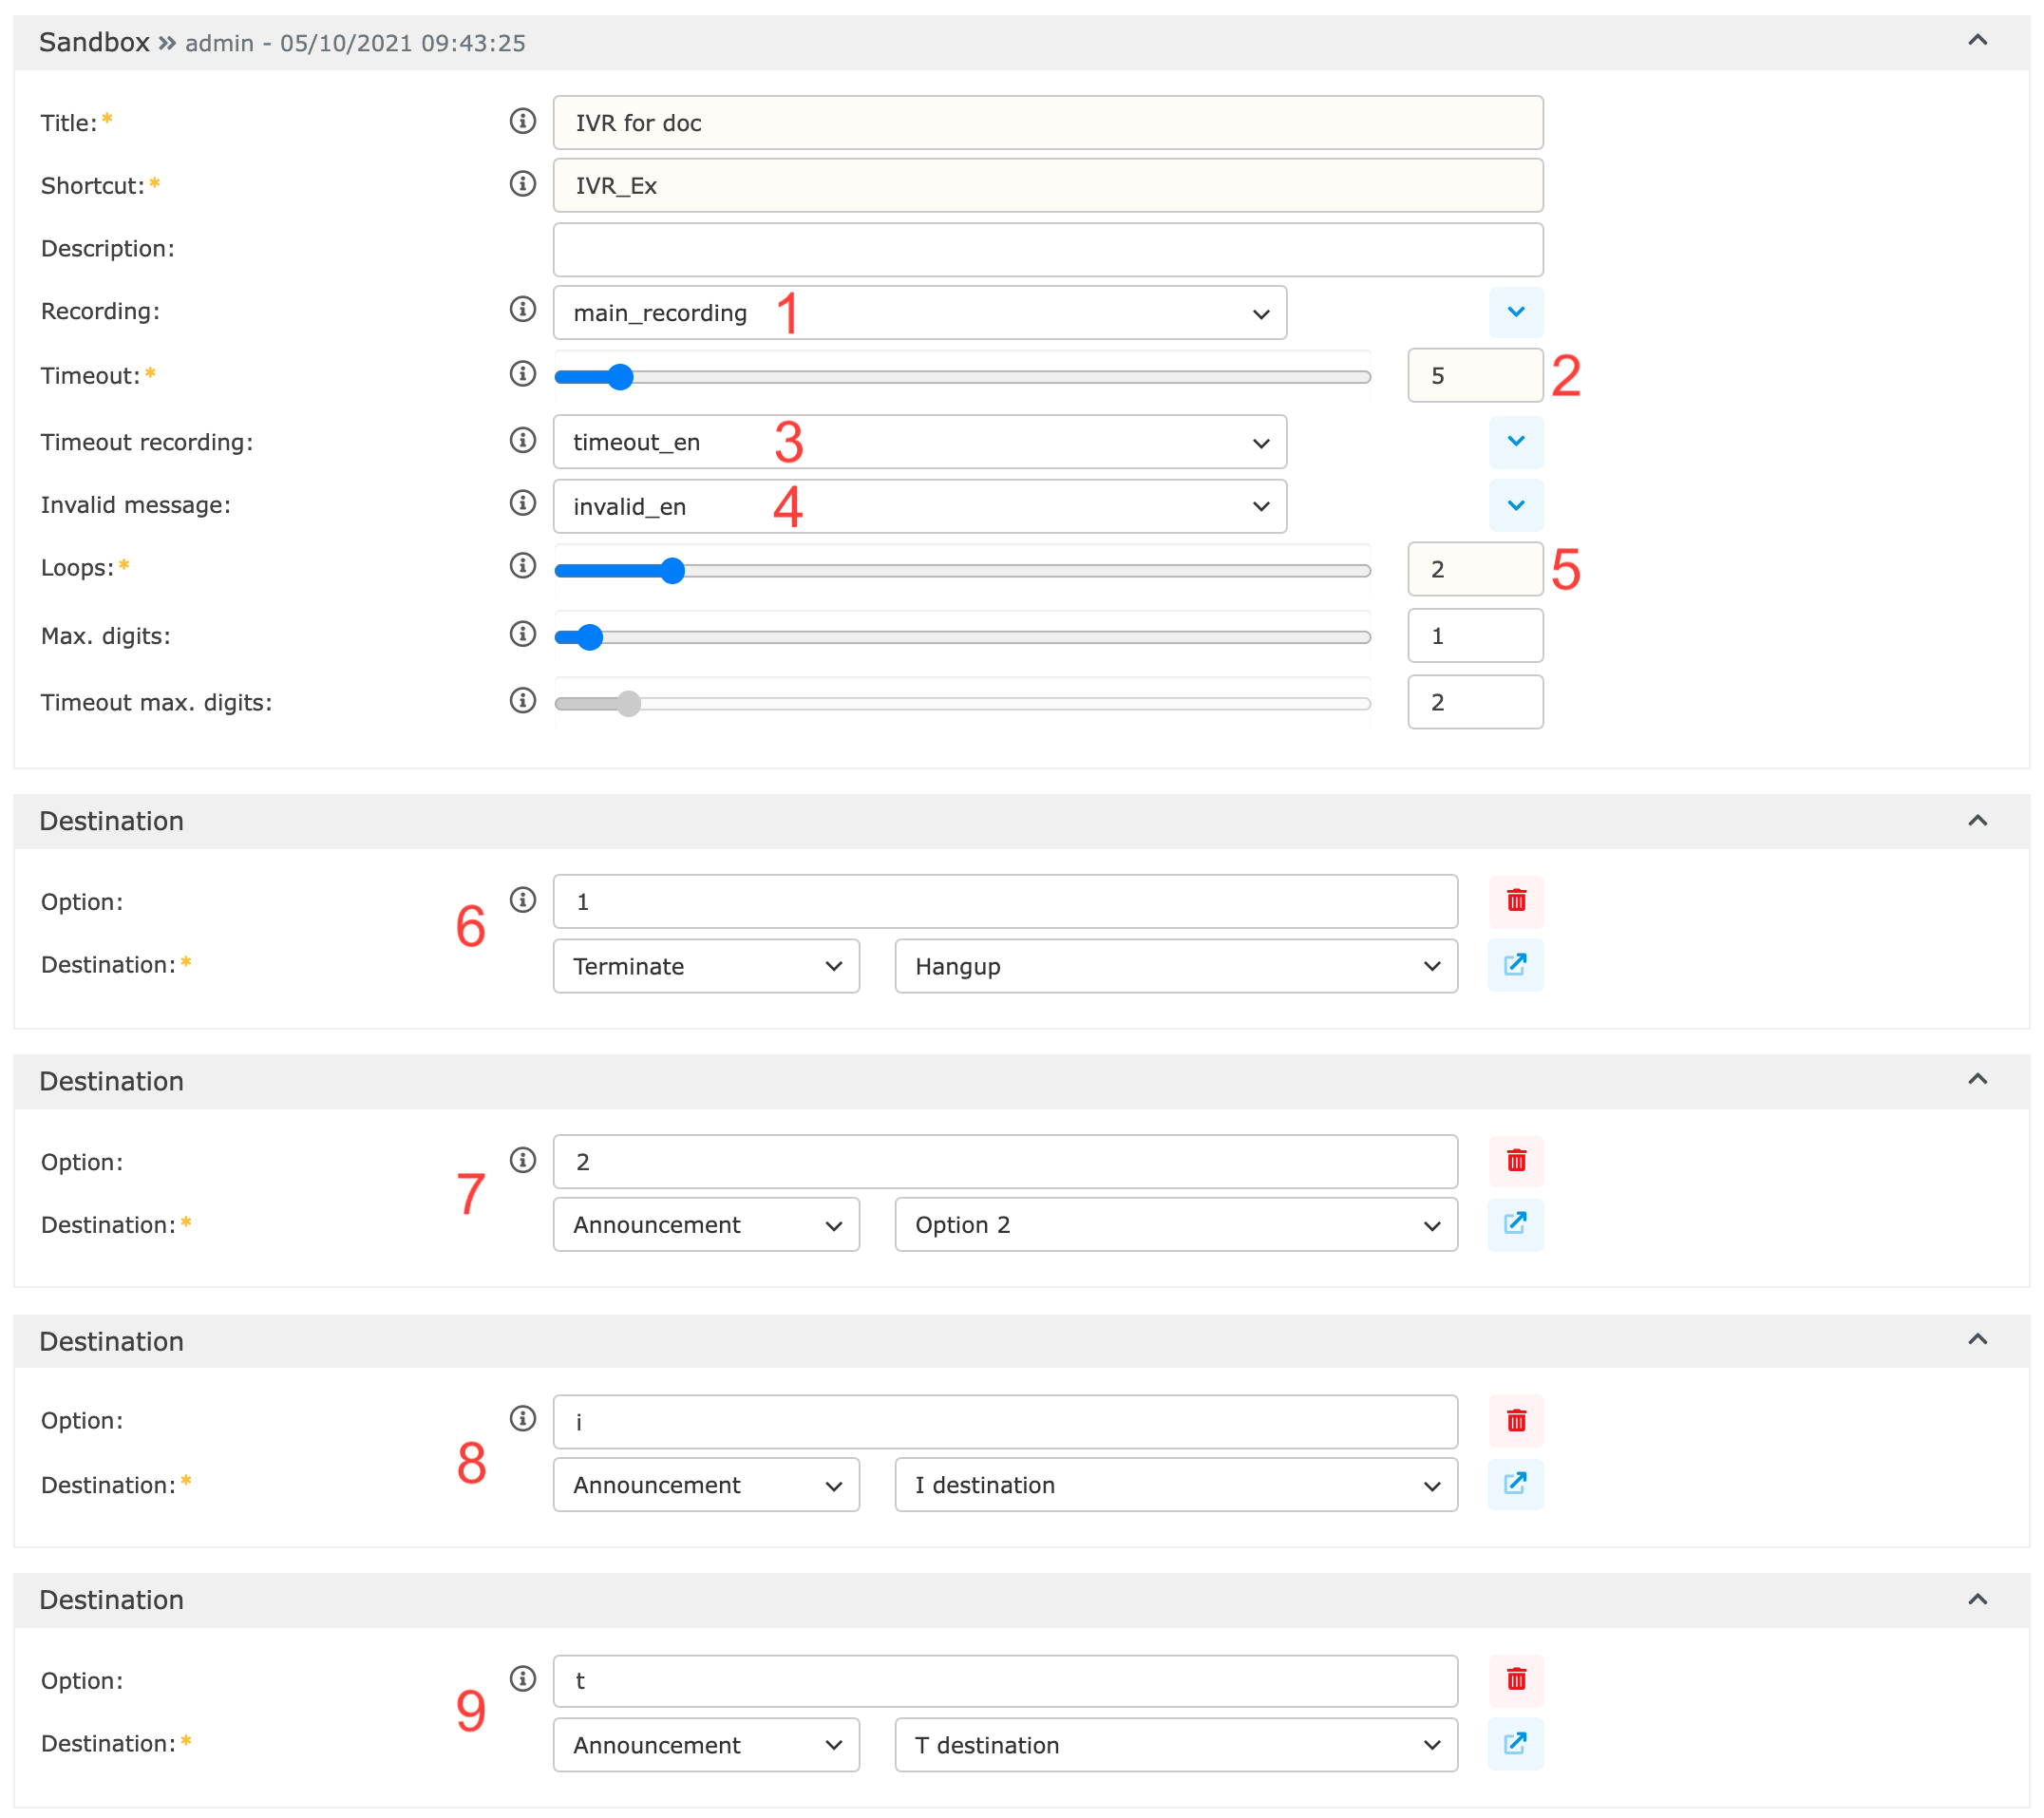
For your ease of use in this example, we have set up the Destinations of the Announcements (numbers 7, 8 and 9 in the pictures above) back at the beginning of the IVR.
Call Steering
Using call steering, customers can simply say which person or department they want to speak with and the application connects them.
You need a valid Call steering license to use this feature.
There is a detailed description of each setting in the tooltips directly in Daktela.
See the table below for a description of the different Call steering Application types.
Application type | Description |
|---|---|
Widget (Only save transcript) | The call will be routed to the selected Next destination. The Transcripts widget displays the customer's speech using speech-to-text technology. The agent can read the text when they accept the call. Setup needed: Add the Transcripts widget to the widget scheme of the queue that is the destination of your Call steering. See Manage → Queues for instructions. |
Preferred member | The call will be routed to the selected Next destination with the matched user as a "PREFMEMBER" parameter – if the matched is user is available, the call will be routed to them. The application searches agents' Titles and Call steering descriptions. Setup needed: Go to Manage → Users → List of users. Make sure all users have a Title that corresponds to their real name. Enter any nicknames, aliases or other hints in the Call steering description field. If your language uses cases, the app can recognise them and match the name of a person correctly – you don't need to enter all the cases in the Call steering description. E.g in Czech, "Tomášem Novotným" will match Tomáš Novotný automatically. |
Queue | The call will be routed to the matched queue or, if there is no match, to the selected Next destination. The application searches queues' Titles and Call steering descriptions. Setup needed: Go to Manage → Queues. Make sure your incoming call queues that you use with call steering have Titles that customers are likely to know, e.g. Tech Support, Sales, Returns etc. You can also fill out any other words or phrases customers are likely to say in the Call steering description fields. |
Custom directions | The call will be routed to the matched custom Destination or, if there is no match, to the selected Next destination. Setup needed: Set up your own custom Destinations at the bottom of the page. Enter the Key words that the customer needs to say to match the Destination. You can enter several words/phrases separated by a comma. Avoid using similar key words in multiple destinations – the call will be routed to the destination of the first key word matched with the Similarity limit selected in the general call steering options. Select a Preferred member – if the matched user is available, the call will be routed to them. Select the Destination where the call will be routed if the customer's speech matches the key words. |
Dialplan routing | The call will be routed to the Next Destination with the asterisk variables CALLSTEERING_USER, CALLSTEERING_USER_SIMILARITY, CALLSTEERING_QUEUE and CALLSTEERING_QUEUE_SIMILARITY set according to the customer's speech. These variables can then be used in Custom context. Setup needed: We recommend to set the Next destination as one of your Custom contexts. |
Missed Calls
Used Missed to calls to create a Missed activity for your agents to handle later. You can end the call here or route it to another destination.
The In production column displays the latest setup, who created it and when. You can edit the setup in the Sandbox column.
Set up your missed call:
Field | Description |
|---|---|
Title | Enter a title. |
Description | Enter a description. |
Queue | Select the queue where you want the missed call to be created. Missed activities must be turned on in the queue settings, otherwise missed calls will not be displayed in Missed in the sidebar. |
Next destination | Select where the call will be routed next. You can select:
After you select the type of destination in the first dropdown menu, select a specific instance of the type in the second dropdown menu. E.g. first select Queue, then select a specific queue that you have previously created, e.g. Accounts payable. You will only see the types of destinations where you have already created some items. E.g. if you have not created any queues, you will not see Queue as one of your options. |
Advanced Settings
Caller IDs
Set up with what phone numbers outgoing calls from the PBX will be presented to the callee and under what conditions.
If you want to use different phone numbers than those assigned to the PBX, please contact us.
First, set up your Caller ID basic settings:
Field | Description |
|---|---|
Number | Enter the phone number that will be displayed to the callee when the conditions set up below are met. |
Priority | Enter the priority of this setup. Higher number = higher priority. If a call matches several identifications, the Caller ID with higher priority will be used. If there are several identifications with the same priority, a random one with the given priority will be selected. |
Next, set up the conditions under which the this Caller ID will be matched. Select the Trunk, Users, Queues, Destination (the number you are calling), Variable (select one of the four options) and SIP, External or MS Teams devices used to make the call.
You can use a regular expression in the Destination field to match a range of numbers.
If you don't select any conditions, the Caller ID will match every outgoing call.
Click Save and Apply.
Simulation
To test what Caller ID will be used for an outgoing call, click the Simulation button at the top of your list of Caller IDs. The Clid Simulator will open.
Select the Trunk, Device, Queue, User and Destination. You don't need to fill out all the fields.
Click Simulate.
The Caller ID will be displayed in the Identification field.
Trunks
Set up a trunk that will be used for your calls.
Trunks are set up by our Support team. Only make changes if you know what you are doing!
Setting | Description |
|---|---|
Title | Enter the title of your trunk. |
Unique name | Enter a unique name. This cannot be changed later. |
Description | Enter a description of you trunk to help you identify it later. |
Type | Select the protocol type. |
Outgoing identification | Enter a phone number that will be presented to the callee in outgoing calls made using this trunk. You must have the right to use the number you enter, otherwise it will not be used. |
Max channels | Enter the maximum number of outgoing concurrent calls. Incoming calls are not counted. |
Dialling rules | Modify outgoing called number based on patterns: |
CallerId rules | Modify incoming callerID based on patterns – same as above. |
PJSIP config | Enter the trunk configuration, e.g.:
CODE
|
Conferences
Set up conferences that can be joined by agents internally as well as customers dialling in from external numbers.
To create a new Conference from scratch, click Add new.
To use an existing Conference as a template for your new one, click Clone in the Actions column.
To edit an existing Conference, click its title.
The Conference details will open.
Enter a Title and Description (optional), then set up your Conference details.
There is a detailed description of each setting in the tooltips directly in Daktela.
Save your Conference.
The Conference number works like an extension – Daktela users can use it to dial into the conference. If you want external users to be able to dial into the conference, make it the target of one of your incoming routings.
The maximum number of conference participants is 50.
Conference Controls Overview
You must enable "Allow menu" to let participants use these numpad controls.
Key | Action |
|---|---|
1 | Mute/unmute yourself. |
2 (admin only) | Lock and unlock the conference – when locked, no more participants will be allowed to join. |
3 (admin only) | Remove the last participant that joined from the conference. |
4 or 6 | Decrease or increase the conference volume. |
7 or 9 | Decrease or increase your volume. |
8 | Exit the conference. |
* | Play back these options. |
Background Music
Here is possible to create folder with baground music for your calls waiting time.
Warning
With regard to system resources, we strongly recommend to use music in WAV format with 'PMC Uncompressed' 8000hz 16bit mono.
Click the Title to open its details or click Add new to create a new folder with background music.
Display name: enter name.
Description: enter a description.
Folder: it will fill automatically it is same as display name.
File name: Click the Record/Upload new own recording to open window for record or upload a new recording.
Recording name: enter name of the new recording.
File upload: Select file to upload a new recording. Recommended format is wav.
Phone call: After you click Continue, you will receive a call at your extension. Follow the on-screen instructions to record your greeting over the phone.
To add custom background music to your calls follow your queue settings.
System Recordings
Here is possible to add and edit audio files which can be then used in announcements, IVR, etc.
Record can be uploaded from external file (in any supported asterisk format) or using phone connected to PBX.
If you are uploading a WAV file, be sure that the file is with 'PCM Uncompressed' 8000hz 16bit mono properties. Recording in other format can not be played by PBX.
If you want to upload an audio file, find and upload it to the PBX. If you want to record the file using phone, follow the steps below:
to the field with 'If you wish to make and verify recordings from your phone, please enter your extension number here:' description enter number of extension from which you want to record audio file and click on the button 'Go'.
From previously entered extension dial *77, a beep sounds and you can record the audio. Please, finish each recording by clicking on the button # on the phone, if you only hang up, audio file will not be saved.
After finishing the recording is possible to immediately listen to the recorded file or record it again.
Then name the audio file (using field 'Name this Recording:' - to be on the safe side, we do not recommend to use diacritic and special characters) and click on the button 'Save'.
Custom Context
Please get in touch with our Support team on +420 226 211 245 or at daktela@daktela.com if you need to change your custom context.