Email Queue
Email queues handle communication between an email server and Daktela.
Email Queue Details
Fill out the Unique queue number , Title and Description (optional), then sign in to your email server and set up your queue. Queue Number Auto-Suggestion Daktela will automatically suggest the next available number based on previous numbers of the same queue type (including deleted ones).
Warning
For your email queue to send and receive email, you need to set up Incoming mail server and Outgoing mail SMTP server at the bottom of the queue settings.
Queue Field Details
Open more settings using theExtended button in the top right corner.
| Field | Description |
|---|---|
| Advanced settings | |
| Queue active | By disabling the queue, you can quickly pause it. Call queues will stop dialling new calls. Already dialled calls will not be interrupted. Email queues will stop receiving emails. Outgoing emails will not be affected. |
| Auto response | Select a template to automatically send as a reply to all newly created tickets received using this queue. Will only be used during working hours if set up below. Go to Manage → Settings → Templates to set up your templates. |
| Working hours | Select your working hours from your Time groups. Go to Manage → Settings → Time groups to set up your Time groups. |
| Sender info | Title of sent email. Queue and user object can be used. e.g. {{user.alias}} - {{queue.title}} |
| Sender address | This address will appear as the sender’s address. Must be allowed on mail server! |
| Reply-to header | The email address to which replies should be sent. If left empty, replies will be sent to the default address. |
| Default template | Select an Email template to automatically pre-fill the editor (subject, body, and attachments) whenever an agent starts a new outgoing email (Reply, Forward, or a new email) in this queue. The subject is only pre-filled if it's still empty. Agents can still edit the content or switch to a different template before sending. Go to Manage → Settings → Templates to set up your templates. |
| Signature template | Select an Email signature template to automatically add to emails. Go to Manage → Settings → Templates to set up your templates. |
| NPS survey template | Template for adding Net Promoter Score surveys. Go to Manage → Settings → Templates to set up your templates. |
| Postprocessing in event | Warning: This is an advanced feature. When set up incorrectly, it will break outgoing emails in this queue. Turn on if you want to transform your outgoing emails using a custom script before they are sent out. The email queue will pass the email onto the event selected – the event must take care of sending the email. To enable this functionality, it is necessary to have an Email Postprocessing event prepared. |
| Wrapup time | Select the amount of time that needs to pass before a new activity can be routed to an agent that has just finished an activity (the length of the Wrap pause). |
| Multiple statuses | Allow or disallow users to set multiple statuses for activities using this queue. |
| SSL Trusted | Allow trusted certificates only. |
| Helpdesk title | Select the helpdesk for this queue. Contact Daktela Support to set up a helpdesk. |
| Incoming mail server | Warning: Daktela requires a direct mailbox integration rather than an email alias. The connection relies on full authentication credentials (via IMAP, SMTP, or MS Graph protocols), which aliases do not possess. If a mailbox has multiple aliases associated with it, the system will retrieve all mail delivered to the primary account. To send outbound messages from an alias address, the appropriate "Send As" permissions must be configured on your email server. |
| IMAP | |
| Protocol | Select how you would like to authenticate communication with your email server. |
| Server | The server your email is located on. Contact your email provider to find your address. |
| Name | Your login name – usually the same as your email address. |
| Password | Your email login password. |
| SSL | Turn on to connect using SSL. |
| Don't keep emails (Extended) | Do you want to remove emails from the mail server after downloading them? |
| POP3 | |
| Protocol | Select how you would like to authenticate communication with your email server. |
| Server | The server your email is located on. Contact your email provider to find your address. |
| Name | Your login name – usually the same as your email address. |
| Password | Your email login password. |
| SSL | Turn on to connect using SSL. |
| Do not keep emails | Do you want to remove emails from the mail server after downloading them? |
| IMAP + OAuth2 | |
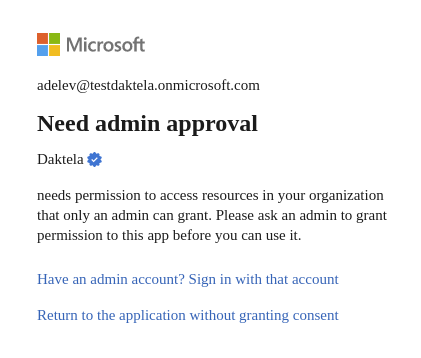
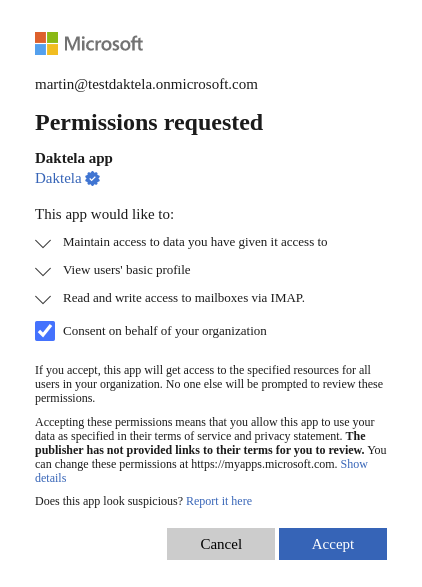
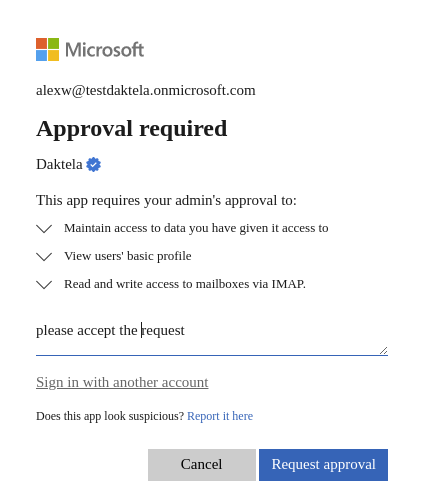
| Protocol | Select the protocol used to communicate with the email server (POP3 or IMAP, from 6.21+ Microsoft Office 365 OAuth2 or Google OAuth2). If you encounter the “Need admin approval” issue with microsoft, it is necessary to grant the required permissions according to the steps below (Azure Security Setting for Microsoft Office 365). |
| Use same method for Outgoing | Use same settings (including token) for outgoing emails. One token is used for incoming & outgoing emails. |
| Name | Your login name – usually the same as your email address. |
| Do not keep emails | Do you want to remove emails from the mail server after downloading them? |
| Google API + OAuth2 | |
| Protocol | Select how you would like to authenticate communication with your email server. |
| Use same method for Outgoing | Use same settings (including token) for outgoing emails. One token is used for incoming & outgoing emails. |
| Name | Your login name – usually the same as your email address. |
| Oauth provider | Click the G button to authorise Gmail. |
| Do not keep emails | Do you want to remove emails from the mail server after downloading them? |
| AzureAD GraphAPI + SSO | |
| Protocol | Select how you would like to authenticate communication with your email server. If you encounter the ”Need admin approval” issue with microsoft, it is necessary to grant the required permissions according to the steps below (Azure Security Setting for Microsoft Office 365). |
| Use same method for Outgoing | Use same settings (including token) for outgoing emails. One token is used for incoming & outgoing emails. |
| Name | Your login name – usually the same as your email address. |
| Oauth provider | Click the Windows button to authorise email. |
| Custom scopes (Extended) | Enter additional Microsoft Graph API permissions separated by spaces (e.g. Mail.Send Mail.Read). The scopes openid offline_access are always included automatically to ensure token functionality. Visible when at least one protocol (incoming or outgoing) is set to AzureAD GraphAPI + SSO and Extended settings are enabled. Applies to both incoming and outgoing Azure SSO protocols. Any change requires re-authorisation — existing tokens are not refreshed automatically with the new scopes. If left empty, the queue behaves the same as before. |
| AzureAD GraphAPI Tenant | |
| Protocol | Select how you would like to authenticate communication with your email server. |
| Use same method for Outgoing | Use same settings (including token) for outgoing emails. One token is used for incoming & outgoing emails. |
| Name | Your login name – usually the same as your email address. |
| Configuration | You can find configuration in integrations. First of all you have to create an Azure Email Tenant Application configuration in Integrations (External Libraries ). |
| Outgoing mail SMTP server | |
| SMTP server | |
| Protocol | Select how you would like to authenticate communication with your email server. |
| Server | The outgoing (SMTP) server used to send your email. Contact your email provider to find your address. |
| Name | Your login name – usually the same as your email address. |
| Password | Your email login password. |
| Port | SMTP | Port 587 Use for your business or for secure connections. Port 587 is the default SMTP port, most businesses use this port. SMTP | Port 465 Use if your application or company require. Port 465 is a port that carries out message submission over Implicit TLS protocol. SMTP | Port 25 - Use for non-encrypted connections. Still thought of as the standard SMTP port, most residential ISPs and hosting providers block port 25 due to heavy spam traffic. Note: STARTTLS on port 25 is available if the server supports it. |
| SMTP + OAuth2 | |
| Protocol | Select how you would like to authenticate communication with your email server. |
| Server | The outgoing (SMTP) server used to send your email. Contact your email provider to find your address. |
| Name | Your login name – usually the same as your email address. |
| Port | SMTP | Port 587 Use for your business or for secure connections. Port 587 is the default SMTP port, most businesses use this port. SMTP | Port 465 Use if your application or company require. Port 465 is a port that carries out message submission over Implicit TLS protocol. SMTP | Port 25 - Use for non-encrypted connections. Still thought of as the standard SMTP port, most residential ISPs and hosting providers block port 25 due to heavy spam traffic. Note: STARTTLS on port 25 is available if the server supports it. |
| Google API + OAuth2 | |
| Protocol | Select how you would like to authenticate communication with your email server. |
| Name | Your login name – usually the same as your email address. |
| Oauth provider | Click the G button to authorise Gmail. |
| AzureAD GraphAPI + SSO | |
| Protocol | Select how you would like to authenticate communication with your email server. |
| Name | Your login name – usually the same as your email address. |
| Oauth provider | Click the Windows button to authorise email. |
| Tickets | |
| Category | Select a category that will automatically be assigned to tickets created in activities using this queue. |
| Auto response exceptions | Auto responses will not be sent to these email addresses – checks both "from" and "reply-to" fields. You can enter only domain or use wildcards * (for anything) and ? (for any character). |
Save your queue.
Tip
Don't forget to set up:
- which Agents can use the queue.
- the queue's relations.
- the queue's widget scheme. See Queues for instructions.
How to Authorise Gmail For Use With Daktela
Incoming email
- Under Incoming mail server, select the Google OAuth2 Protocol.
- Enter your email address into the Name field.
-
Click the G button to authorise Gmail.
-
A new tab will open. Sign in to your Google Account.
-
Grant Daktela permission to access your Google Account. Make sure to check Read, compose and send emails from your Gmail account . Click Continue .

Outgoing email
Fill out the following under Outgoing mail SMTP server :
| Field | Description |
|---|---|
| Server | smtp.gmail.com |
| Name | Enter your email address. |
| Port | Select465 (Encrypted connection SSL) . |
Microsoft 365: Which Protocol to Use
Microsoft is disabling SMTP AUTH for Exchange Online by default. When security defaults are enabled in a Microsoft 365 tenant, SMTP AUTH is already turned off, which may cause password-based SMTP sending to stop working.
Warning
If your organisation uses SMTP to send email through a Microsoft 365 mailbox and encounters sending failures, SMTP AUTH may be disabled for your tenant or mailbox. You can enable it per mailbox in Exchange Online, or — preferably — switch to a Graph API-based protocol. See Microsoft's documentation for details.
For Microsoft 365 mailboxes, Daktela supports two modern protocols that communicate with Microsoft via the Graph API:
| AzureAD GraphAPI + SSO | AzureAD GraphAPI Tenant | |
|---|---|---|
| How it works | Uses delegated permissions — acts as the specific user who authorised the queue. Accesses only that user's mailbox. | Uses application permissions — acts as an Azure app with access to all mailboxes in the tenant. |
| Permissions | Delegated (per user). Optional custom scopes configurable under Extended settings. | Application-level. Admin must grant consent in Azure Portal. |
| Setup | Click the Windows button in the queue to authorise. Each queue needs separate authorisation. | Admin creates one Azure app registration and configures it once in Manage → Integrations. Applies to all queues. |
| Best for | Single mailbox, or when per-user access control matters. | Multiple email queues within the same Microsoft tenant — one app covers all. |
| Outgoing email | Enable Use same method for Outgoing — no separate SMTP needed. | Enable Use same method for Outgoing — no separate SMTP needed. |
| Tokens | Access and refresh tokens — auto-renewed, work indefinitely. | Azure app credentials (client secret) managed in Azure Portal. |
| Required licence | Standard Microsoft 365 / Office 365 licence. | Standard Microsoft 365 / Office 365 licence. |
For AzureAD GraphAPI Tenant setup, see the Azure Email Tenant Application guide.
How to Authorise Microsoft Office 365 For Use With Daktela
Incoming email
- In the Incoming mail server section, select AzureAD GraphAPI + SSO in theProtocol field.
- Enter your email address into theName field.
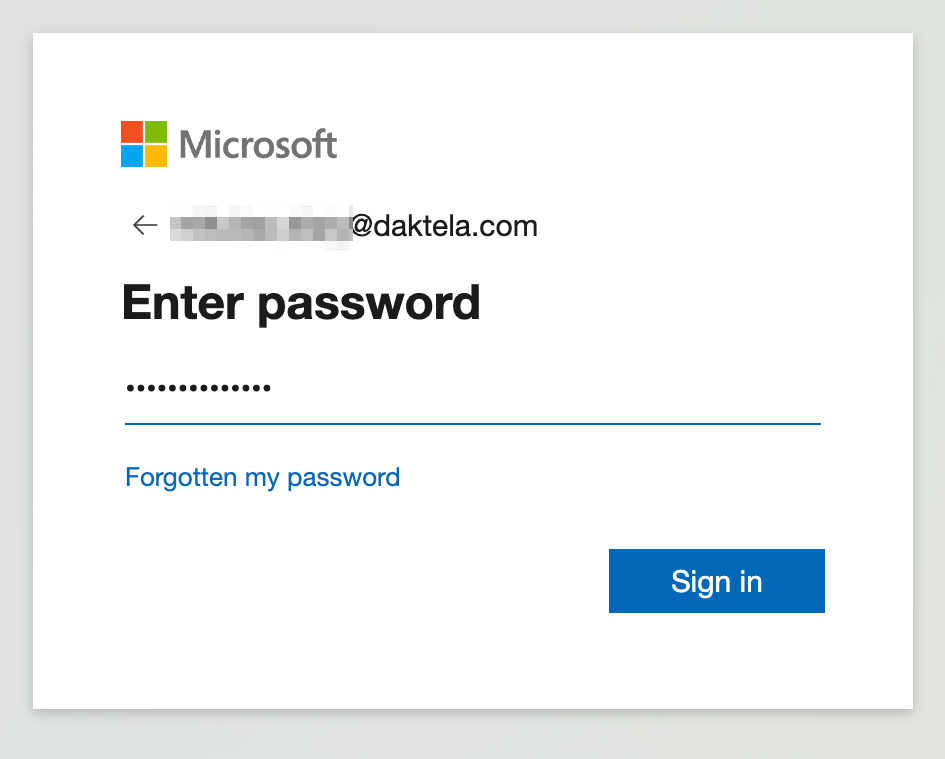
- Click the MS window button to authorise your MS Account. a. A new tab will open. Enter your email address and clickNext to continue.
 b. Enter your password and clickSign in.
 c. ClickYes to continue.
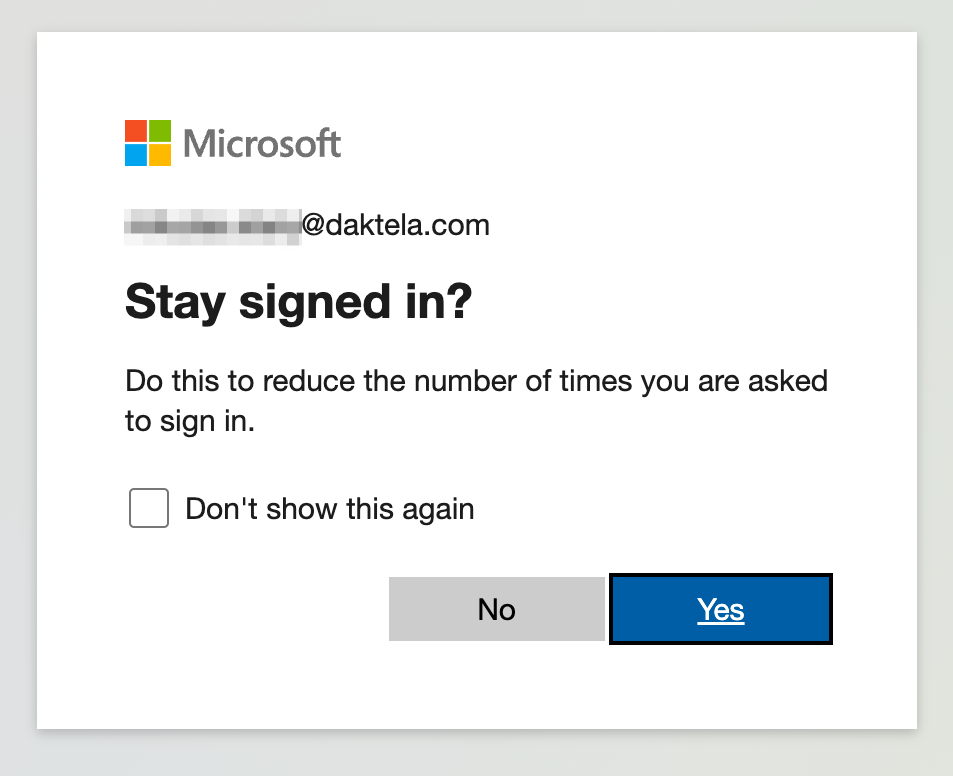 d. Finish the authorisation by click theYes button.
 4. Aftersuccessfulauthorisation the MS Windows button will change colour to green.
Outgoing email
Tip
Instead of configuring a separate SMTP outgoing server, we recommend enabling Use same method for Outgoing in the Incoming mail server section above. This uses the same Graph API connection for both incoming and outgoing email — no SMTP password required.
If you prefer to use SMTP for outgoing email, fill out the fields in the Outgoing mail SMTP server section:
| Field | Description |
|---|---|
| Server | smtp.office365.com |
| Name | Enter you email address. |
| Password | Enter your password. Warning: For two-step verification you need to generate the App Password. Generate one and enter it here. |
| Port | 587 |
Azure Security Setting for Microsoft Office 365
Scenario 01 Screen 01
 Screen 02
 Screen 03
 Scenario 2
Screen 01
Scenario 2
Screen 01
 screen 02
 screen 03
 screen 04
 Screen 05
 screen 06
 screen 07

Incoming Email Process
Incoming emails, email routings, tickets, categories, views – how are they all connected? When you receive an email at an address that you have linked with Daktela, it will be routed according to the chart below:

| Step | Description |
|---|---|
| Incoming email and Mailbox | You receive an email on your mail server. |
| Email queue | The mail server is synchronised with Daktela via an email queue. The incoming email becomes a part of a ticket (a new ticket if it is a new email or an existing ticket it the email is a reply). The queue sets the ticket category. |
| Email routing | In email routings, you can define conditions under which further ticket parameters will be set. If none of the conditions are met, new tickets will only have a category set and the rest of the parameters will be blank. The category set in email routings will overwrite the category set in the email queue. |
| Ticket in All Tickets | The ticket is visible in All tickets to users that have rights to the ticket's category. |
| Ticket in another Ticket View | A ticket view is a predefined ticket filter that groups together tickets based on their parameters (either set up in the email queue or email routings, or selected manually in the ticket). Consequently, a single ticket can be part of several views – e.g. one based on its category, one based on its status and one based on its age since the last activity. A view is accessible to all users that have rights to it. However, to view the tickets contained in the view, they must still have rights to their categories. This means that different users can see different tickets in the same view. In the example below, there are 3 users that all have rights to the view "Leads". - UK Sales Person only sees tickets in the "UK Leads" category in the view. - FR Sales Person only sees tickets in the "FR Leads" category in the view. - Sales Manager sees tickets in both categories in the view.  |