Authenticate Visitors
By default the chat widget treats every visitor as anonymous and recognises them by their browser. Visitor authentication replaces that with a verified identity: your website states who the visitor is using a token signed by your identity provider, and the platform verifies that token before it trusts anything in it.
Once a visitor is authenticated, their conversation history follows the person rather than the browser, and values from the token — a contract number, a customer segment, a name — reach the dialog in a form the visitor cannot alter.
When you need it
Consider turning authentication on when any of the following applies:
- Chat history is enabled and devices are shared. An anonymous visitor is recognised by their browser, not by their person, so on a shared computer the next user of the same browser can open the previous visitor's conversations.
- The dialog works with personal data. Order status, invoices, contract details — anything that should only be shown to the person it belongs to.
- You want the conversation linked to a customer account. Authentication carries your own customer identifier into the platform, so conversations can be matched to the right record.
Warning
Without authentication, chat history is tied to the browser. Anyone using that browser afterwards can reach it. Where the dialog handles personal data, this is the risk authentication exists to remove.
How it works
- Your website signs a token (JWT) describing the visitor. The token is signed with your identity provider's private key.
- The page calls
window.daktelaAiChat.authorize()with that token. - The platform verifies the signature against the public key you configured, and checks the issuer, the audience and the expiry.
- If everything matches, the platform issues a session and the conversation continues under the verified identity.
The widget never takes the page's word for who the visitor is. Everything it trusts comes out of a token it has verified itself, which is why the private key must stay on your server and never reach the browser.
A visitor who is signed in sees a padlock in the chat header:

Set up verification
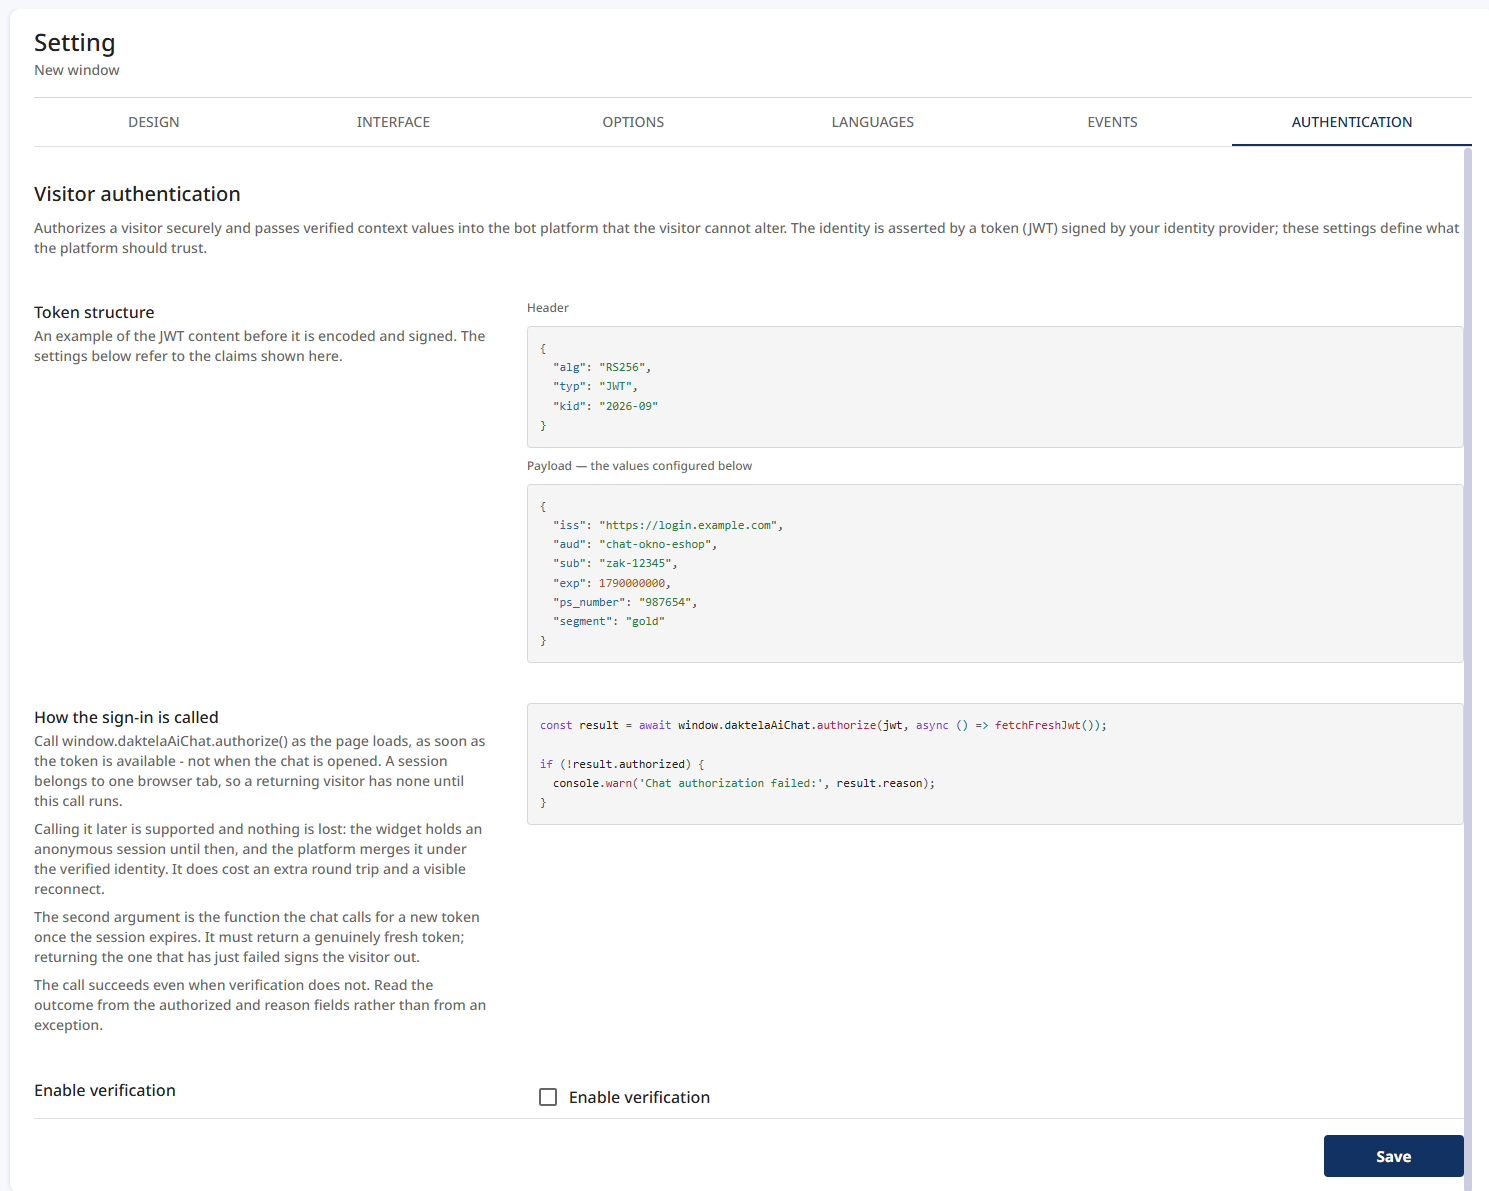
Open the widget, go to the Authentication tab and switch on Enable verification.
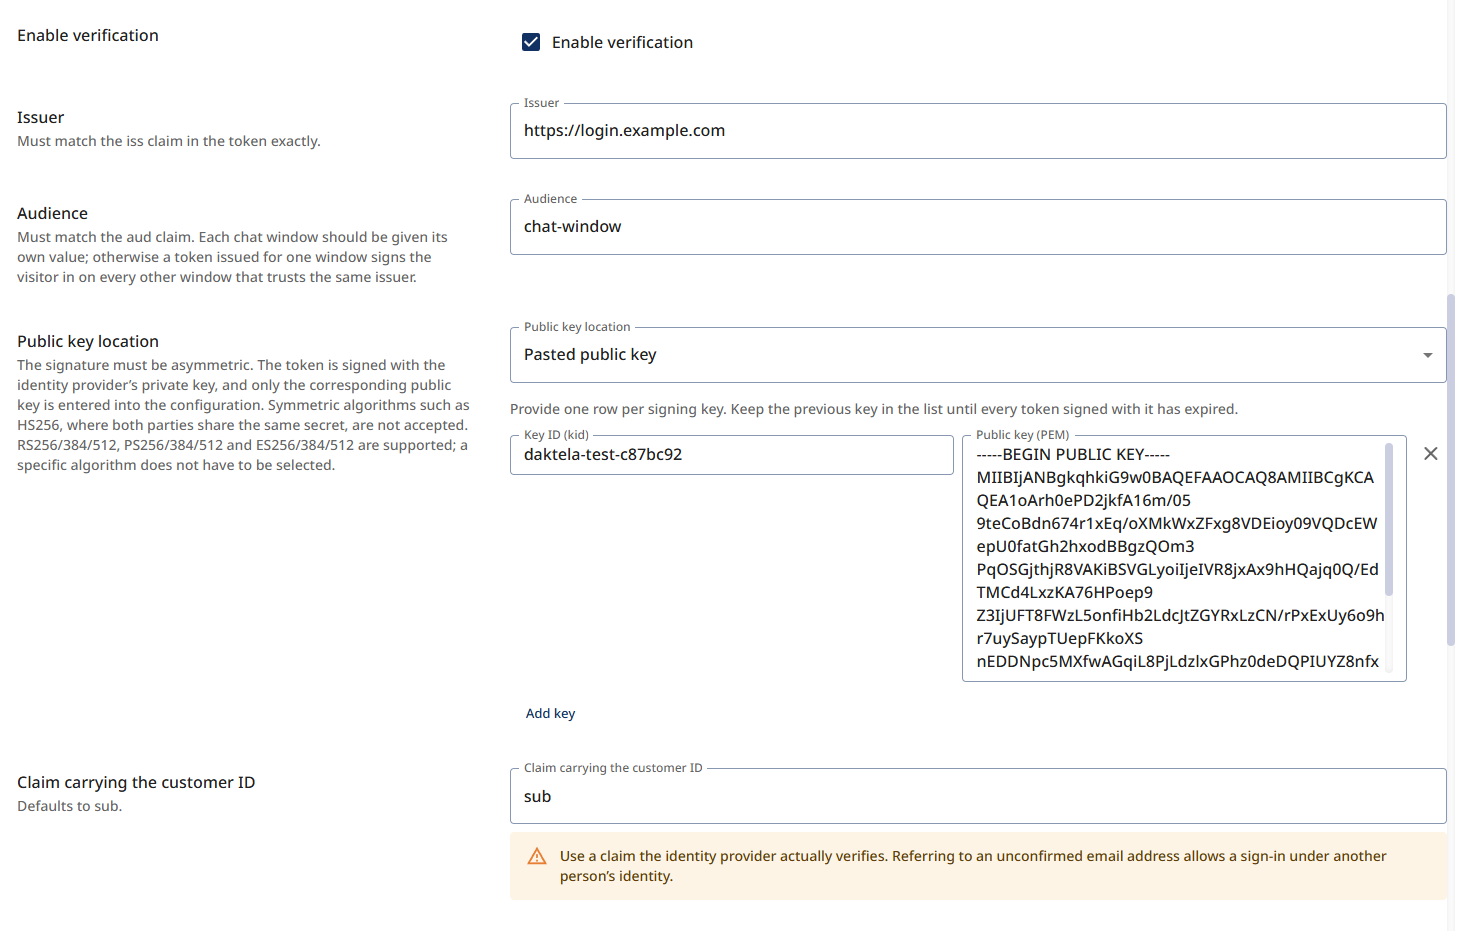
Issuer and audience
| Field | What to enter |
|---|---|
| Issuer | Must match the iss claim in the token exactly. |
| Audience | Must match the aud claim. |
Warning
Each chat window should be given its own Audience value; otherwise a token issued for one window signs the visitor in on every other window that trusts the same issuer.
Signing key
The signature must be asymmetric — the token is signed with your private key and the platform only ever holds the matching public key. Symmetric algorithms such as HS256, where both sides share one secret, are not accepted. RS256/384/512, PS256/384/512 and ES256/384/512 are supported, and you do not have to select a specific one.
Choose where the platform should look for the public key under Public key location:
- JWKS URL — the address of your JWKS endpoint. It must use HTTPS and be reachable from the internet. Key rotation is then handled automatically, which makes this the better option wherever you can offer such an endpoint.
- Pasted public key — for cases where no public JWKS endpoint exists. Enter the Key ID (kid) and the Public key (PEM). Key rotation becomes a manual change to this configuration.
You can enter up to five public keys with Add key. When rotating, keep the previous key in the list until every token signed with it has expired.
Identity claims
Claim carrying the customer ID names the claim that identifies the visitor. It defaults to sub.
Warning
Use a claim your identity provider actually verifies. Pointing this at an unconfirmed email address allows one person to sign in as another.
Claim carrying the first name (optional) and Claim carrying the surname (optional) let the bot address the visitor by name. They are used for nothing else.
Carry token values into the dialog
Under Carrying token values into the dialog, each row copies one value from the verified token into a variable the dialog can read. Add a row with Add mapping, then fill in the JWT claim and the Context variable it becomes.
| JWT claim | Context variable |
|---|---|
ps_number |
$ps_number |
segment |
$segment |
A claim you do not map never reaches the dialog at all.

Because these values arrive from a token the platform verified, the browser cannot overwrite them afterwards — which is what makes it safe for a dialog to act on them.
What to keep in mind:
- Only top-level claims are read. A dot is part of the claim name, not a path into a nested object.
- A claim the token does not contain is skipped, and the visitor stays signed in.
snake_caseis recommended for variable names.- At most 10 claims can be mapped.
Info
A value longer than 128 characters is skipped, and all transferred values together must fit within 1 kB. Anything beyond the limit never reaches the dialog, and no warning is given.
Session length and token lifetime
| Field | What it controls |
|---|---|
| Session length (seconds) | How long a sign-in stays valid before the chat asks your page for a new token. The sign-in always ends at whichever comes first: this period, or the exp in the token. 60–3600 seconds, default 3600 (one hour). |
| Longest accepted token lifetime (seconds) | Caps how long a single token can keep a visitor signed in, whatever validity period it was issued with. 60–43200 seconds, default 43200 (12 hours). |
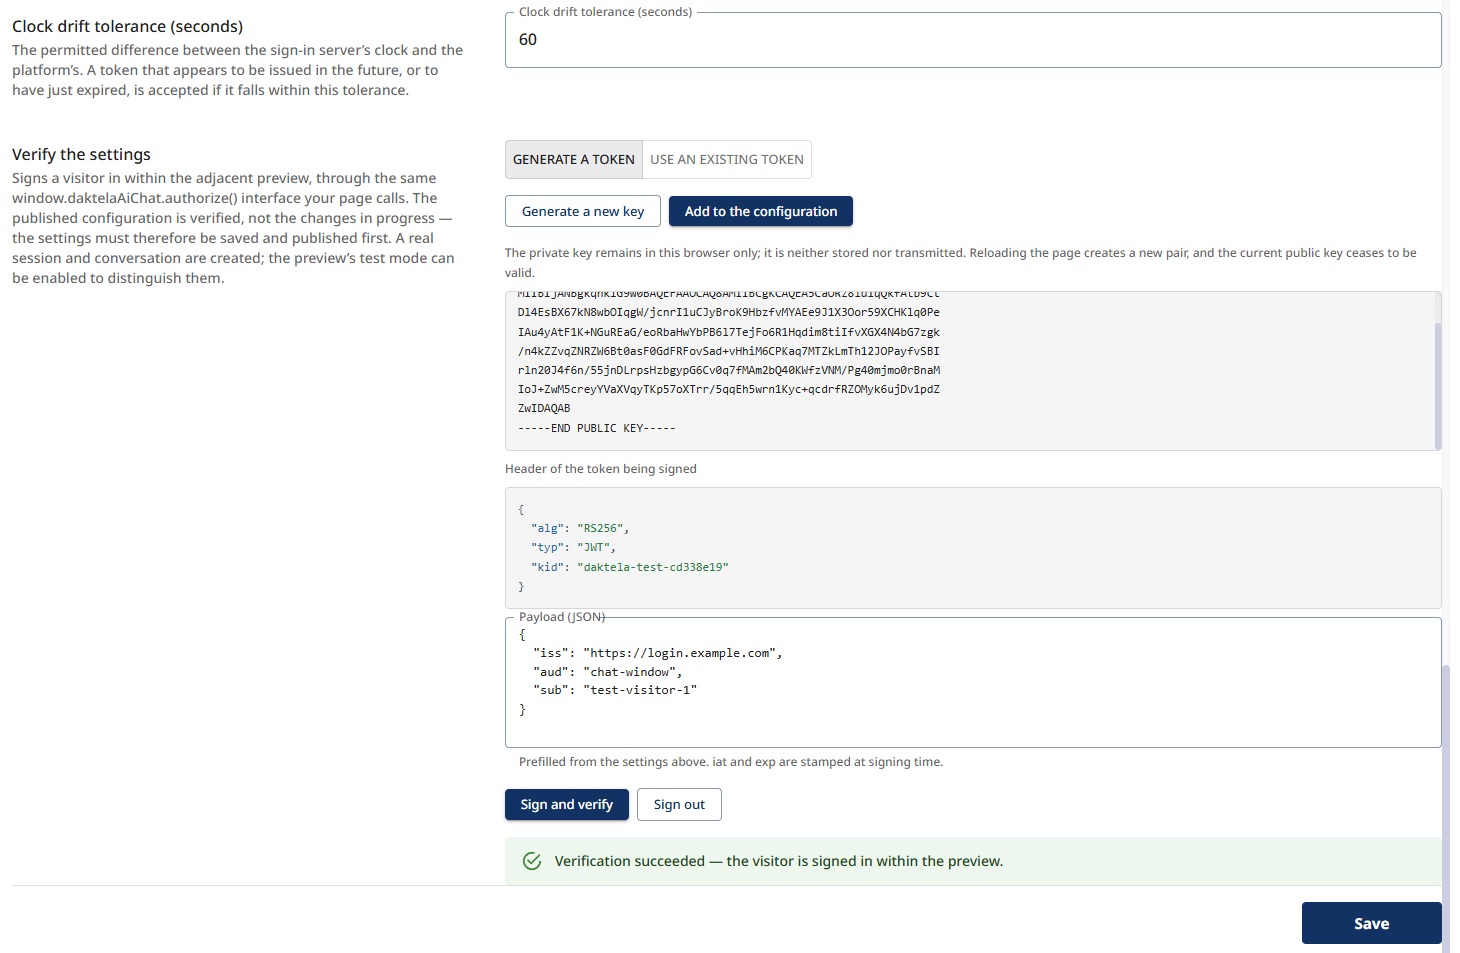
| Clock drift tolerance (seconds) | The permitted difference between your signing server's clock and the platform's. A token that looks issued slightly in the future, or just expired, is still accepted within this tolerance. 0–300 seconds, default 60. |
Tip
The identity provider should set an expiry (exp) on the tokens it issues. Without one, the authorization period is measured from the moment the token was issued and is bounded only by Longest accepted token lifetime (seconds), which is a considerably blunter limit.
Call the sign-in from your page
const result = await window.daktelaAiChat.authorize(
  jwt,
  async () => fetchFreshJwt(),   // called when the session expires
);

if (!result.authorized) {
  console.warn('Chat authorization failed:', result.reason);
}
Three things decide whether this works well in practice:
- The recommended moment is page load, as soon as the token is available — rather than when the visitor opens the chat. A session belongs to one browser tab, so a returning visitor has none until this call runs. Calling it later is supported and nothing is lost: the widget holds an anonymous session until then and the platform merges it under the verified identity. It does cost an extra round trip and a visible reconnect.
- The second argument is the function the chat calls for a new token once the session expires. It must return a token that is still valid — which may be the same one as before: what runs out is the chat session, not your token, so a cached token that has not expired yet is a good answer. An expired token, an empty value, throwing, or never settling signs the visitor out instead of retrying.
- The call succeeds even when verification does not. Read the outcome from the
authorizedandreasonfields rather than from an exception.
For the full method reference, see Widget API.
Verify the settings
The Authentication tab has a Verify the settings section that signs a visitor in inside the preview beside it, through the same window.daktelaAiChat.authorize() interface your page uses.
You can either Generate a token — the browser creates a temporary key pair, and Add to the configuration puts its public key into the settings — or choose Use an existing token and paste a JWT signed with a key already in the configuration. Then click Sign and verify.
Info
The check verifies the published configuration, not changes in progress, so on a window that is already live, save and publish before testing. A window nobody has published yet is the exception: there the check reads the draft, so the settings can be got right before the first publish. A real session and conversation are created; the preview's test mode can be enabled to tell them apart from live ones.
Use Sign out to return the preview to an anonymous visitor.
Signing out
window.daktelaAiChat.logout() is called when the visitor signs out of your website. It revokes the session on the server for every tab and device, not only the current one, and returns this browser to an anonymous identity with the local history cleared.
Two things it deliberately does not do:
- It does not end the conversation. The discussion stays open and is marked with a note in the transcript. The visitor cannot continue it anonymously, but signing in again takes them back to it.
- It does not forget the browser. The next anonymous visit is recognised as the same browser, which by then owns nothing of the signed-in account.
What's Next?
Need the full list of methods your page can call — opening the window, switching conversations, passing context, registering tools? See Widget API.